Tired of stale crackers, half-open chip bags, and a pantry that looks like a landfill? The OXO Good Grips POP Container Set fixes all of it in one elegant system.
Here’s the magic: press the signature pop-top button once, and it creates an airtight seal that locks out air and moisture. Press again, and the same button pops up to serve as a handle for effortless opening. No wrestling with stubborn lids, no broken nails, no guesswork.
These containers hit every checkbox that matters for a sustainable kitchen:
Airtight protection keeps grains, pasta, snacks, and coffee fresh far longer than original packaging. Stackable, square design maximizes shelf space—no more wasted corners. BPA-free construction means safe food contact. Top-rack dishwasher safe cleaning eliminates maintenance headaches. Modular sizing means you can build a system that fits your pantry perfectly.
At a mid-tier budget investment, the POP set outperforms both cheaper plastic containers (which warp and stain) and pricier glass alternatives (heavy, breakable, harder to store). It’s the sweet spot of durability, design, and practicality.
Plastic bottles pile up in landfills by the billion. The fix? One bottle you actually want to carry everywhere. Enter the Takeya Actives — a vacuum-insulated stainless steel workhorse that checks every box at a mid-range budget tier.
Why It Wins
Ergonomic carry handle rotated 90 degrees, walking with your hand naturally — no pressure points, no sharp edges
Smooth flip spout opens quickly and delivers a clean, spill-free sip every time
Protective spout cover keeps things sanitary and leak-proof when closed
Double-wall insulation holds ice for hours in summer heat
Wide mouth makes cleaning effortless; dishwasher-safe components simplify maintenance
Durable, sleek finish that looks as good as it performs
The Bottom Line
Finding a bottle that’s genuinely easy to hold, drink from, carry, and clean is harder than it sounds. The Takeya Actives nails all four — making it the perfect everyday alternative to single-use plastics.
Every single day, millions of people reach for a disposable drink bottle — grab a coffee cup, pick up a bottled water, swing through a drive-through for a soda in a plastic cup with a straw. Convenience feels effortless. But that convenience comes with a staggering environmental cost that piles up faster than any of us care to admit.
This guide is designed to walk you through everything you need to know about switching from single-use drink containers to reusable tumblers and water bottles. Whether you’re motivated by sustainability, saving money long-term, keeping your drinks at the perfect temperature, or simply expressing your personal style, we’ll help you find the right reusable vessel for your lifestyle.
The Problem: Disposable Drink Waste Is Staggering
Let’s start with some perspective. Globally, humans purchase approximately one million plastic bottles per minute. Of those, only a fraction — some estimates suggest around 9% — actually get recycled. The rest end up in landfills, oceans, waterways, and scattered across landscapes where they take hundreds of years to decompose.
But here’s what most people miss: even when a plastic bottle does make it into the recycling stream, the cap often doesn’t. Bottle caps are made from a different type of plastic than the bottle itself (typically HDPE vs. PET), which means many municipal recycling facilities either can’t process them or won’t bother separating them. Millions of caps are landfilled or become ocean debris every year.
And then there are straws. Plastic drinking straws are virtually never recycled — they’re too lightweight to be captured by standard sorting machinery, and they’re too small to be economically viable for recyclers. They consistently rank among the top ten items found during beach cleanups worldwide. While paper straws have gained popularity as an alternative, many users find them frustratingly soggy and short-lived, which brings us back to the core issue: people just want a good drinking experience.
The bottom line? Even “recyclable” disposable options are far from a real solution. The only genuinely sustainable approach is reuse — and that’s where tumblers and water bottles come in.
Why Reusable Tumblers & Water Bottles Are the Answer
Switching to a reusable tumbler or water bottle addresses the waste problem directly. Instead of contributing to the mountain of single-use plastics, you invest in a durable container that can last for years — sometimes decades — with proper care. Over its lifetime, a single reusable bottle can replace thousands of disposable ones.
But sustainability isn’t the only benefit. Here are several reasons why making the switch improves your everyday experience:
Superior Temperature Retention: Most quality reusable bottles and tumblers feature double-wall vacuum insulation. This technology creates an airless gap between two stainless steel walls, dramatically reducing heat transfer. Cold drinks stay icy for up to 24 hours or more. Hot beverages like coffee or tea remain piping hot for 6–12 hours. Compare that to a flimsy plastic bottle or paper coffee cup that lets your drink go lukewarm within the hour.
Personal Expression: Unlike a generic disposable bottle, a reusable tumbler or water bottle becomes an extension of your personality. Brands offer a dizzying array of colors — from muted earth tones to vibrant metallic finishes. Patterns range from minimalist geometric designs to bold florals and everything in between. And then there’s the sticker culture: many enthusiasts adorn their Yeti, Hydro Flask, or Stanley tumblers with custom stickers showcasing their hobbies, travels, favorite bands, or sense of humor. Your drink container becomes a canvas.
Functional Variety: Reusable vessels come in configurations that disposables simply can’t match. Want a built-in straw for easy sipping on the go? There’s a tumbler for that. Need a sturdy handle for carrying your giant hydration companion everywhere? Several brands have you covered. Prefer a flip-top lid, a screw cap, a chug spout, or a wide-mouth opening for ice? The options are nearly endless, and many brands offer interchangeable lids so you can customize your setup.
Cost Savings Over Time: While the upfront investment is higher than a single disposable bottle, the math quickly tips in favor of reuse. If you’re someone who buys bottled water, specialty coffees, or fountain drinks regularly, a reusable container pays for itself in a matter of weeks to months.
Types of Reusable Drink Containers Explained
Before diving into features and recommendations, let’s clarify the terminology, since “tumbler” and “water bottle” are sometimes used interchangeably but actually refer to different form factors.
Water Bottles
Water bottles are designed primarily for portability and active use. They typically feature a narrower profile, a secure sealing lid (screw cap, flip-top, or chug spout), and are built to be tossed in a backpack, gym bag, or cup holder. They tend to hold anywhere from 12 to 40 ounces and prioritize leak-proof designs over open-drinking convenience.
Best for: Gym-goers, hikers, students, commuters, and anyone who needs a sealed, spill-proof container for on-the-go hydration.
Tumblers
Tumblers are broader, often wider vessels that prioritize drinking comfort over absolute portability. They typically feature a straw lid or a press-in slider lid, and their wider base makes them ideal for desk use, car cup holders (in many cases), and leisurely sipping. Tumblers commonly range from 20 to 40+ ounces and often include a handle for easier carrying.
Best for: Office workers, road-trippers, desk sippers, iced coffee lovers, and anyone who prefers straw-based drinking.
Hybrid/Multi-Use Vessels
Some modern designs blur the line — offering both a carry handle and a straw, or coming with multiple interchangeable lid types. These versatile options are ideal for people who want one container that adapts to multiple situations throughout the day.
Best for: People who want maximum versatility from a single purchase.
Key Features to Consider When Choosing
With the basics covered, let’s dig into the specific features that differentiate products within each category. Understanding these will help you match a product to your specific needs.
Insulation Technology
The vast majority of premium reusable drinkware uses double-wall vacuum insulation. Two layers of stainless steel are joined with a vacuum-sealed gap between them. Because there’s no air (and therefore no medium for heat transfer), this design is remarkably effective at maintaining temperature.
Lower-cost options may use double-wall construction without a true vacuum, or even single-wall designs. These offer some insulation benefit but fall significantly short of vacuum-insulated performance. If temperature retention is a priority — especially for hot drinks or all-day ice retention — vacuum insulation is essential.
Some ultra-budget options use plastic double-wall construction. These are lightweight and inexpensive but don’t insulate as effectively and may retain odors or flavors over time.
Lid Types
The lid is arguably the most important functional component of any reusable vessel. Common lid styles include:
Straw Lids: Feature a hole for a reusable straw. Excellent for cold drinks and easy sipping while driving or working. Look for models with a sliding cover or flip closure to keep the straw clean when not in use.
Chug Spouts: A raised, angled spout designed for taking large gulps quickly. Popular among athletes and outdoor enthusiasts.
Screw Caps: The classic, most leak-proof option. Great for tossing in a bag without worry, though less convenient for quick sips.
Flip-Top/Press-Button Lids: One-handed operation with a spring-loaded mechanism. Convenient but more complex, meaning more parts to clean and a higher likelihood of mechanical failure over time.
Slider Lids: A lever that slides open to reveal a drinking opening. Common on coffee tumblers and travel mugs.
Material Quality
18/8 Stainless Steel: The gold standard for reusable drinkware. It’s food-safe, resistant to corrosion, doesn’t impart flavors, and is highly durable. All premium brands use this material.
Tritan Plastic (BPA-Free): A shatter-resistant, clear plastic used in many lower-cost bottles. Lighter than steel and allows you to see contents, but doesn’t insulate as well and may scratch over time.
Glass: Offers the purest taste — no flavor retention whatsoever — but is heavy, fragile, and generally impractical for portable use. Some brands offer silicone sleeves for protection.
Silicone/Collapsible: Ideal for travel and space-saving. These can be rolled or folded when empty. Trade-offs include less insulation and a somewhat floppy drinking experience.
Size and Capacity
Capacity Range
Best Use Case
Portability
12–18 oz
Desk use, kids, short outings
Very portable, fits all cup holders
20–30 oz
Daily driver, commuting, gym
Portable, most cup-holder friendly
32–40 oz
All-day hydration, outdoor activities
Less portable, may not fit all cup holders
40+ oz
Serious hydration goals, office desk
Bulky; often includes a handle for carrying
Handle Options
Handles have become increasingly popular, especially on larger-capacity tumblers. A well-designed handle makes carrying a 40-ounce vessel comfortable and natural. Look for handles that are integrated into the lid (allowing 360-degree rotation) or molded into the tumbler body for structural durability.
Straw Considerations
If you opt for a straw-equipped vessel, consider the straw material:
Reusable Plastic Straws: Lightweight, clear, and affordable. Found in most tumbler kits. May scratch over time.
Stainless Steel Straws: Extremely durable and easy to clean, but conduct temperature — beware of very cold or very hot drinks. Often come with silicone tips for comfort.
Silicone Straws: Soft, flexible, and kid-friendly. Won’t conduct temperature. May retain some flavors over time.
Regardless of material, always use a straw cleaning brush — straws are notorious breeding grounds for bacteria if not properly maintained.
Budget Tier Comparison
Rather than citing specific prices (which fluctuate constantly due to sales, availability, and retailer pricing), here’s a breakdown of what you can expect at each budget tier. All Amazon product links are affiliate links, meaning we may earn a commission at no additional cost to you.
Budget Tier ($)
At this tier, you’ll find single-wall or basic double-wall stainless steel bottles, Tritan plastic tumblers, and simpler designs. Expect minimal accessories, fewer color options, and basic lids (often just a screw cap or simple straw lid). Insulation performance will be modest — cold drinks may stay cool for a few hours, but don’t expect ice to last overnight. Warranty coverage is typically limited or nonexistent.
Who it’s for: First-time buyers, casual users, kids, or anyone testing the waters of reusable drinkware without committing significant funds. Also great for bulk purchases (office teams, event giveaways).
This is where vacuum insulation becomes standard. You’ll find 18/8 stainless steel construction, double-wall vacuum insulation with respectable temperature retention (cold for 12–18 hours, hot for 6–8 hours), and a decent selection of colors and finishes. Lid options expand — many brands at this tier offer straw lids, chug spouts, and slider lids. Warranties are typically 1–5 years.
Who it’s for: Most everyday users. This tier hits the sweet spot of performance, durability, and value. If you’re replacing daily disposable drinks and want something that genuinely outperforms them, this is your starting point.
Premium-tier drinkware represents the best of the best. Expect top-tier vacuum insulation (cold retention up to 24+ hours, hot up to 12+ hours), extensive color and finish palettes including powder-coated and metallic options, modular accessory ecosystems (interchangeable lids, handles, boot protectors, straw packs), and robust warranties — often lifetime or “limited lifetime.” Build quality and attention to detail are noticeably superior, and brand communities offer sticker swaps, customization guides, and social sharing.
Who it’s for: Daily heavy users, outdoor enthusiasts, gifting, brand loyalists, and anyone who wants a “forever bottle” that performs flawlessly for years.
Not sure which form factor suits you? This chart breaks down the key differences:
The Maintenance Catch: What Nobody Tells You
Here’s the honest truth that many buying guides gloss over: reusable drink containers require ongoing maintenance, and neglecting it can create health concerns that single-use bottles never pose.
Why Cleaning Matters
Every time you drink from a tumbler or bottle, you introduce saliva, food particles, and potentially sugary residues into the vessel. Over time, this creates an environment where bacteria, mold, and mildew can flourish — particularly in damp, dark, and warm conditions (which describes the interior of a sealed bottle perfectly). Studies have found that unwashed reusable bottles can harbor significantly more bacteria than a toilet seat.
The Problem Areas
Straws: The inside of a straw is the single hardest component to clean properly. A quick rinse is not enough — you need a dedicated straw brush to scrub the full interior length.
Lid Mechanisms: Flip-top lids, slider mechanisms, and press-button releases have small crevices and moving parts where gunk accumulates. Many premium lids can be disassembled for cleaning, but you need to do so regularly.
Thread Seals: The threading where the lid screws onto the bottle collects residue. An old toothbrush works wonders here.
Bottom Seams: Many tumblers have a slight ridge or seam at the bottom interior where liquid pools. Pay special attention to this area during washing.
Gaskets/O-Rings: Silicone gaskets that create the leak-proof seal are prime real estate for mold growth. Remove them periodically and soak in warm, soapy water or a diluted vinegar solution.
Recommended Cleaning Routine
Daily: Rinse thoroughly with warm water after each use. At minimum, wash with warm soapy water and a bottle brush every evening.
Weekly Deep Clean: Disassemble all removable components (lids, straws, gaskets, sliders). Soak in warm water with dish soap or a mixture of water and white vinegar. Scrub all surfaces with appropriate brushes. Allow all parts to air-dry fully — moisture is the enemy.
Monthly Sterilization: Run dishwasher-safe components through a heated dishwasher cycle. For hand-wash-only items, a soak in a diluted bleach solution (1 teaspoon per quart of water) followed by thorough rinsing provides sterilization. Alternatively, bottle-cleaning tablets (widely available) offer a fizz-action deep clean that reaches areas brushes can’t.
Drying Is Non-Negotiable
Even the cleanest bottle will develop odors and bacterial growth if stored damp. Always store your vessel with the lid off and allow full air circulation. Store upside down on a drying rack when possible. Never store a sealed, damp bottle — you’re essentially creating a terrarium for microbes.
Additional Considerations
Dishwasher Safety
Not all premium drinkware is dishwasher safe. Powder-coated finishes can degrade over time in high-heat dishwasher cycles. Vacuum seals can theoretically be compromised by extreme temperatures (though modern manufacturing has largely mitigated this). Always check the manufacturer’s recommendations. If dishwasher cleaning is important to you, filter for “dishwasher safe” explicitly.
Cup Holder Compatibility
If you spend significant time driving, cup holder compatibility is a practical consideration. Most bottles up to ~3 inches in diameter fit standard car cup holders. Large-capacity tumblers (40 oz+) often exceed this and may require a vehicle with oversized cup holders or an aftermarket adapter. Handles that rotate 360 degrees can help navigate tight cup holder spaces.
Sustainability of the Container Itself
It’s worth noting that producing a stainless steel water bottle requires significantly more energy and resources than producing a single plastic bottle. Various lifecycle analyses suggest that a reusable bottle needs to replace somewhere between 10 and 80 disposable bottles (depending on the study and assumptions) to “break even” environmentally. Given that a quality reusable vessel replaces thousands of disposables over its lifespan, this threshold is easily cleared — but it underscores the importance of actually reusing your reusable. Buying five different “reusable” bottles that each sit unused in a cabinet is not an environmental win.
Sticker Culture and Customization
One of the most delightful aspects of the reusable tumbler movement is the sticker culture. Vinyl, waterproof, and dishwasher-safe stickers let you transform a plain vessel into a deeply personal statement piece. Travel stickers, band logos, funny quotes, nature illustrations, anime characters — if you can imagine it, there’s a sticker for it. Some enthusiasts curate their tumblers seasonally, swapping sticker collections throughout the year. Just be aware that applying stickers over powder-coated finishes is fine, but removing them may leave adhesive residue that requires careful cleaning.
How long do insulated tumblers and water bottles typically last?
With proper care, a high-quality stainless steel vacuum-insulated bottle or tumbler can last for many years — sometimes 5 to 10+ years. The vacuum seal is the most vulnerable component; if the bottle is dropped hard enough to dent the inner wall, the vacuum can be lost, and insulation performance will drop. The exterior finish (especially powder coating) may show wear over time, but this is cosmetic rather than functional.
Can I put hot drinks in a tumbler designed for cold drinks?
In most cases, yes — the vacuum insulation works for both hot and cold. However, lids matter. A straw lid with a straw inserted is not suitable for hot liquids, as the straw can become dangerously hot and cause burns. Switch to a slider or sip lid for hot beverages. Some straws (particularly metal ones) conduct heat efficiently and can deliver scalding liquid directly to your lips.
Are stainless steel bottles safe for acidic drinks?
Yes. 18/8 stainless steel is highly resistant to corrosion from acidic beverages like lemon water, sports drinks, or fruit-infused water. However, prolonged storage (multiple days) of highly acidic drinks is not recommended as it can eventually affect the taste. Stick to daily use and regular cleaning.
Will my bottle sweat with cold drinks?
Vacuum-insulated stainless steel bottles should not sweat externally — that’s one of their key advantages. If you notice condensation forming on the outside, it likely means the vacuum seal has been compromised (possibly from a drop or dent). Single-wall bottles and some lower-quality double-wall bottles will sweat.
How do I remove stubborn odors from my tumbler?
Try one of these methods:
Baking soda paste: Mix baking soda with water to form a paste. Apply to the interior, let sit for several hours, then scrub and rinse.
Vinegar soak: Fill with equal parts white vinegar and water. Let sit overnight, then wash thoroughly.
Denture tablets: Drop a denture-cleaning tablet in with warm water. Let fizz for 15–20 minutes, then wash.
Bottle cleaning tablets: Commercial products designed specifically for this purpose are highly effective and convenient.
Is it safe to put my tumbler in the freezer?
Generally, no. Freezing a vacuum-insulated bottle can damage the vacuum seal due to liquid expansion. If you want colder drinks, add ice cubes to your beverage instead. Some manufacturers explicitly state that freezer use voids the warranty.
What size tumbler fits in a standard car cup holder?
Most standard car cup holders accommodate containers up to approximately 3 inches in diameter. A 20-ounce tumbler typically fits comfortably. Larger 30-40 ounce tumblers may fit depending on the vehicle, but many require oversized holders or adapters. If this is a primary concern, check dimensions before purchasing.
Are glass bottles a viable eco-friendly option?
Glass is infinitely recyclable and doesn’t retain flavors or odors, making it an excellent choice from a purity standpoint. However, glass is heavy and breakable, making it impractical for many use cases. Glass bottles with protective silicone sleeves are available and work well for home and light office use, but they’re not ideal for active or outdoor scenarios.
Making the Switch: A Step-by-Step Action Plan
Ready to commit? Here’s a practical roadmap:
Assess your daily drinking habits. What do you drink most (water, coffee, smoothies)? Where do you drink most (car, desk, gym)? This determines your ideal form factor (bottle vs. tumbler), capacity, and lid type.
Set your budget tier. Decide whether you want a budget, mid-range, or premium option. Remember: a mid-range vacuum-insulated vessel offers the best balance of performance and value for most users.
Choose your features. Based on step 1, prioritize lid type (straw, chug, screw cap), handle (yes/no), capacity (oz), and any specific requirements (dishwasher safe, particular color, cup-holder compatible).
Order your vessel and essential accessories. At minimum, pick up a cleaning brush set and a straw brush if applicable. A silicone boot is a worthwhile investment for longevity.
Establish a cleaning routine from day one. Commit to daily rinsing, weekly deep cleans, and proper drying/storage. This is what separates a beloved daily companion from a science experiment.
Personalize it. Add stickers, choose a color you love, make it yours. The more attached you are to your vessel, the more likely you are to actually use it — and that’s the entire point.
Track your impact. If you were previously buying one bottled water per day, that’s 365 bottles per year eliminated. Seeing the numbers adds motivation and satisfaction.
Final Thoughts
The shift from disposable drink containers to reusable tumblers and water bottles is one of the most accessible, impactful lifestyle changes an individual can make. It reduces landfill waste, cuts ocean plastic pollution, saves money over time, keeps your drinks at optimal temperature, and gives you a canvas for personal expression — all while being genuinely enjoyable to use.
The key to success isn’t finding the “perfect” bottle. It’s finding the right bottle for your life and committing to the simple maintenance routine that keeps it hygienic and functional for years. With the information in this guide, you’re well-equipped to make that choice confidently.
Now go find your forever bottle.
This article contains affiliate links to Amazon. As an Amazon Associate, we may earn from qualifying purchases at no additional cost to you. Recommendations are based on feature categories and budget tiers, not specific brand endorsements.
Every time you open your pantry, you’re looking at a quiet environmental crisis. Those crinkly plastic bags, the flimsy clamshell packaging, the single-use wrap—they all add up. The average household throws away hundreds of pieces of food packaging waste each year, much of it not recyclable through municipal programs. But beyond the environmental toll, there’s a practical frustration we’ve all felt: packages that are absurdly oversized for the food they contain, bags that won’t seal properly after opening, and containers that hide deceptively small portions behind bulky cardboard.
Enter the eco-friendly food storage container—a seemingly simple solution that can transform your pantry, reduce your waste footprint, and even save you money over time. But choosing the right containers isn’t as straightforward as it seems. Different foods have wildly different storage needs. Some ingredients demand airtight seals to stay fresh; others will mold overnight if they can’t breathe. Materials matter enormously—not just for sustainability, but for food safety, durability, and ease of cleaning. And then there are the hidden trade-offs: the extra maintenance required, the logistics of transporting bulk foods, and the question of whether communal arrangements might serve you better than going it alone.
This guide walks you through everything you need to know to make informed, sustainable choices for your kitchen storage.
Why Eco-Friendly Food Storage Containers Matter
The Packaging Waste Problem
Food packaging accounts for a significant portion of household waste. According to the EPA, containers and packaging represent the largest category of municipal solid waste—over 80 million tons annually in the United States alone. Much of this is food-related: chip bags, pasta boxes, rice sacks, spice jars, produce clamshells, and the endless parade of plastic tubs.
Many of these materials aren’t accepted by standard curbside recycling programs. Multi-layered snack bags, black plastics, polystyrene foam trays, and grease-stained paperboard routinely end up in landfills. Even “recyclable” plastics degrade in quality with each cycle and often can’t be recycled more than once or twice.
Eco-friendly food storage containers break this cycle. By transferring ingredients from disposable packaging into durable, reusable containers, you eliminate the need for ongoing single-use packaging. One high-quality glass jar can replace hundreds of plastic bags over its lifetime.
Beyond Waste: Freshness, Visibility, and Organization
The benefits extend well beyond waste reduction. Proper food storage containers:
Extend shelf life by creating optimal environments (airtight for dry goods, ventilated for produce)
Reduce food waste by keeping ingredients visible and organized, so nothing gets lost in the back of the pantry until it’s spoiled
Enable bulk purchasing, which is typically cheaper per unit and uses less packaging per quantity of food
Improve kitchen aesthetics—a row of matching glass jars on open shelelling looks far more appealing than a jumble of half-crumpled bags
Simplify meal prep by making ingredients easy to identify and access
Understanding Different Food Storage Needs
Before diving into container types, it’s essential to understand that not all foods want the same environment. Choosing the right container means matching the storage method to the ingredient.
Foods That Need Airtight Storage
These ingredients are vulnerable to moisture, pests, and oxidation:
Grains and legumes (rice, quinoa, lentils, beans, oats)—moisture causes clumping and mold; pantry moths can infiltrate poorly sealed packages
Flours and baking supplies—particularly susceptible to weevils and rancidity
Nuts and seeds—oxidize and go rancid when exposed to air and light
Coffee beans and tea—lose flavor rapidly when exposed to air
Dried fruit—becomes overly dry and tough if left uncovered
Spices—lose potency when exposed to air and humidity
Foods That Need Ventilation
Some ingredients actually deteriorate when sealed too tightly:
Onions and garlic—need airflow to prevent mold and sprouting; airtight containers cause rotting
Tomatoes—should never be stored in airtight containers at room temperature; they need to breathe
Mushrooms—store best in breathable paper bags or vented containers
Root vegetables (carrots, beets, turnips)—benefit from some humidity but also need airflow
Bananas—should be kept in open air, away from other produce (they release ethylene gas)
Foods With Special Requirements
Berries—need ventilation but also humidity control; best in containers with built-in vents
Leafy greens—benefit from slight moisture; a damp cloth inside a loosely closed container works well
Cheese—needs to breathe slightly; wrapping in beeswax or storing in containers with small air gaps prevents suffocation while limiting drying
Bread—freezes well in airtight containers but stales faster in the refrigerator; countertop storage in breathable cloth bags is ideal for short-term use
Materials Comparison: Which Eco-Friendly Container Material Is Right for You?
This is where most buyers get overwhelmed. The market offers several materials, each with distinct advantages and drawbacks. Here’s a comprehensive comparison:
Material
Sustainability
Durability
Food Safety
Visibility
Weight
Best For
Glass (Borosilicate)
★★★★★ Endlessly recyclable, inert
★★★☆☆ Breakable but long-lasting
★★★★★ Non-reactive, no leaching
★★★★★ Fully transparent
Heavy
Dry goods, leftovers, fridge storage
Stainless Steel
★★★★★ Recyclable, extremely durable
★★★★★ Nearly indestructible
★★★★★ Non-reactive, no leaching
★☆☆☆☆ Opaque
Medium
Lunchboxes, pantry dry goods, outdoor use
Ceramic/Stoneware
★★★★☆ Made from natural materials
★★★☆☆ Chip-prone but can last decades
★★★★★ Inert if lead-free glaze
★☆☆☆☆ Opaque
Heavy
Countertop storage (sugar, coffee), serving
Silicone
★★★☆☆ Durable but not widely recycled
★★★★☆ Flexible, tear-resistant
★★★★☆ Food-grade is safe; concern over fillers
★★☆☆☆ Usually translucent
Light
Lids/seals, collapsible containers, freezer
Bamboo
★★★★☆ Renewable, biodegradable
★★★☆☆ Can crack or warp over time
★★★★☆ Natural; some finishes may contain chemicals
★☆☆☆☆ Opaque
Light
Produce storage, decorative pantry
Beeswax Wrap
★★★★★ Biodegradable, compostable
★★☆☆☆ Lasts months to ~1 year
★★★★★ All-natural
N/A
Very light
Wrapping cheese, bread, covering bowls
Cotton/Muslin Bags
★★★★★ Biodegradable, washable
★★★☆☆ Wear over time
★★★★★ Natural fiber
N/A
Very light
Produce, bulk shopping transport
Deep Dive: Glass vs. Stainless Steel
These are the two heavyweights in the eco-friendly container world, and the choice between them comes down to lifestyle factors:
Glass wins on transparency—you can see exactly what’s inside and how much remains without opening the container. It’s microwave-safe, doesn’t absorb odors or stains, and is generally considered the safest food-contact material. Borosilicate glass (used in brands like Pyrex and Glasslock) resists thermal shock better than standard soda-lime glass. However, glass is heavy, breakable, and not ideal for travel or households with young children.
Stainless steel is the adventurer’s choice. It’s lightweight relative to its strength, virtually indestructible in normal use, and impervious to staining or odor absorption. It’s the go-to for lunchboxes, camping, and outdoor kitchens. The downside? You can’t see through it, it’s not microwave-safe, and acidic foods can sometimes impart a metallic taste if stored for very long periods (though high-quality 304/316 stainless steel largely mitigates this).
Key Factors to Consider When Buying Eco-Friendly Food Storage Containers
1. Seal Quality and Mechanism
The seal is the heart of any food storage container. Look for:
Silicone gaskets—provide excellent airtight seals; removable for cleaning is essential
Locking clamp lids (bail-wire closures)—classic Mason jar style; reliable and long-lasting
Push-button air removal systems—found in premium containers; create near-vacuum conditions
Screw-top lids—simple and effective for jars; ensure threads are robust
Vent ports—for produce containers; adjustable vents let you control airflow
Avoid containers with glued-on gaskets or non-replaceable silicone seals, as these are the first components to wear out and will render the container useless when they fail.
2. Stackability and Space Efficiency
Kitchen space is precious. Containers that nest when empty and stack neatly when full dramatically improve pantry organization. Square and rectangular containers make more efficient use of shelf space than round ones—typically 25–30% more efficient. Modular systems designed to fit together in standardized dimensions (like OXO POP (affiliate link) or Container Store’s Elfa line) are ideal if you’re building a system from scratch.
3. Lid Compatibility and Standardization
One of the most frustrating aspects of food storage is the “lid drawer” problem—endless mismatched lids and containers. Choose a brand ecosystem that uses standardized lid sizes across multiple container volumes. This reduces clutter, simplifies finding the right lid, and means if one container breaks, its lid still serves others.
4. Cleaning Ease
Consider how easy containers are to clean thoroughly:
Wide-mouth openings allow hand and brush access
Removable silicone gaskets prevent mold buildup in crevices
Dishwasher-safe components (check both container and lid)
Avoid containers with complex hinge mechanisms or narrow necks that trap food residue
5. Transparency and Labeling
Clear containers let you monitor freshness and inventory at a glance. If using opaque containers (stainless steel, ceramic), invest in a labeling system—chalkboard labels, erasable markers on glass, or simple masking tape. Some premium containers include built-in date-tracking dials on the lid.
6. Size Range and Versatility
A good container system should offer sizes ranging from small (spices, nuts—4–8 oz) to large (flour, grains, pasta—up to 1 gallon or more). Having a range lets you right-size containers to contents, reducing excess air that can accelerate staleness.
Comparison Chart: Popular Eco-Friendly Food Storage Container Brands
As an Amazon Associate I earn from qualifying purchases.
Add larger containers for bulk grain/flour/sugar storage
Invest in stainless steel containers for lunch transport
Add specialized produce storage containers with vents (berries, greens)
Spice jars (standardize to one size—small Mason jars or dedicated spice containers)
Phase 3: Optimization (Months 3–6)
Replace remaining plastic containers as they wear out
Add vacuum-sealing capability for long-term storage of nuts, seeds, dried fruit
Consider a labeling system (consistent labels, marker type, or erasable options)
Evaluate whether your storage system supports bulk buying habits—are containers readily available when you shop?
The Hidden Trade-Offs: What Nobody Tells You
The Cleaning Burden
Eco-friendly containers require maintenance. Unlike disposable packaging—which you simply toss—reusable containers must be washed, dried, and stored. This is real labor, and it compounds with each container in your collection.
Tips to minimize the burden:
Establish a dishwashing routine that includes container cleaning
Choose dishwasher-safe containers whenever possible
Dry containers completely before sealing to prevent mold
Clean gaskets and seals weekly—they’re mold hotspots
Line containers for sticky/oily ingredients with compostable parchment or reusable silicone liners
The Transport Problem
Buying in bulk reduces packaging, but it creates a logistical challenge: how do you get loose food from the store to your home? Options include:
Reusable cloth bags (cotton, muslin, or hemp)—lightweight, washable, ideal for dry goods
Silicone bags—leakproof, good for wetter bulk items like nut butters or liquids
Glass jars with tare weight recorded—some zero-waste stores allow you to bring your own jars and deduct the container weight at checkout
Collapsible containers—save bag space when empty
The reality is that some zero-waste shopping requires planning and extra bags, which themselves represent additional packaging (albeit reusable). It’s not a perfect system, but it’s far better than the disposable alternative.
The Upfront Cost
Quality eco-friendly containers cost more upfront than disposable packaging. However, the long-term economics are compelling. If a glass jar costs $5 and replaces 200 plastic bags at $0.03 each, it pays for itself within months and continues saving money for years. The key is buying durable containers that last—cheap plastic “reusable” containers that crack within a year are false economy.
Alternative Approaches: Community and Scale
Communal Kitchen Arrangements
Not everyone needs to own a complete set of storage containers individually. Communal or shared kitchen arrangements—common in co-housing communities, student cooperatives, and intentional living situations—offer several advantages:
Shared container libraries distribute the cost and cleaning burden across many members
Bulk purchasing power enables group orders of staples (50 lb sacks of flour, bulk beans, wholesale nuts) that individuals couldn’t justify
Specialized containers (large fermentation crocks, vacuum sealers, dehydrators) become affordable when shared
Cleaning rotations make maintenance less burdensome for any single person
If you live in a situation where shared kitchens are feasible—roommate households, apartment buildings with community kitchens, co-housing, or co-ops—this model can significantly amplify the sustainability and cost benefits of eco-friendly storage.
Specialty Recycling Services
Even with the best intentions, some food packaging cannot be avoided. Condiment bottles with multi-material construction, snack bags with foil linings, polystyrene meat trays—these often fall outside municipal recycling capabilities.
Specialty recycling services fill this gap:
Terracycle offers free and paid programs for hard-to-recycle packaging, including snack wrappers, coffee capsules, and beauty product containers
Local zero-waste stores increasingly offer collection points for packaging their customers bring back
Mail-in recycling programs from brands like Gimme 5 (for #5 plastics) accept specific containers
Community recycling events periodically accept items not taken curbside
These services don’t eliminate the need for reduced consumption, but they provide a safety net for packaging that’s difficult to avoid.
FAQ: Common Questions About Eco-Friendly Food Storage Containers
Are glass containers really better for the environment than plastic?
In almost all cases, yes. Glass is infinitely recyclable without quality loss, doesn’t leach chemicals into food, and typically lasts far longer than plastic. The main environmental drawback of glass is its weight, which increases transportation emissions, and the energy intensity of production. However, because glass containers can last decades and are fully recyclable, their lifetime environmental impact is generally lower than repeatedly purchasing disposable or short-lived plastic containers.
Can I store acidic foods in stainless steel?
High-quality food-grade stainless steel (304/18-8 or 316 grade) is non-reactive and safe for most foods, including acidic ones like tomatoes and citrus. Lower grades of stainless steel (such as 201 or 430) may react with highly acidic foods over extended storage periods. When in doubt, check the manufacturer’s grade specification. For long-term storage of acidic foods, glass remains the gold standard.
Are silicone containers truly eco-friendly?
Silicone occupies a middle ground. It’s more durable than plastic, doesn’t leach harmful chemicals, and withstands extreme temperatures. However, it’s not biodegradable and recycling options are limited—most municipal programs don’t accept silicone. It’s a better choice than single-use plastic, but less sustainable than glass or stainless steel. Its key advantage is flexibility and versatility (freezer, microwave, dishwasher, oven-safe), which can reduce the number of different containers needed.
How do I keep pantry moths out of my containers?
Pantry moths (Indian meal moths) can infiltrate seemingly sealed containers. To prevent infestation:
Ensure containers are truly airtight—test the seal by pressing down on the lid; you should feel resistance
Inspect bulk grains and flours before transferring to containers—freeze new grains for 72 hours to kill any eggs
Keep containers clean and dry
Store susceptible items (grains, flour, nuts) in glass jars with rubber-gasket lids, which moths cannot penetrate
Use bay leaves in the pantry as a natural deterrent
What’s the best way to label glass containers?
Several effective labeling methods exist:
Chalkboard labels with liquid chalk markers—erasable, reusable
Washi tape with permanent marker—removable without residue
Dry-erase markers directly on glass—works well on smooth surfaces; easily wiped off
Engraved labels—permanent option for frequently used containers
Masking tape and pen—inexpensive, functional, won’t leave residue if removed within a few weeks
Avoid permanent adhesive labels on glass, as they leave stubborn residue.
Is it safe to freeze food in glass containers?
Yes, with precautions. Use borosilicate glass or specifically freezer-rated glass containers. Leave at least 1 inch of headspace to allow for expansion. Avoid putting frozen glass directly into a hot oven or vice versa—thermal shock causes cracking. Tempered soda-lime glass (standard Mason jars) can be frozen but is more prone to cracking than borosilicate. Wide-mouth jars are safer than narrow-neck jars for freezing, as the wider opening accommodates expansion more gracefully.
How do I transition from plastic to eco-friendly containers on a budget?
Start with Mason jars—they’re the most cost-effective entry point ($1–3 per jar). Gradually replace plastic containers as they wear out, prioritizing the most-used sizes first. Repurpose glass jars from purchased foods (pasta sauce, jam, pickles) after thorough cleaning. Shop thrift stores and secondhand marketplaces for quality containers at reduced prices. Focus on high-impact swaps first: the containers holding your most frequently used pantry staples.
Can I use beeswax wraps in place of all plastic wrap?
Beeswax wraps excel at covering bowls, wrapping cheese, bread, and firm produce—but they have limitations. They’re not ideal for wrapping raw meat, very wet foods, or for freezer storage. They typically last 6–12 months with proper care and can be re-waxed to extend life. For the applications they do cover well, they’re an excellent single-use wrap replacement. For raw meat and freezer storage, consider silicone lids or silicone bags as alternatives.
Quick-Reference Decision Matrix
Your Need
Recommended Container
Material
Approximate Cost
Dry pantry staples (rice, flour, beans)
Large airtight jar
Glass
$5–15
Spices
Small jars with shaker lids
Glass
$1–4 each
Fresh berries
Vented produce container
Glass or BPA-free plastic
$10–20
Onions/garlic
Wire basket or mesh bag
Metal or cotton
$10–15
Leafy greens
Container with vent + damp cloth
Glass
$10–15
Lunch transport
Leakproof container with compartments
Stainless steel or glass
$15–35
Cheese/bead
Beeswax wrap or cloth bag
Beeswax or cotton
$10–20
Bulk shopping transport
Cloth drawstring bags
Cotton/muslin
$2–5 each
Leftovers (fridge)
Glass with snap lid
Glass
$8–15 each
Freezer storage
Freezer-safe glass or silicone bag
Glass or silicone
$10–25 each
Coffee beans
Dark or opaque airtight container
Ceramic or stainless steel
$15–30
Conclusion: Building a Sustainable Kitchen, One Container at a Time
Transitioning to eco-friendly food storage containers is one of the highest-impact changes you can make in your kitchen—both environmentally and practically. It reduces waste, saves money over time, extends food freshness, and transforms chaotic pantries into organized, beautiful spaces.
The journey doesn’t require an overnight overhaul. Start with what you have—repurposed jars, a few strategic purchases, and a commitment to replacing disposables as they run out. Build gradually, choose materials that match your lifestyle and the foods you cook with, and don’t be afraid to experiment with communal solutions if they fit your living situation.
The perfect eco-friendly kitchen isn’t about having a Pinterest-ready wall of matching jars. It’s about making thoughtful choices that reduce waste, keep food fresher, and make your daily cooking routine simpler and more enjoyable. Every container you switch is a small vote for a less wasteful future—and those votes add up.
Ready to start your eco-friendly pantry transformation? Begin with a visit to your local bulk store, a handful of Mason jars, and a plan to phase out disposables one swap at a time. Your kitchen—and the planet—will thank you.
Let’s start with a confession most of us are guilty of: we fill a glass from the tap, drink it down, and rarely give the water a second thought. Municipal water treatment facilities do an admirable job in most developed nations. They chlorinate, they filter, they test. The water that arrives at your kitchen faucet meets legal safety standards—at least on paper.
But meeting legal standards and being truly safe aren’t always the same thing.
In the United States alone, the Environmental Working Group (EWG) has identified contaminants in tap water supplies affecting millions of households—contaminants that may fall below regulatory thresholds but still raise health concerns with chronic exposure. Lead leaching from aging infrastructure, disinfection byproducts formed when chlorine reacts with organic matter, agricultural runoff carrying nitrates and pesticides, microplastics, PFAS (so-called “forever chemicals”), and even pharmaceutical residues—these are realities in water systems across the country and around the world.
Then there are the secondary issues: taste and odor compounds, hardness minerals that wreck your appliances, and the occasional boil-water notice that reminds everyone that the system isn’t bulletproof.
Home water filtration offers a practical line of defense. But navigating the market is complicated. Pitcher filters, faucet attachments, under-sink systems, countertop distillers, reverse osmosis units, whole-house systems—each addresses different problems, carries different costs, and has different limitations.
This guide breaks it all down so you can make an informed decision for your household.
Understanding What’s Actually in Your Water
Before you buy any filtration system, you need to know what you’re filtering. The right solution for a household dealing with hard water is very different from one concerned about lead contamination or PFAS.
Common Contaminants by Category
Contaminant Category
Examples
Potential Sources
Health Concern
Disinfection byproducts
Trihalomethanes (THMs), haloacetic acids
Chlorine/chloramine reacting with organic matter in treated water
Linked to increased cancer risk with long-term exposure
Heavy metals
Lead, copper, arsenic
Aging pipes, natural deposits, industrial runoff
Neurological damage, kidney problems, developmental issues in children
Old pipes, construction activity, well degradation
Primarily aesthetic; can harbor other contaminants
Emerging contaminants
Microplastics, pharmaceutical residues
Consumer product waste, improper disposal
Effects still being studied; potential endocrine disruption
How to Find Out What’s in Your Water
Don’t guess—test. Here’s the hierarchy of testing options:
Check your municipal water quality report (Consumer Confidence Report). If you’re on a public water supply, your utility is legally required (in the U.S.) to publish an annual report detailing detected contaminants. You can often find this on your water utility’s website or through the EPA’s Safe Drinking Water Information System.
Order an independent lab test. Companies like Tap Score, SimpleLab, and local certified laboratories offer comprehensive home water testing kits. You collect samples per their instructions and mail them in. Prices typically range from $50–$300 depending on the breadth of the panel. For well water owners, this is essentially mandatory—at minimum annually.
Be aware that municipal reports reflect water quality at the treatment facility, not necessarily at your tap. This is a critical distinction. If your home was built before 1986 (when lead solder for pipes was banned in the U.S.), lead can leach into water as it travels through your home’s plumbing. Only point-of-use or point-of-entry filtration—or pipe replacement—addresses this.
Types of Water Filtration Systems: Comprehensive Comparison
Not all filters are created equal. Different technologies remove different contaminants. Below is a detailed comparison of the major categories you’ll encounter when shopping.
Master Comparison Chart
System Type
Typical Price Range
Filter Lifespan
Contaminants Removed
Flow Rate
Installation
Best For
Pitcher / Gravity Filter
$25–$80
2–6 months
Chlorine, some lead, some VOCs, taste/odor
Very slow (fills over minutes)
None
Budget-conscious, renters, light use
Faucet-Mounted Filter
$25–$60
2–4 months
Chlorine, some lead, sediment, cysts
Moderate
Simple DIY
Renters, quick install, modest budgets
Countertop Filter
$80–$250
3–6 months
Wide range depending on media; some remove fluoride, arsenic, PFAS
Moderate to fast
Minimal DIY
Those who want better filtration without permanent installation
Under-Sink (Single/Stage) Filter
$100–$300
6–12 months
Carbon filtration: chlorine, VOCs, lead; varies by cartridge
Good
Moderate DIY or plumber
Homeowners wanting clean water at the kitchen sink without wasted water
Households wanting the most thorough contaminant removal
Whole-House (Point-of-Entry) Filter
$300–$1,500+
3–6 months (often)
Varies widely: sediment, chlorine, iron, hardness (if combined with softener)
High; serves entire home
Professional installation
Protecting plumbing, appliances, and skin; addressing well water issues
Water Distiller
$150–$400
Heating element lasts years
Removes nearly all contaminants including minerals, microbes, heavy metals
Very slow (hours per gallon)
None (countertop unit)
Those wanting ultra-pure water; camping/emergency backup
Deep Dive: Each System Explained
1. Pitcher and Gravity Filters (e.g., Brita, PUR, zeroWater)
These are the entry point for most consumers. You fill a reservoir, gravity pulls water through an activated carbon and/or ion-exchange cartridge, and filtered water collects below.
Pros: Inexpensive upfront, no installation, portable, readily available at retail stores.
Cons: Limited filtration capacity compared to larger systems, frequent filter changes (every 40–100 gallons or roughly every 2 months), slow filtration, small batch size. Most standard pitcher filters reduce chlorine taste and odor and some lead—but they generally do not remove PFAS, arsenic, nitrates, fluoride, or microbial pathogens effectively. The ZeroWater brand is somewhat of an exception, using a five-stage process that reduces more dissolved solids, but its filters clog faster and cost more per gallon filtered over time.
Hidden issue: Pitchers are notorious for harboring mold and bacteria. If water sits in a pitcher for several days—especially in warm environments—microbial growth can occur on the filter itself and in the reservoir. One study published in the journal Water Research found bacterial counts in filtered pitcher water that actually exceeded the original tap water in some cases, because the filter cartridge became a colonization site. Regular cleaning of the pitcher and timely filter replacement are essential. And ironically, you may be filtering out the chlorine that was keeping bacteria at bay—leaving the water more vulnerable to regrowth.
2. Faucet-Mounted Filters
These screw onto your existing faucet (most have an adapter) and divert water through a small cartridge when you flip a lever. Brands like PUR and Brita dominate this space.
Pros: Easy to install, relatively affordable, better flow rate than pitchers, more frequent filter changes mean fresher filtration media.
Cons: Doesn’t fit all faucets, visible on the counter, smaller cartridge capacity means more frequent replacement. Similar contaminant profile limitations to pitchers, though some models have NSF certifications for broader contaminant reduction including lead and cysts.
Key certification note: Look for NSF/ANSI Standard 53 (health effects) and Standard 42 (aesthetic effects) certifications. These independent certifications confirm the filter actually does what the packaging claims. Many cheap knockoff cartridges lack certification.
3. Countertop Filter Systems
These are standalone units that sit beside the sink and connect via a diverter valve attached to your faucet. They typically use larger filter cartridges (or multiple stages) than faucet-mounted models.
Pros: Better filtration capacity and longer filter life than faucet or pitcher units, easier to maintain than under-sink systems, no permanent modifications to plumbing (ideal for renters).
Cons: Takes up counter space, can look utilitarian. Some models require manual refilling.
High-end countertop systems (like those from Berkey or Propur) use gravity-fed ceramic/carbon elements that can remove bacteria, cysts, and even some viruses—but these products have faced scrutiny over marketing claims and independent testing results, so verify with third-party certifications where available.
4. Under-Sink Filtration Systems
These are installed beneath the kitchen sink and deliver filtered water through a dedicated faucet (or an integrated faucet) above the counter. Single-stage systems use one cartridge (typically carbon block); multi-stage systems stack several types of filtration media.
Pros: Hidden from view, convenient dispensing, good flow rate, longer filter life (6–12 months typically), can target specific contaminants by choosing appropriate cartridges.
Cons: Requires some plumbing work (though often DIY-friendly), takes up cabinet space under the sink, dedicated faucet drilling may be needed.
Multi-stage under-sink systems can be highly effective. A common configuration pairs a sediment pre-filter, an activated carbon block, and a KDF (Kinetic Degradation Fluxion) media cartridge for heavy metal reduction. Depending on the cartridges chosen, these systems can address chlorine, lead, PFAS, VOCs, and more.
5. Reverse Osmosis (RO) Systems
RO is the gold standard for point-of-use contaminant removal. Water is forced through a semi-permeable membrane with pores so tiny that the vast majority of dissolved contaminants—including dissolved solids, heavy metals, PFAS, nitrates, fluoride, arsenic, and microbes—cannot pass through.
Pros: The broadest contaminant reduction of any home filtration method. NSF-certified RO systems can remove 95–99% of many contaminants. Excellent for households on wells or in areas with known contamination issues.
Cons: Produces wastewater (for every gallon of filtered water, 2–4 gallons may go down the drain as “reject” water—though newer efficiency models are improving this ratio). Removes beneficial minerals along with harmful ones, which can make water taste flat and slightly acidic; many systems include a remineralization stage to address this. Requires regular pre-filter changes (every 6–12 months) and membrane replacement (every 2–5 years). Slower production rate requires a storage tank.
Important consideration: RO systems are the most effective option for removing PFAS, which is increasingly a concern given that these chemicals are found in the drinking water of communities across the globe and are extremely persistent in the environment.
6. Whole-House (Point-of-Entry) Filters
These systems filter all water entering the home, meaning every faucet, shower, and appliance receives treated water. Configurations vary widely—some are simple sediment and carbon filters, others are multi-stage systems, and they can be combined with water softeners.
Pros: Protects plumbing and water-using appliances from sediment and scale, provides filtered water for bathing (important because chlorine and disinfection byproducts can be absorbed through skin and inhaled during showers), and ensures consistent water quality throughout the home.
Cons: Most expensive category, requires professional installation, large filter cartridges need periodic replacement (typically every 3–6 months), and a whole-house system alone may not provide the level of filtration that a point-of-use RO system does at the kitchen sink. Many homeowners pair a whole-house filter for general water quality with an under-sink RO system for drinking water—the best of both worlds.
7. Water Distillers
Distillation involves boiling water and collecting the condensation, leaving behind virtually all contaminants.
Pros: Produces extremely pure water, removes minerals (beneficial if your water is excessively hard), no filter cartridges to replace (though descaling is needed), compact.
Cons: Very slow (several hours per gallon), energy-intensive, removes all minerals (resulting in flat-tasting water), produces heat (can warm the surrounding area), not practical for high-volume household needs.
The Stagnation Problem: What Nobody Tells You
Here’s the issue that most buying guides gloss over: filtered water that sits unused can become less safe than the tap water you started with.
When you remove chlorine (or chloramine—the disinfectant that keeps municipal water safe), you eliminate the very mechanism that prevents bacterial regrowth. This means:
Pitcher filters sitting on the counter for days can develop biofilms. Mold spores, airborne bacteria, and even algae can take hold, especially in warm, humid kitchens. The filter cartridge’s activated carbon, with its enormous surface area, becomes an ideal breeding ground once the disinfectant is gone.
Under-sink systems with storage tanks (like RO systems) can experience bacterial growth in the storage tank if water sits unused for extended periods—during vacations, for example.
Whole-house filters that remove chlorine from all your water mean that the water sitting in your home’s pipes between uses is no longer protected by residual disinfectant. This can be especially problematic in homes with long pipe runs or infrequently used fixtures.
Practical Mitigations
Mitigation Strategy
Applies To
How It Helps
Replace filters on schedule (or sooner)
All systems
Prevents exhausted media from becoming colonization sites; old carbon that’s saturated can actually begin releasing trapped contaminants back into the water
Flush the system after periods of non-use
Under-sink RO, whole-house
Running water for 30–60 seconds clears stagnant water that may have picked up contaminants from sitting in pipes or tanks
Removes biofilm before it becomes established; use mild soap and warm water
Consider a UV sterilization stage
Under-sink RO, whole-house
UV light destroys microorganisms without adding chemicals; available as an add-on stage in many RO systems
Don’t over-filter
All systems
If your primary concern is taste and chlorine removal, a simple carbon filter may suffice and avoids stripping water of its protective disinfectant unnecessarily
Key Buying Criteria: How to Choose
Step 1: Test Your Water
As discussed, you can’t choose the right filter without knowing what’s in your water. Start with your utility’s water quality report, then consider an independent lab test if you have specific concerns (well water, older home plumbing, known local contamination).
Step 2: Match Technology to Contaminants
Your Primary Concern
Recommended Technology
Chlorine taste and odor only
Activated carbon (pitcher, faucet-mounted, or under-sink)
Lead contamination
NSF-53 certified carbon block or RO system
PFAS / “forever chemicals”
Reverse osmosis or specialized activated carbon filters certified for PFOA/PFOS reduction
Hard water (scale on fixtures, dry skin)
Ion-exchange water softener (whole-house) or salt-free conditioning system
Well water (bacteria, nitrates, multiple contaminants)
Multi-stage system with UV sterilization; possibly whole-house + RO at kitchen sink
Nitrates (agricultural areas)
Reverse osmosis or ion-exchange nitrate-specific filter
Fluoride removal
RO system or activated alumina filter
General peace of mind / broad protection
Multi-stage under-sink system or RO system
Step 3: Calculate Total Cost of Ownership
The purchase price is only part of the equation. Factor in filter replacement costs over 1–3 years.
Note: Costs are approximate and vary significantly by brand, region, and specific model. Professional installation adds $150–$500+ depending on complexity.
Step 4: Consider Lifestyle Factors
Renting? Stick with pitchers, faucet-mounted, or countertop systems—no permanent plumbing modifications required.
Large family? Flow rate and filter capacity matter more. Consider an under-sink or RO system to avoid constant refilling.
Well water? A whole-house system plus point-of-use RO is likely your best combination. Testing is non-negotiable.
On a tight budget? A faucet-mounted filter with NSF certifications provides meaningful improvement over unfiltered tap water for a modest investment.
Concerned about environmental impact? Look for systems with replaceable (not proprietary single-use) cartridges, and consider that RO systems waste water. Counterbalance this by using the reject water for plants or cleaning where possible.
Certification Cheat Sheet
When shopping, look for these third-party certifications on packaging:
UV microbiological water treatment (bacteria/virus reduction)
NSF/ANSI 372
Lead-free compliance
WQA Gold Seal
Water Quality Association certification, similar to NSF standards
FDA listing (for materials)
Filter components are made from food-grade materials
If a product makes contaminant reduction claims but lacks any of these certifications, treat those claims with skepticism. Independent certification is the only reliable way to verify that a filter performs as advertised.
Frequently Asked Questions
Q: Do I really need a water filter if my tap water meets legal standards?
A: It depends on your risk tolerance and specific circumstances. Legal standards are based on population-wide averages and cost-benefit analyses—they don’t guarantee zero risk for every individual. Vulnerable populations (pregnant women, infants, immunocompromised individuals) may benefit from additional filtration even when water meets standards. Homes with aging plumbing can have lead levels at the tap that exceed utility-reported levels. Ultimately, a filter is an added layer of protection, not necessarily a necessity for everyone.
Q: Is bottled water a better alternative to filtered tap water?
A: Generally, no. Bottled water is dramatically more expensive per gallon, creates significant plastic waste, and is often sourced from municipal tap water anyway. The regulatory oversight of bottled water (by the FDA) is actually less stringent than tap water regulation (by the EPA) in the U.S. Additionally, microplastic contamination has been detected in bottled water at concerning levels. A good home filtration system is almost always more cost-effective and environmentally responsible.
Q: How do I know when to replace my filter?
A: Follow the manufacturer’s recommended replacement interval (usually stated in months or gallons filtered). Some systems have built-in indicators. As a rule of thumb, don’t wait until the water tastes or smells different—that’s a sign the filter is already exhausted. An exhausted carbon filter not only stops removing contaminants but can begin releasing previously trapped contaminants back into your water.
Q: Can water filters remove PFAS?
A: Yes, but not all of them. Reverse osmosis systems are the most effective, with studies showing >90% PFAS removal. Specialized activated carbon filters (specifically those certified under NSF standards for PFOA/PFOS reduction) can also be effective. Standard pitcher and faucet filters are generally not adequate for PFAS removal. If PFAS contamination is a concern in your area (check EWG’s Tap Water Database or local advisories), an RO system is your most reliable option.
Q: Will a water filter make my water taste better even if it’s already “safe”?
A: In most cases, yes. Chlorine and chloramine, while safe at regulated levels, impart noticeable taste and odor that many people find unpleasant. Activated carbon filtration removes these compounds effectively, resulting in noticeably better-tasting water. This is often the primary reason people purchase filters—and it’s perfectly valid.
Q: Is reverse osmosis water safe to drink long-term since it removes minerals?
A: The mineral content of drinking water contributes a relatively small percentage of total daily mineral intake for most people—you get far more calcium and magnesium from food. That said, some health professionals recommend remineralization (either via a remineralization stage in the RO system itself or by adding a pinch of mineral salt) to improve taste and ensure the water isn’t overly aggressive (very low-mineral water can be slightly corrosive to certain materials). Most modern RO systems offer a remineralization stage as an option.
Q: Can I install an under-sink or RO system myself?
A: Many under-sink systems are designed for DIY installation and come with everything you need, including a faucet and tubing. Basic plumbing skills and a few hand tools are sufficient. However, if you’re uncomfortable drilling into your sink or connecting to your water line, a plumber can handle the installation in 1–2 hours. Whole-house systems should always be installed by a professional.
Q: What about alkaline water filters—are they worth it?
A: Alkaline water filters raise the pH of water, typically through the addition of minerals. While some people report subjective benefits in taste and digestion, the scientific evidence for health claims associated with alkaline water is limited and largely inconclusive. If improved hydration and taste are your goals, a standard filtration system will achieve that. The alkaline component is largely a preference rather than a necessity.
Q: My filtered water pitcher grew mold. Is this dangerous?
A: Mold in a water pitcher is unsightly and indicates that the pitcher isn’t being cleaned or refilled frequently enough. While most common molds aren’t acutely dangerous to healthy adults, they can produce allergic reactions and are particularly problematic for immunocompromised individuals. Discard the filter, thoroughly clean the pitcher with hot soapy water (or a diluted vinegar solution), allow it to dry completely, and install a fresh filter. Going forward, wash the reservoir weekly and don’t let water sit for more than 2–3 days.
Q: Are whole-house filters worth the investment?
A: For homes on private wells, absolutely. For municipal water users, it depends on your goals. If you’re concerned about chlorine exposure through showering (which can be significant—chloroform and other trihalomethanes are volatilized in hot showers and inhaled), a whole-house carbon filter is worthwhile. If your only concern is drinking water quality, a point-of-use system at the kitchen sink is more cost-effective. Whole-house systems also protect plumbing fixtures and appliances from sediment and scale, which can extend their lifespan.
The Bottom Line
There is no single “best” water filtration system—there’s only the best system for your water, your budget, and your living situation. Here’s the decision framework in brief:
Test your water to identify specific contaminants of concern.
Match filtration technology to those contaminants using the chart above.
Calculate total cost of ownership, not just the purchase price.
Look for NSF/WQA certifications that verify the filter actually performs.
Plan for maintenance—factor in filter replacements, cleaning, and the stagnation considerations outlined above.
Consider a layered approach: a whole-house filter for general water quality paired with a point-of-use RO system for drinking water is the most comprehensive solution, though it’s also the most expensive.
Remember that any filtration system is only as good as its maintenance. A neglected filter—whether a $30 pitcher or a $1,500 whole-house unit—can become worse than no filter at all, transforming from a protective barrier into a breeding ground for the very contaminants it was meant to remove.
Clean water is one of the most fundamental investments you can make in your household’s health. With the right information and a modest budget, it’s entirely achievable—just don’t set it and forget it.
Disclaimer: This guide is for informational purposes only and does not constitute professional water quality or medical advice. Always consult your local water utility, certified water treatment professionals, and relevant health authorities for guidance specific to your situation. Product names mentioned are for reference only and are not endorsements.
Let’s start with an uncomfortable truth: the average working adult who buys lunch out generates roughly 300 pieces of disposable packaging waste per year. That’s takeout clamshells, plastic forks, paper bags, napkins, cups, lids, straws, and the little condiment packets you tear open and discard in seconds. Multiply that by five workdays a week, fifty weeks a year, and the numbers become staggering. Now multiply it by the 160 million or so employed adults in the United States alone, and the ecological footprint of “grabbing a quick bite” starts to look less like a harmless convenience and more like a slow-moving environmental catastrophe.
The cost isn’t just environmental—it’s financial. A deli sandwich in a plastic clamshell runs eight to fifteen dollars. A restaurant to-go salad in a compostable bowl? Twelve to eighteen. The packaging itself accounts for a meaningful percentage of that price, and it’s designed to be thrown away within the hour. You’re paying a premium for materials engineered for disposability—materials that will persist in landfills, waterways, and ocean gyres for decades or centuries after your lunch is forgotten.
There’s a better way. And it’s not new. In fact, it’s ancient.
Adult lunchboxes—reusable, washable, durable containers designed to carry meals from home or from a deli counter—are one of the simplest, most impactful sustainability swaps an individual can make. They reduce waste, save money over time, and, when chosen thoughtfully, elevate the daily ritual of eating lunch into something intentional and even beautiful.
This guide will walk you through everything you need to know: the cultural traditions that normalize reusable lunch containers, the materials and designs worth investing in, the honest drawbacks you should expect, and even emerging service models that handle the cleaning and maintenance for you.
The Cultural Precedent: How Other Societies Have Done This for Centuries
The Japanese Bento Box
In Japan, the bento box is not merely a container—it’s a cultural institution. The word bento dates back to the Kamakura period (1185–1333), when cooked and dried rice called hoshi-ii was carried in small lacquered boxes. By the Edo period (1603–1868), bento had evolved into an art form, with elaborate tiered boxes crafted from lacquered wood, bamboo, or even porcelain.
Modern bento boxes continue this tradition. They’re typically compact, divided into compartments, and made from materials ranging from traditional lacquered wood to modern food-grade plastics and stainless steel. The key design principle is portion control and visual harmony—a well-packed bento is as much about aesthetics as nutrition. Japanese adults routinely carry bento boxes to offices, on trains, and to picnics. It’s not seen as childish or frugal. It’s seen as civilized.
What the bento tradition teaches us is that carrying your own lunch container can be an expression of care—for your food, for yourself, and for the world around you.
The Indian Tiffin (Dabba) System
If the Japanese bento represents refinement and individual artistry, the Indian tiffin system represents something equally powerful: community-scale logistics and reusable infrastructure.
In Mumbai, an estimated 5,000 dabbawalas (literally “box carriers”) deliver over 200,000 lunches daily from homes to offices across the city. The system, which has operated since 1890, uses stackable steel containers called tiffins or dabbas. Each tiffin consists of three to four cylindrical steel bowls that latch together, holding rice, curry, dal, and flatbread separately. The dabbawala collects the empty tiffin from the office after lunch and returns it to the home, where it’s washed and refilled the next day.
The error rate of the dabbawala system—often cited as fewer than one mistake per six million deliveries—has been studied by business schools worldwide. But beyond the logistics, the tiffin system demonstrates something profound: reusable containers work at scale, and they work better when integrated into a service infrastructure rather than left entirely to individual effort.
These two traditions—one emphasizing personal elegance, the other emphasizing shared systems—offer complementary blueprints for rethinking how adults carry lunch.
Choosing Your Lunchbox: A Materials Comparison
Not all lunchboxes are created equal. The material you choose affects durability, weight, ease of cleaning, odor retention, aesthetics, and environmental impact. Below is a detailed comparison of the most common materials used for adult lunch containers.
Comparison Chart: Lunchbox Materials at a Glance
Material
Durability
Weight
Ease of Cleaning
Odor Resistance
Aesthetics
Eco-Impact
Price Range
Stainless Steel
Excellent (10+ years)
Medium
Easy (dishwasher-safe)
Excellent
Modern, sleek
Highly recyclable
$$$
Glass (Borosilicate)
Good (breakable)
Heavy
Very easy
Excellent
Elegant, transparent
Infinitely recyclable
$$$
Silicone
Very good (5+ years)
Light
Moderate (can trap odors)
Moderate
Functional, colorful
Recyclable (limited programs)
$$
Bamboo/Wood
Moderate (requires care)
Light-Medium
Moderate (hand wash)
Good (with proper care)
Natural, warm appearance
Biodegradable, renewable
$$$
Food-Grade Plastic
Good (3-5 years)
Very light
Easy
Poor (absorbs odors)
Utilitarian
Poor (petroleum-based)
$
Ceramic/Porcelain
Moderate (breakable)
Heavy
Easy
Excellent
Artisanal, beautiful
Natural materials
$$$
Enamelware
Good (chipping risk)
Medium
Easy
Excellent
Vintage charm
Steel core, recyclable
$$
Deep Dive: The Top Three Materials for Adults
1. Stainless Steel (Best Overall for Everyday Use)
Stainless steel lunchboxes—particularly those made from 18/8 or 304-grade steel—are the workhorse of the adult lunchbox world. Brands like PlanetBox, ECOlunchbox, and U-Konserve have popularized sleek, compartmentalized steel boxes that rival the aesthetic of Japanese bento boxes.
Pros: Virtually indestructible, impervious to odors, dishwasher-safe, doesn’t leach chemicals, highly recyclable, and looks professional.
Cons: Can be heavy, some designs don’t seal watertight (you’ll need separate containers for soups), conducts heat (hot food stays hot—handle carefully), and the upfront cost can range from $25 to $60 per box.
Best for: Office workers who want a zero-maintenance, long-lasting, professional-looking lunch container.
2. Borosilicate Glass (Best for Home-to-Office Commuters)
Glass containers have surged in popularity thanks to brands like Pyrex, Glasslock, and Wean Green. Borosilicate glass specifically (the original Pyrex formulation) is resistant to thermal shock, meaning it can go from refrigerator to microwave without cracking.
Pros: Completely odor-resistant, visually appealing (you can see your food), microwave and oven-safe, infinitely recyclable, and doesn’t degrade over time.
Cons: Heavy—this is the biggest drawback. Glass containers are significantly heavier than steel or silicone alternatives. They’re breakable, which makes them less ideal for cyclists, commuters on public transit, or anyone whose bag gets jostled. Prices typically range from $15 to $40.
Best for: People who drive to work, store lunch in an office fridge, and prioritize being able to microwave directly in the container.
3. Bamboo and Lacquered Wood (Best for Aesthetics and Tradition)
For those drawn to the Japanese bento tradition, lacquered wooden boxes (jubako) and bamboo containers offer unparalleled beauty. Modern manufacturers like Black + Blum and Takenaka have begun producing bamboo-fiber lunchboxes that bridge traditional aesthetics with contemporary functionality.
Pros: Lightweight, biodegradable (at end of life), visually distinctive, and they connect the user to centuries of culinary tradition.
Cons: Require hand-washing and thorough drying (wood and bamboo can warp, crack, or develop mold if left damp). Not microwave or dishwasher-safe in most cases. Odor resistance is decent but requires regular oiling with food-safe mineral oil. Prices range from $20 to $80+, with artisanal pieces exceeding $150.
Best for: Food enthusiasts, aesthetes, and anyone who views lunch as a mindful ritual rather than a refueling stop.
Design Features That Matter: What to Look For
Comparison Chart: Key Design Features
Feature
Why It Matters
Look For
Compartment Separation
Prevents flavors from mingling; enables portion control
Removable dividers or fixed compartments
Leakproof Seal
Essential for sauces, dressings, soups, and yogurts
Silicone gaskets, locking clamps (not snap-fit)
Tiered Stacking
Allows separation of hot and cold items; mimics tiffin design
Fits in standard backpacks, totes, and bike panniers
Dimensions under 8″ x 6″ x 3″ for most bags
The Honest Catch: Drawbacks of Reusable Lunchboxes
This wouldn’t be a responsible buying guide if we only talked about benefits. Let’s address the real obstacles head-on.
Problem 1: Cleaning Difficulty and Odor Buildup
Not all materials clean easily. Food-grade plastics are notorious for absorbing odors—especially from tomatoes, curries, and garlic-heavy dishes. After a few months of use, a plastic container can develop a persistent smell that no amount of soap seems to eliminate. Silicone, while generally better than plastic, can also trap odors over time.
Solutions:
Choose stainless steel, glass, or ceramic to eliminate this problem entirely.
For plastic or silicone containers, scrub with a paste of baking soda and water, then leave in direct sunlight for several hours (UV light neutralizes many odor compounds).
Avoid storing highly acidic or pungent foods in plastic altogether.
Establish a routine: rinse immediately after eating, before food residue dries and bonds to surfaces.
Problem 2: Increased Effort Compared to Disposables
There’s no way around it: using a reusable lunchbox requires planning. You need to pack it. You need to bring it home. You need to wash it. You need to dry it. You need to repack it. This cycle demands maybe ten minutes of additional daily effort compared to tossing a paper bag.
That ten minutes is the central friction point of the entire sustainable lunch movement.
Solutions:
Pack lunch the night before—store the packed lunchbox in the refrigerator overnight.
Keep two or three lunchboxes in rotation so you’re never waiting for one to dry.
Use dishwasher-safe materials to automate the cleaning step.
Meal-prep on weekends: pack three to five lunches at once, stacked in the fridge, ready to grab.
Problem 3: Upfront Cost
A quality stainless steel lunchbox costs $30 to $60. A set of borosilicate glass containers runs $25 to $45. An artisanal bento box can exceed $100. Compare that to a paper bag and plastic wrap, which costs pennies per use.
But here’s the math that reframes the conversation:
A typical takeout lunch costs $10 to $15. Packing the same meal at home costs $3 to $5 in ingredients. Even accounting for the cost of a premium lunchbox, the break-even point arrives within two to four weeks of daily use. Over a year, switching from takeout to home-packed lunches saves between $1,500 and $2,500—more than enough to justify several top-tier lunchboxes and still come out far ahead.
Problem 4: Social Friction
In many Western workplaces, carrying a lunchbox can feel slightly unconventional—associated with childhood or with frugality rather than sophistication. This social perception is a real, if diminishing, barrier.
The cultural shift is already underway, driven partly by sustainability awareness and partly by design evolution. Today’s adult lunchboxes look nothing like the cartoon-charactered plastic boxes of childhood. Sleek stainless steel, minimalist Scandinavian design, and artisanal craftsmanship position the modern lunchbox as an accessory of intentionality—one that signals environmental consciousness and culinary engagement.
The Alternative Shortcut: Lunch as a Service with Reusable Containers
What if you didn’t have to wash your own lunchbox at all?
This is where the Indian tiffin system offers its most radical lesson. In Mumbai, the dabbawala system works because container maintenance is built into the service. Someone else cleans the tiffin. Someone else transports it. The user simply eats, closes the box, and leaves it for collection.
Historical Precedent: The American Milk Delivery System
America has its own version of this model, now largely extinct: the glass milk bottle. Through the mid-20th century, milk delivery drivers dropped off fresh milk in thick glass bottles and collected the empties from the previous delivery. The bottles were sterilized and refilled dozens of times before eventually being retired. It was a closed-loop reusable system embedded in daily commerce.
The system collapsed due to the rise of supermarket distribution, paper cartons, and eventually plastic jugs—but not because it didn’t work. It worked extraordinarily well. It was displaced by economics: cheap disposable packaging made centralized mass production and retail distribution more profitable than decentralized delivery.
Modern Revivals and Emerging Models
Several companies and initiatives are reviving the reusable-container-as-service concept:
Returnable container programs in cities like San Francisco, Portland, and New York, where participating restaurants serve to-go food in standardized stainless steel or glass containers that customers return within a set timeframe.
Office cafeteria programs where employers provide reusable dishware for employees who eat on-site, eliminating disposables entirely.
Subscription meal services that deliver food in reusable containers and collect empties on the next delivery—essentially modernizing the milkman model for prepared meals.
These programs remain limited in America, but they demonstrate proof of concept. The infrastructure exists; it’s a matter of demand and scale.
The insight here is crucial: individual action (buying a lunchbox) is valuable, but systemic solutions (service-integrated reusable containers) have far greater potential impact. A city-wide tiffin-style system could eliminate millions of disposable containers annually. Supporting and advocating for these programs—through participation, through municipal policy, through workplace initiatives—multiplies the effect of any individual lunchbox purchase.
Recommended: Traditional lacquered Japanese jubako or modern bamboo bento (e.g., Takenaka (affiliate link) or Black + Blum (affiliate link)). Pair with cloth wrapping (furoshiki) for a transport method that’s itself sustainable and beautiful.
For the Meal-Prepper
Recommended: A set of three to five identical stainless steel divided containers. Buy in bulk for consistency. Stack in the refrigerator. Rotate through the week. Choose dishwasher-safe designs.
As an Amazon Associate I earn from qualifying purchases.
Environmental Impact: By the Numbers
To contextualize the decision, consider these comparisons:
Metric
Disposable Takeout
Reusable Lunchbox (daily use, 1 year)
Containers used per year
~250
1
Plastic waste generated
~5–8 lbs
~0 lbs
Paper/cardboard waste
~12–15 lbs
~0 lbs
Estimated annual cost (food + packaging)
$2,500–$3,750
$750–$1,250 + $30–$60 (container)
Carbon footprint (packaging only)
Moderate–high
Negligible after first ~50 uses
Time spent dealing with lunch
~5 min/day (ordering/waiting)
~10 min/day (packing/cleaning)
Note: Figures are estimates based on average urban lunch costs and typical packaging weights. Actual figures vary by location, habits, and container choice.
Frequently Asked Questions
Are silicone containers safe for food?
Yes, food-grade silicone is generally considered safe. It’s BPA-free, phthalate-free, and doesn’t leach chemicals the way some plastics do. However, silicone can absorb odors over time, particularly from pungent foods. It’s a good lightweight option but ranks below stainless steel and glass for long-term odor resistance.
Can I put stainless steel lunchboxes in the microwave?
No. Metal should never go in a microwave. If you need to reheat food, transfer it to a microwave-safe glass or ceramic dish. If microwave reheating is essential to your routine, choose glass containers instead of steel.
How do I get rid of smells in my plastic or silicone containers?
Try these methods in order: (1) Wash with hot soapy water and a scrub brush. (2) Soak in a solution of white vinegar and water (1:1 ratio) for 30 minutes. (3) Make a paste of baking soda and water, scrub, and let sit for several hours. (4) Place in direct sunlight for half a day—UV light is remarkably effective at neutralizing organic odors. If none of these work, the container has likely absorbed compounds too deeply to remove and should be recycled or replaced.
Is it really more hygienic to use a reusable container?
It can be, if properly maintained. Disposable containers are manufactured in facilities with varying standards and may sit in warehouses for months. A well-cleaned, thoroughly dried reusable container that you control is arguably more hygienic. The key is drying—moisture, not reuse, is the primary hygiene risk. Always store containers fully dry with lids off or loosely placed.
What about insulated bags versus rigid lunchboxes?
They serve different purposes. Insulated bags (soft-sided, with foam insulation) excel at temperature regulation for a few hours and accommodate various container shapes. Rigid lunchboxes (hard-sided) offer better protection for delicate foods and often include compartments. Many users benefit from pairing a rigid inner container with an insulated outer bag—the best of both worlds.
Are expensive lunchboxes worth it?
Generally, yes. The price difference between a $15 and a $50 lunchbox usually reflects material quality (real stainless steel vs. coated steel), seal integrity (genuine leakproof gaskets vs. snap-on lids that leak), and durability (10+ years vs. 2–3 years). Given that you’ll use this item 250 times per year, even a $60 box costs less than $0.25 per use over its lifespan. The per-use economics overwhelmingly favor quality.
Can I carry restaurant leftovers or deli-made food in my own container?
Increasingly, yes. Many delis, cafés, and restaurants are happy to pack food directly into a customer-provided container, especially when asked politely. Some cities have even begun mandating that businesses accept customer containers. A growing number of zero-waste restaurant directories list establishments that welcome this practice. The worst they can say is no—and increasingly, they’re saying yes.
How do I convince my workplace to adopt reusable dishware?
Start small: bring your own and make it visible. Normalize the behavior. Then propose a pilot program: a set of communal plates, bowls, and utensils in the break room, with a simple dishwasher or wash station nearby. Frame it as cost-saving (reduced disposable purchasing), sustainability (aligns with corporate ESG goals), and employee wellness (better eating habits). Many green business certification programs reward this exact initiative.
Final Thoughts: The Lunchbox as a Small Act of Defiance
Carrying your own lunchbox is, in its quiet way, a radical act. It’s a refusal to accept that convenience must come at the cost of the planet. It’s a rejection of the disposable economy’s central premise—that everything should be used once and discarded. And it’s a reclaiming of the lunch hour as something deliberate rather than automatic.
The Japanese understood this when they elevated the bento into an art form. The dabbawalas of Mumbai understood it when they built a reusable logistics network that outperforms most modern delivery services. The American milkmen of the early 20th century understood it when they collected and refilled glass bottles on doorsteps across the country.
You don’t need to wait for a city-wide reusable container program to start. You don’t need legislation or corporate policy or municipal infrastructure. You need one good lunchbox, the willingness to spend ten extra minutes a day, and the recognition that the most sustainable container is the one you already own—or the one you buy once and use for the next decade.
Choose well. Pack with intention. Eat with pleasure. And when you’re done, wash your box, dry it, and set it by the door for tomorrow.
Have questions about specific products or setup challenges? Share them in the comments below—we’ll update future editions with reader-submitted insights and solutions.
The Complete Guide to Worm Bins: Transform Kitchen Scraps Into Garden Gold Without the Mess
Published: July 7, 2026 | Reading Time: ~12 minutes
Introduction: The Food Waste Problem You’re Probably Ignoring
Every day, American households throw away an estimated 22 pounds of food per person. That’s right—nearly 80 million tons of edible food ends up in landfills annually in the United States alone. When this organic matter decomposes in oxygen-starved landfill conditions, it releases methane, a greenhouse gas that’s up to 36 times more potent than carbon dioxide at trapping heat in our atmosphere.
If you’re reading this, you’ve probably tried to do something about it. Maybe you started a backyard compost pile, joined a curbside compost program, or simply separated your veggie scraps into a countertop container. Here’s where many eco-conscious households hit a wall: traditional composting systems are notoriously finicky.
Backyard thermophilic (hot) composting requires bulky volumes of material, weeks to months of processing time, and physical labor turning piles. Curbside compost collection often means hauling heavy buckets to the street weekly—smells, fruit flies, and potential rodent visits becoming part of the deal. Countertop “composter pails” frequently become unpleasant themselves if not emptied promptly.
But what if there was a middle ground? Something that:
Fits in a corner of your kitchen or basement
Handles the steady stream of daily kitchen scraps naturally
Produces odorless, pest-free results when maintained properly
Generates two powerful garden amendments you can use immediately
Enter vermicomposting—the art of raising red wiggler worms to digest your food waste. This guide will walk you through everything you need to know about setting up, maintaining, and maximizing a worm bin system for hassle-free, year-round kitchen scrap recycling.
Why Worm Composting Beats Traditional Methods for Kitchen Scraps
The Batch vs. Continuous Processing Advantage
Traditional hot composting operates on a batch principle. You accumulate materials over weeks, build volume to achieve proper heat, turn the pile regularly, then wait months for decomposition. This works beautifully for garden waste season but clashes with the reality of continuous kitchen waste generation.
Worm bins, by contrast, operate as continuous-flow systems. Your worms eat constantly. Every carrot peel, coffee ground, or lettuce leaf you add becomes fuel for their digestive process. As they consume materials, they excrete nutrient-dense castings that collect at the bottom of the bin—ready for harvest without waiting months.
Key advantage: Your worms handle whatever scraps arrive today, tomorrow, and next week without requiring accumulation periods or manual turning schedules.
Space Efficiency and Discretion
A quality worm composter occupies roughly the footprint of a small trash can or desktop printer—often under 2 square feet. Stackable tray systems (like popular Vivosun or FCMP designs) can fit under sinks, in pantry corners, or on utility shelves. Unlike outdoor compost tumbblers that demand yard space and expose your neighborhood to the sight (and potential smell) of decomposition, worm bins remain invisible and odor-controlled indoors when maintained correctly.
Temperature Stability = Less Work
Outdoor compost piles freeze solid in winter and cook to sterile temperatures in summer. Both extremes halt biological activity. Worm bins kept at cool-room temperature (55–77°F / 13–25°C) maintain steady biological throughput year-round. No seasonal shutdowns. No waiting for spring thaw to resume processing.
Dual Output: Castings AND Tea
Perhaps the most compelling reason to adopt vermicomposting: you don’t just get one product—you get two powerhouse soil amendments:
Product
Description
Application
Worm Castings
Dark, crumbly worm poop rich in beneficial microbes and nutrients
Direct soil amendment; seed starting mixes; potting soil enrichment
Worm Tea
Liquid extract made by steeping castings in aerated water
Foliar spray for plants; root drench for transplants; nutrient boost
Both are “cold” compost products—meaning they preserve delicate beneficial microorganisms that thermal composting destroys through heat. Gardeners call worm castings “black gold” for good reason: they improve soil structure, water retention, and plant health without risk of burning (common with synthetic fertilizers).
Worm Bin Systems: Choosing Your Setup Type
Not all worm bins are created equal. Three primary designs dominate the market, each with distinct advantages:
How it works: One container filled with bedding material. You bury food scraps directly into the bedding throughout the cycle. After several months, worms migrate away from harvested areas, allowing partial castings removal.
Best for: First-time vermicomposters; minimal equipment investment; straightforward operation.
Trade-offs: Labor-intensive harvesting; longer processing times; harder to isolate finished castings from unfinished materials.
2. Stacked Tray Systems (Most Popular)
How it works: Multiple trays stack vertically. Worms migrate upward through mesh bottoms toward fresh food placed in upper trays. Bottom trays gradually fill with finished castings ready for harvest. Popular models include Vivosun three-layer bins, FCMP Essential Living Worm Composter, WormCity wormeries, and WormBox designs.
Best for: Balanced ease-of-use with efficient harvesting; scalable capacity; clean separation of finished and active zones.
Trade-offs: Higher upfront cost than single-bin systems; slightly more setup complexity.
Industry consensus: Based on 2024–2025 consumer reviews and testing from sources like BBC Gardeners’ World, The Spruce, and dedicated vermiculture communities, stacked tray systems represent the sweet spot for most household users. They balance cost, odor control, and simple tray-based harvesting.
3. Flow-Through Systems (Advanced/Commercial Scale)
How it works: Scraping mechanisms allow you to pull finished castings from a bottom opening while new materials enter the top. Used primarily by commercial operations but occasionally adapted for serious home growers.
Trade-offs: Expensive; complex installation; requires careful regulation to prevent flooding or drying.
Top-Rated Worm Bins for Home Use (2024–2026 Reviews)
Based on aggregated testing from authoritative sources (The Spruce, Gardeners’ World Magazine, YouTube reviewer comparisons, Reddit community discussions), here are the leading models ranked by user satisfaction:
🏆 Best Overall: Vivosun Three-Layer Worm Bin
Price Range: $70–$100 USD
Capacity: Approximately 10–15 lbs of active processing volume
Key Features:
Flat, detachable lid prevents odors and rodents while simplifying tray access
Modular design allows stacking additional layers as your worm population grows
Ventilation system promotes airflow and moisture control
Mesh-bottomed trays enable natural worm migration during harvesting
Pros: Best balance of affordability, odor management, and beginner-friendly operation Cons: Plastic construction may become brittle in extreme cold; initial bedding setup required
Verdict: Recommended as the ideal starter bin for most household vermicomposting applications.
🥈 Best Budget Hybrid: FCMP Outdoor Essential Living Worm Composter
Price Range: $80–$95 USD
Capacity: ~12 lbs processing volume
Key Features:
UV-stable, weather-resistant plastic suitable for covered patios or garages
Dual-chamber system separates active compost from finished castings
Built-in venting minimizes smell without excessive drying
Pros: Excellent value under $100; rugged construction; indoor-outdoor flexibility Cons: Heavier than lightweight alternatives; dual-chamber switching takes practice
Verdict: Strong choice for users who want outdoor resilience without sacrificing price point.
🥉 Best Capacity: WormCity High-Capacity Wormery
Price Range: $120–$150 USD
Capacity: 20 liters (~4.4 gallons)
Key Features:
Extra-large tray system for bulk processing
Reinforced walls resist cracking over years of use
Longer warranty coverage appeals to serious gardeners
Pros: Highest volume among residential units; durable; proven track record Cons: Premium pricing; larger footprint; may be oversized for apartment kitchens
Verdict: Ideal for families producing significant food waste or gardening enthusiasts needing maximum casting yields.
💎 Premium Design Choice: WormBox
Price Range: $120–$150 USD
Capacity: Standardized residential size
Key Features:
Sleek aesthetic suitable for visible kitchen placement
Airtight lid with precisely calibrated ventilation hole
Verdict: Perfect for design-conscious users prioritizing aesthetics alongside functionality.
Setting Up Your First Worm Bin: Step-by-Step Guide
Once you’ve purchased your bin, here’s how to launch successfully within 60 minutes:
Materials Needed Before Arrival
Red Wiggler Worms (Eisenia fetida) — Never use earthworms from your lawn; they require deep soil and won’t thrive in composting environments. Purchase online (Uncle Jim’s Worm Farm, Brothers Worm Farm, local agricultural suppliers) in quantities matched to your bin size (typically 1 lb worms per square foot of surface area for startup).
Bedding Material: Shredded newspaper, cardboard, coconut coir, or aged leaves. Moistened thoroughly before adding.
Optional but Recommended: pH test strips, moisture meter, spray bottle, thermometer.
Day 1 Assembly Protocol
Step 1: Prepare the Container Position your bin in a location meeting these criteria:
Indoor or sheltered outdoor spot protected from freezing temperatures (<50°F / 10°C) and overheating (>85°F / 29°C)
Away from direct sunlight
On a level surface
Easy access for feeding and monitoring
Add ventilation holes if none exist (¼-inch diameter spaced every 2 inches around sides near the top). Elevate the bin on blocks or bricks to allow drainage air circulation underneath.
Step 2: Create Deep Bedding Layers Fill the first tray approximately ¾ full with moistened bedding. Think “wrung-out sponge consistency“—damp enough to hold together when squeezed, but releasing no drips. Fluff the bedding to create air pockets.
Step 3: Introduce Your Worms Spread purchased worms across the bedding surface. Cover lightly with additional shredded paper. Allow 24 hours for acclimation before the first feeding.
Step 4: Initial Feeding Schedule Wait one week after worm arrival before beginning regular feeding. Start with small portions (½ cup) buried under bedding. Observe consumption rates before increasing volume gradually. Worm populations adjust to food availability over time—rushing feeds risks anaerobic conditions and odor development.
Check bedding weekly with gloved finger pressed 2 inches deep
If dry: Mist evenly with dechlorinated water until uniformly damp
If soggy: Remove excess liquid from drainage trays; add dry bedding layers to absorb moisture
Stir/fluff bedding monthly to restore aeration and prevent compaction
Critical Insight: Anaerobic conditions develop rapidly in oversaturated beds, causing foul smells and suffocating worms. Overcorrecting toward dryness is safer than risking drowning your colony.
🍎 Feeding Protocols
Acceptable Foods:
Fruit and vegetable scraps (most varieties)
Coffee grounds and filters
Tea bags (remove staples)
Crushed eggshells (helps neutralize acidity)
Small amounts of bread/grains (bury deeply)
Foods to Avoid:
Citrus peels (too acidic)
Onions, garlic (potentially harmful to worms in quantity)
Meat, fish, bones (attract pests, cause odors)
Dairy products (same issues)
Oily/greasy foods (interfere with oxygen absorption)
Feeding Frequency & Quantities: Start conservatively. One pound of worms theoretically consumes half its body weight daily under perfect conditions—but real-world variables limit intake. Begin feeding weekly portions equivalent to ¼–½ lb of scraps per square foot of surface area. Increase incrementally as you confirm complete consumption between feedings.
Pro Tip: Use designated feeding zones. Divide your tray into quadrants, rotating which zone receives new food. This method lets you monitor consumption patterns while preventing localized overload.
🪱 Harvester Readiness Indicators
Stack tray systems typically signal completion when:
Lower trays contain uniform dark, granular material resembling coffee grounds
Minimal identifiable food particles remain
Reduced worm density in completed layers
Harvesting frequency varies (every 3–6 months depending on bin size and feeding rate). Always leave unfinished trays untouched.
Troubleshooting: Fixing Common Worm Bin Problems Fast
Even attentive operators encounter hiccups. Here’s rapid diagnosis and correction for frequent issues:
Problem
Likely Cause
Immediate Action
Foul Smell
Overfeeding; saturated bedding; poor aeration
Stop feeding for 1–2 weeks; fluff bedding extensively; add dry carbon material (cardboard/newspaper); verify drainage holes aren’t blocked
Worms Escaping
Improper conditions (wet/dry/hot/cold); recent chemical exposure
Check temperature/moisture immediately; improve lighting on top (worms avoid light and may try to flee darkness below); ensure lid isn’t sealed airtight; add fresh bedding layer
Fruit Flies
Exposed food; rotting scraps surfacing
Always bury new food under 2 inches of bedding; cover surface with damp newspaper sheet; trap adults with vinegar + dish soap bait bowls nearby
Slow Decomposition
Underpopulation of worms; incorrect temperature; inadequate moisture
Adjust environment to optimal ranges; consider supplementing with additional worms; increase aeration via periodic stirring
Mold Growth (White/Fuzzy)
Normal fungal colonization; indicates cellulose breakdown
Generally harmless unless black-colored; reduce moisture if abundant; mix moldy material into deeper bedding where worms will consume it
Black Soldier Fly Larvae
Warm temperatures; overfeeding
Reduce feeding frequency; decrease moisture; remove larvae manually; these are actually benign (they don’t harm worms) but indicate imbalanced conditions
Critical Rule: Never dump entire contents and restart unless absolutely necessary. Worm colonies recover from setbacks far faster than you’d expect given patience and corrected parameters.
Dump bin contents onto a tarp outdoors (in indirect sunlight). Form into conical piles. Worms burrow downward away from light. Scoop outer layers of castings, leaving worm-rich center material for re-bedding. Repeat until satisfied with separation.
Method 2: Drop-Off Collection (Tray Systems)
Simply remove bottom trays containing finished castings while keeping active trays intact. Place removed trays on screen or mesh, gently shake off fine compost. Any worms encountered return to active trays manually or by placing them atop the colony where they’ll naturally descend.
Crafting Worm Tea: Instant Plant Nutrition
Ingredients:
1 cup worm castings
1 gallon dechlorinated water
Optional: 1 tablespoon molasses (feeds beneficial bacteria during brewing)
Usage Ratio: Dilute finished tea 1:10 with water before applying. Frequency: Bi-weekly during growing seasons reduces need for synthetic fertilizers significantly.
Electronic Home Composters: The Shortcut Alternative
Given the hands-on nature of worm farming, many modern eco-homers explore electric countertop appliances promising zero-effort composting. Leading brands include Lomi Classic ($349–$399), Lomi Bloom ($299), Lomi 3 ($449), plus competing models like LykoClean ($200–$250) and FoodCycler variants.
How Electric Composters Differ From Worm Bins
Electric units employ heat-assisted dehydration and grinding rather than biological digestion. Cycles run 2–5 hours, reducing waste volume 80–90% into dry, sanitized crumbs marketed as “plant-ready compost.” Crucially:
Factor
Worm Bin
Electric Composter
True compost produced
Yes (living biology preserved)
No (sterilized, dried material)
Input versatility
Limited (no meat/dairy/oils)
Broader range accepted
Operating cost
Negligible (occasional bedding purchases)
Electricity consumption + proprietary consumables (BioGo pods ~$12/month for Lomi)
Learning curve
Moderate (environmental tuning required)
Minimal (push-button simplicity)
Output usability
Immediate soil amendment requiring no aging
Must be mixed into outdoor compost or buried weeks before planting to avoid salt buildup
Maintenance intensity
Weekly checks; active engagement
Occasional cleaning cycles; device-focused care
Environmental footprint
Zero-energy, biological
Energy-dependent manufacturing
Who Benefits Most From Each Solution?
Choose Worm Bins If You:
Have reliable indoor/outdoor shelf space
Enjoy hands-on gardening projects
Seek maximum ecological impact (zero electricity)
Want genuinely live-culture soil amendments
Operate under tighter budgets despite learning investment
Choose Electric Composters If You:
Prioritize convenience over optimization
Lack time/space for ongoing biological management
Need containment for unsavory food types (meat/dairy scraps)
Don’t mind recurring operational costs
Value sleek appliance aesthetics on countertops
Reality Check: Independent reviews (Serious Eats, WIRED, The Cottage Peach) consistently note electric composters serve better as volume-reduction tools than true compost generators. Many users still transfer output to worm bins or outdoor piles for maturation.
Cost Analysis: 3-Year Ownership Comparison
Expense Category
Worm Bin System
Electric Composter
Initial Equipment
$70–$150 (bin + worms)
$299–$450 (unit only)
Consumables (Yearly)
$10–$20 (bedding supplies)
$120–$150 (BioGo pods or similar)
Utilities
$0
Estimated $30–$50/year (electricity)
Replacement Parts
$0–$20 (trays/lids after 3 years)
$0 (warranty typically covers 2 years)
3-Year Total
~$110–$230
~$519–$770
Break-even occurs around month 18–24 favoring worm bin economics substantially for long-term users.
Frequently Asked Questions
Q: Can worm bins survive winter indoors? A: Absolutely—in fact, they work better indoors during cold months. Maintain room temperature above 50°F, position away from drafty doors/windows, and reduce feeding frequency since metabolism slows in cooler ambient conditions.
Q: How long do red wigglers live? A: Red wiggler lifespans average 1–2 years, but colonies reproduce steadily through cocoons laid continuously. Healthy populations self-sustain indefinitely without replenishment if conditions stay optimal.
Q: Will neighbors complain about odors? A: Properly managed worm bins produce faint earthy aromas similar to forest floor—not unpleasant decomposition smells. Odor complaints stem almost exclusively from improper maintenance (overwatering, overfeeding, insufficient ventilation).
Q: Can apartments with balconies accommodate worm composting? A: Yes! Balcony spaces work excellently provided shelter from freezing cold and scorching heat. Many urban renters use enclosed balcony corners or shared community garden plots for larger-scale setups.
Q: What happens if I forget to feed worms for vacation? A: Adult colonies withstand 2–4 weeks without food surprisingly well. For departures exceeding two weeks, prepare extra deep bedding, stop feeding one week prior, and ask someone to briefly check moisture levels mid-vacation.
Q: Are worm teas safe for houseplants? A: Yes—properly brewed and diluted worm tea provides gentle nutrition for indoor container plants. Avoid concentrated applications to prevent salt accumulation affecting sensitive foliage.
Final Thoughts: Making the Switch Worthwhile
Transitioning to vermicomposting represents a meaningful commitment to closing the loop on household organic waste. Yes, it demands initial education and mindful maintenance—but the rewards extend beyond mere waste diversion.
Consider what emerges from your efforts:
Elimination of smelly kitchen pails destined for curbside pickup
Creation of premium-grade fertilizer for gardens, houseplants, landscaping
Development of tangible connection to biological cycles rarely witnessed in modern life
Demonstration of circular economy principles at micro scale
For skeptics weighing worm bins against electric shortcuts, remember: technology advances never replace fundamental ecological wisdom. Living systems working cooperatively with biological intelligence often outlast engineered solutions demanding perpetual inputs and replacements.
Starting modestly—with a single-tray Vivosun or FCMP system costing under $100—lowers barriers considerably. Once comfort establishes, expansion remains possible through modular additions or graduated upgrades matching growing proficiency and ambition.
Food waste doesn’t vanish overnight. But every carrot top consumed by worms instead of oxidizing in a landfill represents climate mitigation happening invisibly beneath your fingertips. And perhaps that’s worth cultivating.
Have questions about specific products or setup challenges? Share them in the comments below—we’ll update future editions with reader-submitted insights and solutions.

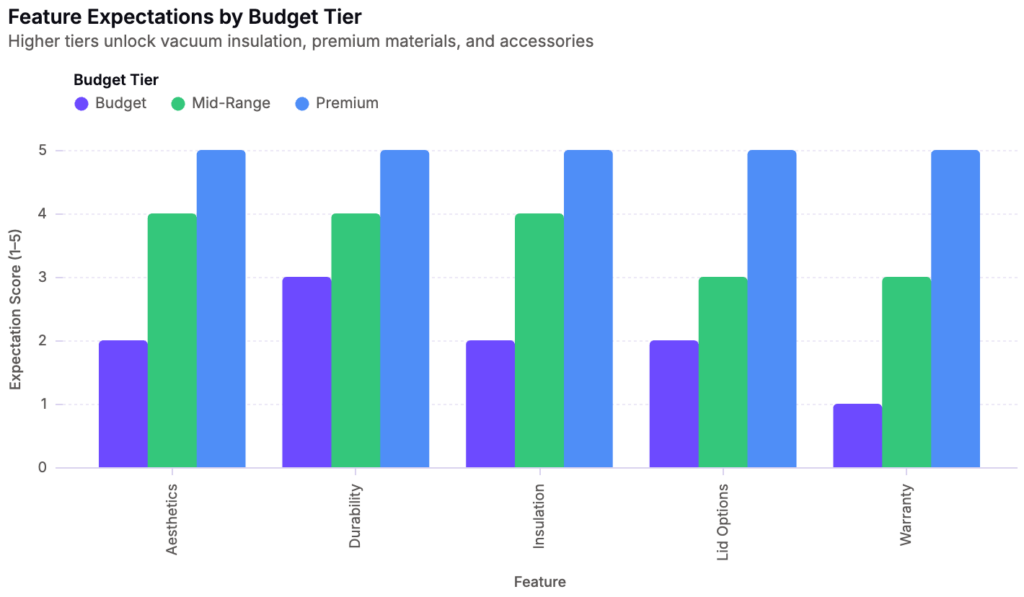

Leave a Reply