Tired of stale crackers, half-open chip bags, and a pantry that looks like a landfill? The OXO Good Grips POP Container Set fixes all of it in one elegant system.
Here’s the magic: press the signature pop-top button once, and it creates an airtight seal that locks out air and moisture. Press again, and the same button pops up to serve as a handle for effortless opening. No wrestling with stubborn lids, no broken nails, no guesswork.
These containers hit every checkbox that matters for a sustainable kitchen:
Airtight protection keeps grains, pasta, snacks, and coffee fresh far longer than original packaging. Stackable, square design maximizes shelf space—no more wasted corners. BPA-free construction means safe food contact. Top-rack dishwasher safe cleaning eliminates maintenance headaches. Modular sizing means you can build a system that fits your pantry perfectly.
At a mid-tier budget investment, the POP set outperforms both cheaper plastic containers (which warp and stain) and pricier glass alternatives (heavy, breakable, harder to store). It’s the sweet spot of durability, design, and practicality.
Plastic bottles pile up in landfills by the billion. The fix? One bottle you actually want to carry everywhere. Enter the Takeya Actives — a vacuum-insulated stainless steel workhorse that checks every box at a mid-range budget tier.
Why It Wins
Ergonomic carry handle rotated 90 degrees, walking with your hand naturally — no pressure points, no sharp edges
Smooth flip spout opens quickly and delivers a clean, spill-free sip every time
Protective spout cover keeps things sanitary and leak-proof when closed
Double-wall insulation holds ice for hours in summer heat
Wide mouth makes cleaning effortless; dishwasher-safe components simplify maintenance
Durable, sleek finish that looks as good as it performs
The Bottom Line
Finding a bottle that’s genuinely easy to hold, drink from, carry, and clean is harder than it sounds. The Takeya Actives nails all four — making it the perfect everyday alternative to single-use plastics.
Every single day, millions of people reach for a disposable drink bottle — grab a coffee cup, pick up a bottled water, swing through a drive-through for a soda in a plastic cup with a straw. Convenience feels effortless. But that convenience comes with a staggering environmental cost that piles up faster than any of us care to admit.
This guide is designed to walk you through everything you need to know about switching from single-use drink containers to reusable tumblers and water bottles. Whether you’re motivated by sustainability, saving money long-term, keeping your drinks at the perfect temperature, or simply expressing your personal style, we’ll help you find the right reusable vessel for your lifestyle.
The Problem: Disposable Drink Waste Is Staggering
Let’s start with some perspective. Globally, humans purchase approximately one million plastic bottles per minute. Of those, only a fraction — some estimates suggest around 9% — actually get recycled. The rest end up in landfills, oceans, waterways, and scattered across landscapes where they take hundreds of years to decompose.
But here’s what most people miss: even when a plastic bottle does make it into the recycling stream, the cap often doesn’t. Bottle caps are made from a different type of plastic than the bottle itself (typically HDPE vs. PET), which means many municipal recycling facilities either can’t process them or won’t bother separating them. Millions of caps are landfilled or become ocean debris every year.
And then there are straws. Plastic drinking straws are virtually never recycled — they’re too lightweight to be captured by standard sorting machinery, and they’re too small to be economically viable for recyclers. They consistently rank among the top ten items found during beach cleanups worldwide. While paper straws have gained popularity as an alternative, many users find them frustratingly soggy and short-lived, which brings us back to the core issue: people just want a good drinking experience.
The bottom line? Even “recyclable” disposable options are far from a real solution. The only genuinely sustainable approach is reuse — and that’s where tumblers and water bottles come in.
Why Reusable Tumblers & Water Bottles Are the Answer
Switching to a reusable tumbler or water bottle addresses the waste problem directly. Instead of contributing to the mountain of single-use plastics, you invest in a durable container that can last for years — sometimes decades — with proper care. Over its lifetime, a single reusable bottle can replace thousands of disposable ones.
But sustainability isn’t the only benefit. Here are several reasons why making the switch improves your everyday experience:
Superior Temperature Retention: Most quality reusable bottles and tumblers feature double-wall vacuum insulation. This technology creates an airless gap between two stainless steel walls, dramatically reducing heat transfer. Cold drinks stay icy for up to 24 hours or more. Hot beverages like coffee or tea remain piping hot for 6–12 hours. Compare that to a flimsy plastic bottle or paper coffee cup that lets your drink go lukewarm within the hour.
Personal Expression: Unlike a generic disposable bottle, a reusable tumbler or water bottle becomes an extension of your personality. Brands offer a dizzying array of colors — from muted earth tones to vibrant metallic finishes. Patterns range from minimalist geometric designs to bold florals and everything in between. And then there’s the sticker culture: many enthusiasts adorn their Yeti, Hydro Flask, or Stanley tumblers with custom stickers showcasing their hobbies, travels, favorite bands, or sense of humor. Your drink container becomes a canvas.
Functional Variety: Reusable vessels come in configurations that disposables simply can’t match. Want a built-in straw for easy sipping on the go? There’s a tumbler for that. Need a sturdy handle for carrying your giant hydration companion everywhere? Several brands have you covered. Prefer a flip-top lid, a screw cap, a chug spout, or a wide-mouth opening for ice? The options are nearly endless, and many brands offer interchangeable lids so you can customize your setup.
Cost Savings Over Time: While the upfront investment is higher than a single disposable bottle, the math quickly tips in favor of reuse. If you’re someone who buys bottled water, specialty coffees, or fountain drinks regularly, a reusable container pays for itself in a matter of weeks to months.
Types of Reusable Drink Containers Explained
Before diving into features and recommendations, let’s clarify the terminology, since “tumbler” and “water bottle” are sometimes used interchangeably but actually refer to different form factors.
Water Bottles
Water bottles are designed primarily for portability and active use. They typically feature a narrower profile, a secure sealing lid (screw cap, flip-top, or chug spout), and are built to be tossed in a backpack, gym bag, or cup holder. They tend to hold anywhere from 12 to 40 ounces and prioritize leak-proof designs over open-drinking convenience.
Best for: Gym-goers, hikers, students, commuters, and anyone who needs a sealed, spill-proof container for on-the-go hydration.
Tumblers
Tumblers are broader, often wider vessels that prioritize drinking comfort over absolute portability. They typically feature a straw lid or a press-in slider lid, and their wider base makes them ideal for desk use, car cup holders (in many cases), and leisurely sipping. Tumblers commonly range from 20 to 40+ ounces and often include a handle for easier carrying.
Best for: Office workers, road-trippers, desk sippers, iced coffee lovers, and anyone who prefers straw-based drinking.
Hybrid/Multi-Use Vessels
Some modern designs blur the line — offering both a carry handle and a straw, or coming with multiple interchangeable lid types. These versatile options are ideal for people who want one container that adapts to multiple situations throughout the day.
Best for: People who want maximum versatility from a single purchase.
Key Features to Consider When Choosing
With the basics covered, let’s dig into the specific features that differentiate products within each category. Understanding these will help you match a product to your specific needs.
Insulation Technology
The vast majority of premium reusable drinkware uses double-wall vacuum insulation. Two layers of stainless steel are joined with a vacuum-sealed gap between them. Because there’s no air (and therefore no medium for heat transfer), this design is remarkably effective at maintaining temperature.
Lower-cost options may use double-wall construction without a true vacuum, or even single-wall designs. These offer some insulation benefit but fall significantly short of vacuum-insulated performance. If temperature retention is a priority — especially for hot drinks or all-day ice retention — vacuum insulation is essential.
Some ultra-budget options use plastic double-wall construction. These are lightweight and inexpensive but don’t insulate as effectively and may retain odors or flavors over time.
Lid Types
The lid is arguably the most important functional component of any reusable vessel. Common lid styles include:
Straw Lids: Feature a hole for a reusable straw. Excellent for cold drinks and easy sipping while driving or working. Look for models with a sliding cover or flip closure to keep the straw clean when not in use.
Chug Spouts: A raised, angled spout designed for taking large gulps quickly. Popular among athletes and outdoor enthusiasts.
Screw Caps: The classic, most leak-proof option. Great for tossing in a bag without worry, though less convenient for quick sips.
Flip-Top/Press-Button Lids: One-handed operation with a spring-loaded mechanism. Convenient but more complex, meaning more parts to clean and a higher likelihood of mechanical failure over time.
Slider Lids: A lever that slides open to reveal a drinking opening. Common on coffee tumblers and travel mugs.
Material Quality
18/8 Stainless Steel: The gold standard for reusable drinkware. It’s food-safe, resistant to corrosion, doesn’t impart flavors, and is highly durable. All premium brands use this material.
Tritan Plastic (BPA-Free): A shatter-resistant, clear plastic used in many lower-cost bottles. Lighter than steel and allows you to see contents, but doesn’t insulate as well and may scratch over time.
Glass: Offers the purest taste — no flavor retention whatsoever — but is heavy, fragile, and generally impractical for portable use. Some brands offer silicone sleeves for protection.
Silicone/Collapsible: Ideal for travel and space-saving. These can be rolled or folded when empty. Trade-offs include less insulation and a somewhat floppy drinking experience.
Size and Capacity
Capacity Range
Best Use Case
Portability
12–18 oz
Desk use, kids, short outings
Very portable, fits all cup holders
20–30 oz
Daily driver, commuting, gym
Portable, most cup-holder friendly
32–40 oz
All-day hydration, outdoor activities
Less portable, may not fit all cup holders
40+ oz
Serious hydration goals, office desk
Bulky; often includes a handle for carrying
Handle Options
Handles have become increasingly popular, especially on larger-capacity tumblers. A well-designed handle makes carrying a 40-ounce vessel comfortable and natural. Look for handles that are integrated into the lid (allowing 360-degree rotation) or molded into the tumbler body for structural durability.
Straw Considerations
If you opt for a straw-equipped vessel, consider the straw material:
Reusable Plastic Straws: Lightweight, clear, and affordable. Found in most tumbler kits. May scratch over time.
Stainless Steel Straws: Extremely durable and easy to clean, but conduct temperature — beware of very cold or very hot drinks. Often come with silicone tips for comfort.
Silicone Straws: Soft, flexible, and kid-friendly. Won’t conduct temperature. May retain some flavors over time.
Regardless of material, always use a straw cleaning brush — straws are notorious breeding grounds for bacteria if not properly maintained.
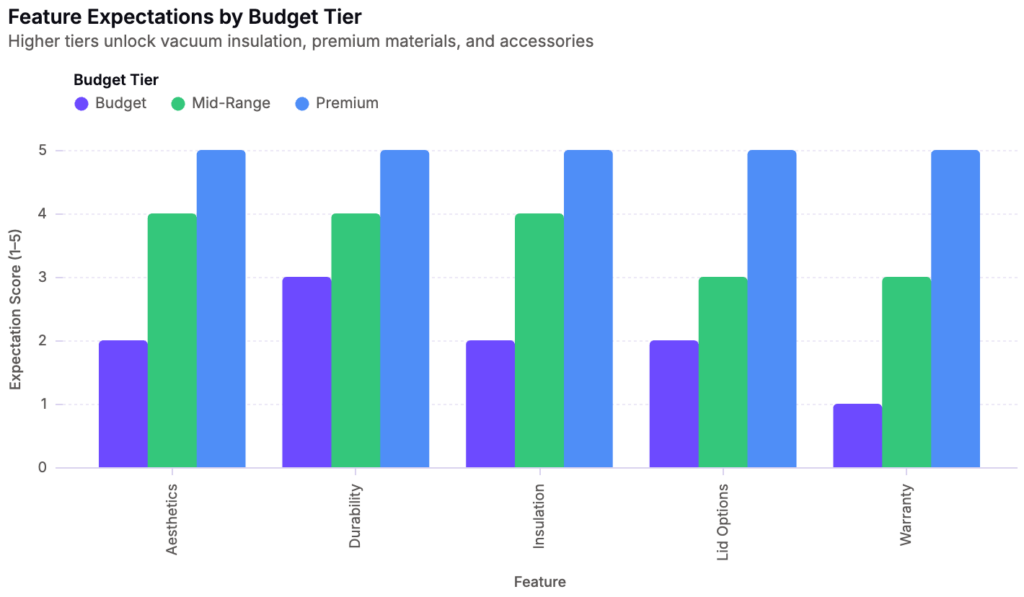
Budget Tier Comparison
Rather than citing specific prices (which fluctuate constantly due to sales, availability, and retailer pricing), here’s a breakdown of what you can expect at each budget tier. All Amazon product links are affiliate links, meaning we may earn a commission at no additional cost to you.
Budget Tier ($)
At this tier, you’ll find single-wall or basic double-wall stainless steel bottles, Tritan plastic tumblers, and simpler designs. Expect minimal accessories, fewer color options, and basic lids (often just a screw cap or simple straw lid). Insulation performance will be modest — cold drinks may stay cool for a few hours, but don’t expect ice to last overnight. Warranty coverage is typically limited or nonexistent.
Who it’s for: First-time buyers, casual users, kids, or anyone testing the waters of reusable drinkware without committing significant funds. Also great for bulk purchases (office teams, event giveaways).
This is where vacuum insulation becomes standard. You’ll find 18/8 stainless steel construction, double-wall vacuum insulation with respectable temperature retention (cold for 12–18 hours, hot for 6–8 hours), and a decent selection of colors and finishes. Lid options expand — many brands at this tier offer straw lids, chug spouts, and slider lids. Warranties are typically 1–5 years.
Who it’s for: Most everyday users. This tier hits the sweet spot of performance, durability, and value. If you’re replacing daily disposable drinks and want something that genuinely outperforms them, this is your starting point.
Premium-tier drinkware represents the best of the best. Expect top-tier vacuum insulation (cold retention up to 24+ hours, hot up to 12+ hours), extensive color and finish palettes including powder-coated and metallic options, modular accessory ecosystems (interchangeable lids, handles, boot protectors, straw packs), and robust warranties — often lifetime or “limited lifetime.” Build quality and attention to detail are noticeably superior, and brand communities offer sticker swaps, customization guides, and social sharing.
Who it’s for: Daily heavy users, outdoor enthusiasts, gifting, brand loyalists, and anyone who wants a “forever bottle” that performs flawlessly for years.
Not sure which form factor suits you? This chart breaks down the key differences:
The Maintenance Catch: What Nobody Tells You
Here’s the honest truth that many buying guides gloss over: reusable drink containers require ongoing maintenance, and neglecting it can create health concerns that single-use bottles never pose.
Why Cleaning Matters
Every time you drink from a tumbler or bottle, you introduce saliva, food particles, and potentially sugary residues into the vessel. Over time, this creates an environment where bacteria, mold, and mildew can flourish — particularly in damp, dark, and warm conditions (which describes the interior of a sealed bottle perfectly). Studies have found that unwashed reusable bottles can harbor significantly more bacteria than a toilet seat.
The Problem Areas
Straws: The inside of a straw is the single hardest component to clean properly. A quick rinse is not enough — you need a dedicated straw brush to scrub the full interior length.
Lid Mechanisms: Flip-top lids, slider mechanisms, and press-button releases have small crevices and moving parts where gunk accumulates. Many premium lids can be disassembled for cleaning, but you need to do so regularly.
Thread Seals: The threading where the lid screws onto the bottle collects residue. An old toothbrush works wonders here.
Bottom Seams: Many tumblers have a slight ridge or seam at the bottom interior where liquid pools. Pay special attention to this area during washing.
Gaskets/O-Rings: Silicone gaskets that create the leak-proof seal are prime real estate for mold growth. Remove them periodically and soak in warm, soapy water or a diluted vinegar solution.
Recommended Cleaning Routine
Daily: Rinse thoroughly with warm water after each use. At minimum, wash with warm soapy water and a bottle brush every evening.
Weekly Deep Clean: Disassemble all removable components (lids, straws, gaskets, sliders). Soak in warm water with dish soap or a mixture of water and white vinegar. Scrub all surfaces with appropriate brushes. Allow all parts to air-dry fully — moisture is the enemy.
Monthly Sterilization: Run dishwasher-safe components through a heated dishwasher cycle. For hand-wash-only items, a soak in a diluted bleach solution (1 teaspoon per quart of water) followed by thorough rinsing provides sterilization. Alternatively, bottle-cleaning tablets (widely available) offer a fizz-action deep clean that reaches areas brushes can’t.
Drying Is Non-Negotiable
Even the cleanest bottle will develop odors and bacterial growth if stored damp. Always store your vessel with the lid off and allow full air circulation. Store upside down on a drying rack when possible. Never store a sealed, damp bottle — you’re essentially creating a terrarium for microbes.
Additional Considerations
Dishwasher Safety
Not all premium drinkware is dishwasher safe. Powder-coated finishes can degrade over time in high-heat dishwasher cycles. Vacuum seals can theoretically be compromised by extreme temperatures (though modern manufacturing has largely mitigated this). Always check the manufacturer’s recommendations. If dishwasher cleaning is important to you, filter for “dishwasher safe” explicitly.
Cup Holder Compatibility
If you spend significant time driving, cup holder compatibility is a practical consideration. Most bottles up to ~3 inches in diameter fit standard car cup holders. Large-capacity tumblers (40 oz+) often exceed this and may require a vehicle with oversized cup holders or an aftermarket adapter. Handles that rotate 360 degrees can help navigate tight cup holder spaces.
Sustainability of the Container Itself
It’s worth noting that producing a stainless steel water bottle requires significantly more energy and resources than producing a single plastic bottle. Various lifecycle analyses suggest that a reusable bottle needs to replace somewhere between 10 and 80 disposable bottles (depending on the study and assumptions) to “break even” environmentally. Given that a quality reusable vessel replaces thousands of disposables over its lifespan, this threshold is easily cleared — but it underscores the importance of actually reusing your reusable. Buying five different “reusable” bottles that each sit unused in a cabinet is not an environmental win.
Sticker Culture and Customization
One of the most delightful aspects of the reusable tumbler movement is the sticker culture. Vinyl, waterproof, and dishwasher-safe stickers let you transform a plain vessel into a deeply personal statement piece. Travel stickers, band logos, funny quotes, nature illustrations, anime characters — if you can imagine it, there’s a sticker for it. Some enthusiasts curate their tumblers seasonally, swapping sticker collections throughout the year. Just be aware that applying stickers over powder-coated finishes is fine, but removing them may leave adhesive residue that requires careful cleaning.
How long do insulated tumblers and water bottles typically last?
With proper care, a high-quality stainless steel vacuum-insulated bottle or tumbler can last for many years — sometimes 5 to 10+ years. The vacuum seal is the most vulnerable component; if the bottle is dropped hard enough to dent the inner wall, the vacuum can be lost, and insulation performance will drop. The exterior finish (especially powder coating) may show wear over time, but this is cosmetic rather than functional.
Can I put hot drinks in a tumbler designed for cold drinks?
In most cases, yes — the vacuum insulation works for both hot and cold. However, lids matter. A straw lid with a straw inserted is not suitable for hot liquids, as the straw can become dangerously hot and cause burns. Switch to a slider or sip lid for hot beverages. Some straws (particularly metal ones) conduct heat efficiently and can deliver scalding liquid directly to your lips.
Are stainless steel bottles safe for acidic drinks?
Yes. 18/8 stainless steel is highly resistant to corrosion from acidic beverages like lemon water, sports drinks, or fruit-infused water. However, prolonged storage (multiple days) of highly acidic drinks is not recommended as it can eventually affect the taste. Stick to daily use and regular cleaning.
Will my bottle sweat with cold drinks?
Vacuum-insulated stainless steel bottles should not sweat externally — that’s one of their key advantages. If you notice condensation forming on the outside, it likely means the vacuum seal has been compromised (possibly from a drop or dent). Single-wall bottles and some lower-quality double-wall bottles will sweat.
How do I remove stubborn odors from my tumbler?
Try one of these methods:
Baking soda paste: Mix baking soda with water to form a paste. Apply to the interior, let sit for several hours, then scrub and rinse.
Vinegar soak: Fill with equal parts white vinegar and water. Let sit overnight, then wash thoroughly.
Denture tablets: Drop a denture-cleaning tablet in with warm water. Let fizz for 15–20 minutes, then wash.
Bottle cleaning tablets: Commercial products designed specifically for this purpose are highly effective and convenient.
Is it safe to put my tumbler in the freezer?
Generally, no. Freezing a vacuum-insulated bottle can damage the vacuum seal due to liquid expansion. If you want colder drinks, add ice cubes to your beverage instead. Some manufacturers explicitly state that freezer use voids the warranty.
What size tumbler fits in a standard car cup holder?
Most standard car cup holders accommodate containers up to approximately 3 inches in diameter. A 20-ounce tumbler typically fits comfortably. Larger 30-40 ounce tumblers may fit depending on the vehicle, but many require oversized holders or adapters. If this is a primary concern, check dimensions before purchasing.
Are glass bottles a viable eco-friendly option?
Glass is infinitely recyclable and doesn’t retain flavors or odors, making it an excellent choice from a purity standpoint. However, glass is heavy and breakable, making it impractical for many use cases. Glass bottles with protective silicone sleeves are available and work well for home and light office use, but they’re not ideal for active or outdoor scenarios.
Making the Switch: A Step-by-Step Action Plan
Ready to commit? Here’s a practical roadmap:
Assess your daily drinking habits. What do you drink most (water, coffee, smoothies)? Where do you drink most (car, desk, gym)? This determines your ideal form factor (bottle vs. tumbler), capacity, and lid type.
Set your budget tier. Decide whether you want a budget, mid-range, or premium option. Remember: a mid-range vacuum-insulated vessel offers the best balance of performance and value for most users.
Choose your features. Based on step 1, prioritize lid type (straw, chug, screw cap), handle (yes/no), capacity (oz), and any specific requirements (dishwasher safe, particular color, cup-holder compatible).
Order your vessel and essential accessories. At minimum, pick up a cleaning brush set and a straw brush if applicable. A silicone boot is a worthwhile investment for longevity.
Establish a cleaning routine from day one. Commit to daily rinsing, weekly deep cleans, and proper drying/storage. This is what separates a beloved daily companion from a science experiment.
Personalize it. Add stickers, choose a color you love, make it yours. The more attached you are to your vessel, the more likely you are to actually use it — and that’s the entire point.
Track your impact. If you were previously buying one bottled water per day, that’s 365 bottles per year eliminated. Seeing the numbers adds motivation and satisfaction.
Final Thoughts
The shift from disposable drink containers to reusable tumblers and water bottles is one of the most accessible, impactful lifestyle changes an individual can make. It reduces landfill waste, cuts ocean plastic pollution, saves money over time, keeps your drinks at optimal temperature, and gives you a canvas for personal expression — all while being genuinely enjoyable to use.
The key to success isn’t finding the “perfect” bottle. It’s finding the right bottle for your life and committing to the simple maintenance routine that keeps it hygienic and functional for years. With the information in this guide, you’re well-equipped to make that choice confidently.
Now go find your forever bottle.
This article contains affiliate links to Amazon. As an Amazon Associate, we may earn from qualifying purchases at no additional cost to you. Recommendations are based on feature categories and budget tiers, not specific brand endorsements.
If you’ve ever rummaged through three tote bags, a gym sack, and a coat pocket at 7:45 AM trying to find your laptop charger, you already understand the core promise of a good backpack: everything has a place, and everything is in its place. In a world that increasingly pulls us between locations—home office, co-working space, train platform, trailhead, coffee shop—the backpack has quietly become the modern person’s most trusted companion.
But here’s the tension: the backpack industry is enormous, largely synthetic, and not particularly kind to the planet. Most mainstream backpacks are constructed from virgin polyester, nylon, and PU-coated fabrics—materials derived from petroleum, shed microplastics with every wash, and end up in landfills after a few years of zipper failures and frayed straps. So how do you choose a backpack that serves your life and aligns with your values?
This guide walks through everything you need to know: materials, sizing, ergonomics, water resistance, brand transparency, and—crucially—a mindset shift that might mean you need less bag than you think.
Why Your Backpack Choice Matters More Than You Think
Let’s start with some context. The global backpack market was valued at roughly $18 billion in the late 2010s and has only grown since. The environmental footprint of that market is significant: producing a single polyester backpack requires petroleum extraction, energy-intensive polymerization, textile weaving, dyeing (often with toxic chemicals), and global shipping. Multiply that by the hundreds of millions of backpacks produced annually, and the cumulative impact is staggering.
Meanwhile, the average backpack is used for just 2–3 years before being replaced. Cheap construction, changing fashion trends, and planned obsolescence in zippers and stitching all contribute to a throwaway culture around an item that could—and should—last a decade or more.
Choosing an eco-friendly backpack is a small act with outsized ripple effects. It signals demand for better materials, supports companies investing in sustainable supply chains, and keeps synthetic waste out of landfills and oceans. Done well, it also gives you a more durable, more beautiful, and more functional piece of everyday gear.
Understanding Eco-Friendly Backpack Materials
The single most important factor in a backpack’s environmental impact is its material composition. Here’s a deep dive into the main categories:
Natural Fibres: Canvas, Hemp, and Cotton
Waxed canvas is the standout here. Cotton canvas—typically 14oz to 18oz weight—coated with a blend of waxes (paraffin, beeswax, or plant-based alternatives) creates a naturally water-resistant, incredibly durable fabric. It ages beautifully, developing a patina that many people find more attractive over time. Brands like Fjällräven (with their G-1000 fabric) and Topo Designs have popularized this approach.
Hemp is arguably the most sustainable natural fibre for bags. It grows densely, requires minimal water and no pesticides, improves soil health, and produces a fabric that’s stronger than cotton. However, hemp backpacks remain relatively niche, and the texture can be coarser than some users prefer.
Organic cotton (non-waxed) is breathable and pleasant but lacks water resistance. It’s best suited for dry climates or as an inner lining material.
Recycled Synthetics: rPET and Recycled Nylon
Recycled polyethylene terephthalate (rPET) is made from post-consumer plastic bottles. It diverts waste from landfills and requires significantly less energy to produce than virgin polyester. Many forward-thinking brands—Patagonia, Fjällräven, Evergoods—now use rPET extensively.
The caveat: rPET is still plastic. It still sheds microplastics, and at end of life it’s still difficult to recycle again. It’s better than virgin polyester, but it’s not a perfect solution. Think of it as harm reduction rather than environmental regeneration.
Recycled nylon (often branded as ECONYL) is similar—made from recovered fishing nets and industrial plastic waste. It’s more durable than rPET and better suited to heavy-duty applications, but carries the same end-of-life concerns.
Leather: The Complicated Classic
Full-grain vegetable-tanned leather is naturally water-resistant, extraordinarily durable (decades, not years), and biodegradable at end of life (unlike chrome-tanned leather). It’s also a byproduct of the meat industry, which means it doesn’t directly require animal agriculture for its existence—but it’s economically tied to it, which is a consideration for vegans.
Chrome-tanned leather, which accounts for the vast majority of global leather production, uses toxic chromium salts and generates significant wastewater pollution. If you choose leather, look specifically for vegetable-tanned, full-grain hides, and ideally from tanneries with certified environmental standards (e.g., LWG Gold-rated tanneries).
Emerging Materials: Piñatex, Cork, and Bio-Based Polymers
Piñatex (pineapple leaf fibre) and cork are gaining traction as vegan leather alternatives. Both are biodegradable and derived from renewable sources. Their durability in high-stress applications (like backpack bottoms and strap attachments) remains less proven than traditional materials, but they’re improving rapidly.
Bio-based polymers, partially derived from castor oil or corn starch, are beginning to appear in hardware and buckles, reducing reliance on fossil-fuel-based plastics.
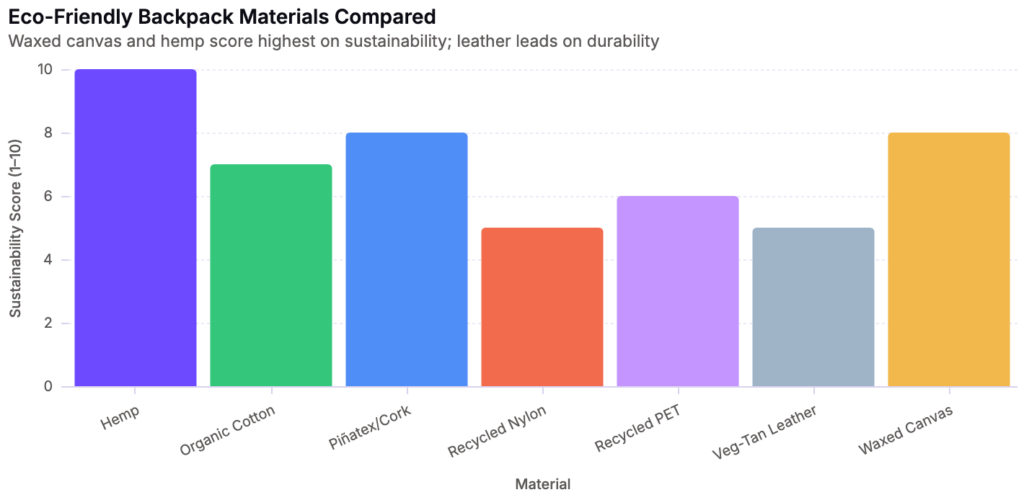
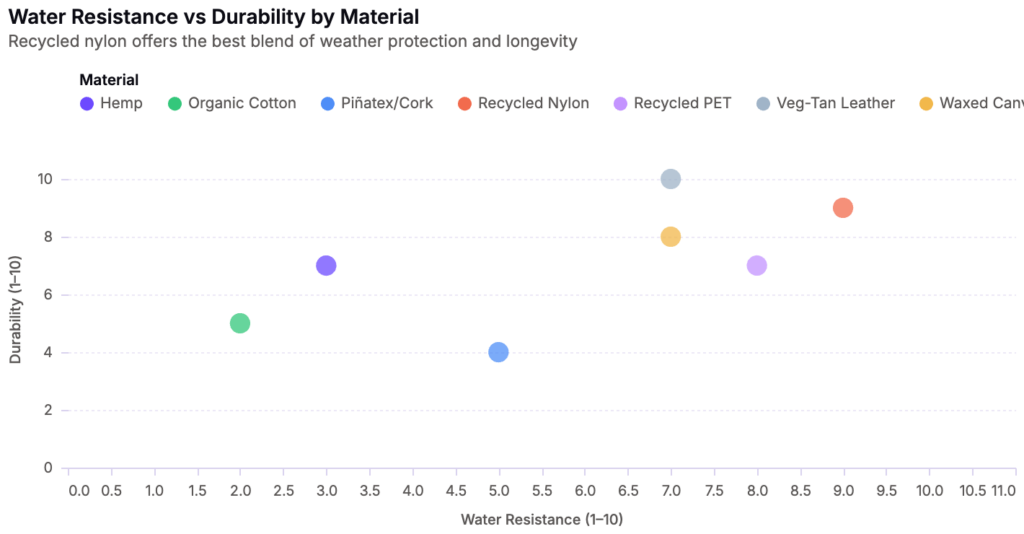
Material Comparison at a Glance
These chart illustrate a fundamental trade-off in sustainable backpack shopping: the most eco-friendly materials (hemp, organic cotton) tend to offer the least weather protection, while the most weather-resistant options (recycled nylon, rPET) are still fundamentally plastic. Waxed canvas occupies a sweet spot—natural, reasonably water-resistant, and highly durable—but it’s heavier than synthetic alternatives.
Choosing the Right Size: The Goldilocks Problem
Size is where most backpack buyers go wrong. Too small, and you’re constantly leaving things behind or awkwardly strapping items to the outside. Too large, and you’re tempted to fill empty space with unnecessary weight, straining your shoulders, back, and hips.
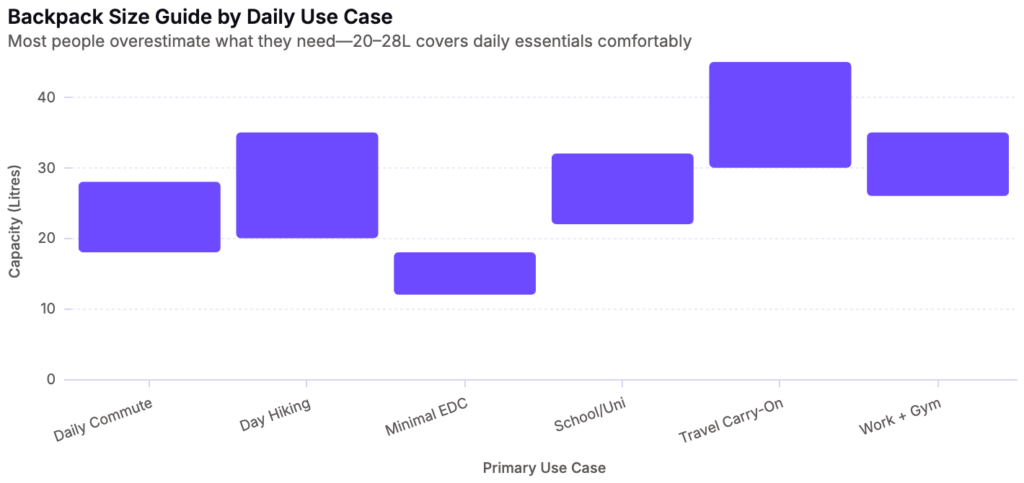
Here’s a practical framework based on capacity (measured in litres):
Rules of Thumb
Under 18L: Minimalist everyday carry (EDC). Phone, wallet, keys, tablet, light jacket, water bottle. Great for urban life when you’ve embraced minimalism.
20–28L: The sweet spot for most people. Fits a laptop, lunch, change of clothes, water bottle, and miscellaneous essentials without becoming a black hole. This is the range that transitions seamlessly from work to gym to weekend hike.
30–35L: Students, cyclists, and those who genuinely carry bulky items (textbooks, gym shoes, climbing gear). At this size, pay close attention to hip belt support and load-lifting straps—your shoulders alone can’t manage 30+ pounds comfortably for extended periods.
40L+: Travel territory. These should have proper suspension systems (frame, padded hip belt, load lifters). If you’re carrying 40L every day, seriously evaluate whether you need to.
The Weight Penalty Nobody Talks About
Here’s an often-overlooked truth: a larger backpack encourages a heavier load, and the strain on your body increases nonlinearly. A 15-pound load carried on poorly designed shoulder straps for an hour causes measurable discomfort. The same weight distributed through a hip belt and frame is barely noticeable. Before sizing up, ask: Do I actually need to carry this, or am I packing out of anxiety?
Ergonomics: Protecting Your Back, Shoulders, and Posture
An eco-friendly backpack that destroys your posture isn’t truly sustainable—it’s just shifting environmental cost onto your body. Here’s what to look for:
Padded, contoured shoulder straps are non-negotiable. Look for at least 15mm of closed-cell foam, shaped to follow the curve of your shoulders rather than cutting straight across. Sternum straps (the small connector across your chest) prevent straps from sliding off shoulders and improve load stability dramatically—especially when cycling or walking briskly.
Hip belts matter more than people think, even on smaller packs. Even a lightweight webbing hip belt transfers 20–30% of load weight to your pelvis, which is structurally far better equipped to bear weight than your relatively delicate trapezius muscles.
Back panels should provide ventilation channels to reduce sweating and have enough rigidity to prevent the pack contents from pressing unevenly against your spine. Some eco-conscious brands use recycled mesh or natural cork panels.
Load distribution is the real ergonomic secret. Pack heaviest items closest to your spine and higher up. Lighter, bulkier items go in the outer compartments. This keeps your centre of gravity aligned and reduces the rotational torque that causes lower back pain.
What to Look for in an Eco-Conscious Brand
Beyond materials, the company behind your backpack matters enormously. Greenwashing is rampant in the outdoor industry—here’s a checklist for evaluating brand authenticity:
Criteria
What to Look For
Material Transparency
Full disclosure of fabric composition, lining, hardware, and coatings. If a brand hides its material specs, that’s a red flag.
Supply Chain
Publishing factory locations, fair labour certifications (Fair Trade, SA8000), and traceability programs.
Repair Programs
Offering replacement parts, repair services, or lifetime warranties. A brand willing to fix your bag is invested in longevity.
Take-Back/Recycling
End-of-life programmes that accept old bags for recycling or upcycling rather than landfilling.
and smaller artisanal makers who handcraft waxed canvas and leather packs in small batches.
As an Amazon Associate I earn from qualifying purchases.
Water Resistance and the Eco-Friendly Catch
Here’s the rub that catches many sustainable shoppers: most truly waterproof backpacks rely on synthetic coatings and membranes. Polyurethane (PU) coatings, DWR (durable water repellent) treatments, and thermoplastic polyurethane (TPU) linings are all derived from petrochemicals. And the most effective waterproofing technology—expanded PTFE (the membrane in Gore-Tex)—involves fluorinated compounds that persist indefinitely in the environment (PFAS, or “forever chemicals”).
So what’s the eco-conscious alternative for wet climates?
Waxed canvas, as discussed, provides respectable water resistance through a natural mechanism. When rain hits waxed fabric, the wax causes water to bead and roll off. It’s not fully waterproof—sustained downpours will eventually penetrate—but it handles light to moderate rain admirably. Crucially, you can re-wax the fabric periodically (every 6–12 months depending on use), restoring its water resistance and extending its life for years or decades. This is sustainability in practice: maintenance over replacement.
Vegetable-tanned leather offers similar natural water resistance, again requiring periodic conditioning with natural oils or waxes.
For truly waterproof needs (commuting by bike in heavy rain, hiking in monsoon conditions), you may need to accept a hybrid approach: a natural-material backpack paired with a separate rain cover (which can be made from recycled materials and used only when needed) or dry bags inside your pack for electronics and documents.
The Mindset Shift: Carrying Less Is the Ultimate Sustainability
Here’s where we need to get honest. No backpack—however eco-friendly its materials—is truly sustainable if you’re using it to haul around 35 pounds of things you don’t need. The most environmentally responsible backpack decision might not be about which backpack to buy, but about how much you’re carrying and why.
Auditing Your Essentials
Consider doing a weekly “pack audit.” Empty your bag completely and sort contents into three categories:
Used today or will be used tomorrow – stays in the bag.
Used in the past week – candidate for staying, but question whether it needs to live in your bag permanently.
Hasn’t been touched in two weeks – remove it. If you need it unexpectedly, you’ll survive.
Most people find they can remove 20–40% of their bag’s contents through this exercise. Less weight means less strain on your body, less wear on the bag (extending its life), and—paradoxically—a greater sense of readiness, because you can actually find things quickly.
The Shared Culture Alternative
There’s a deeper philosophical point here worth considering. Much of what we carry is motivated by a desire for self-sufficiency—”I might need this, so I’d better have it.” But in communities with strong shared infrastructure, this burden shrinks dramatically:
Workplaces with proper lockers eliminate the need to carry gym clothes both directions.
Public libraries, maker spaces, and tool libraries mean you don’t need to own—or carry—specialised equipment.
Community bike repair stations along commuting routes reduce the need for full tool kits.
Shared kitchen facilities at co-working spaces mean you don’t need to lug lunch containers, cutlery, and condiments.
This isn’t about austerity—it’s about recognising that carrying everything yourself is a uniquely modern, individualistic assumption. Previous generations routinely relied on shared spaces and community infrastructure. Rebuilding that infrastructure, or simply tapping into what already exists, can lighten your load—literally and figuratively.
The most resilient “grab bag” for emergencies, after all, isn’t one stuffed with every conceivable item. It’s one with the essentials—documents, medications, cash, phone charger, first aid—organised so you can grab it and go, trusting that you can access additional resources through community networks.
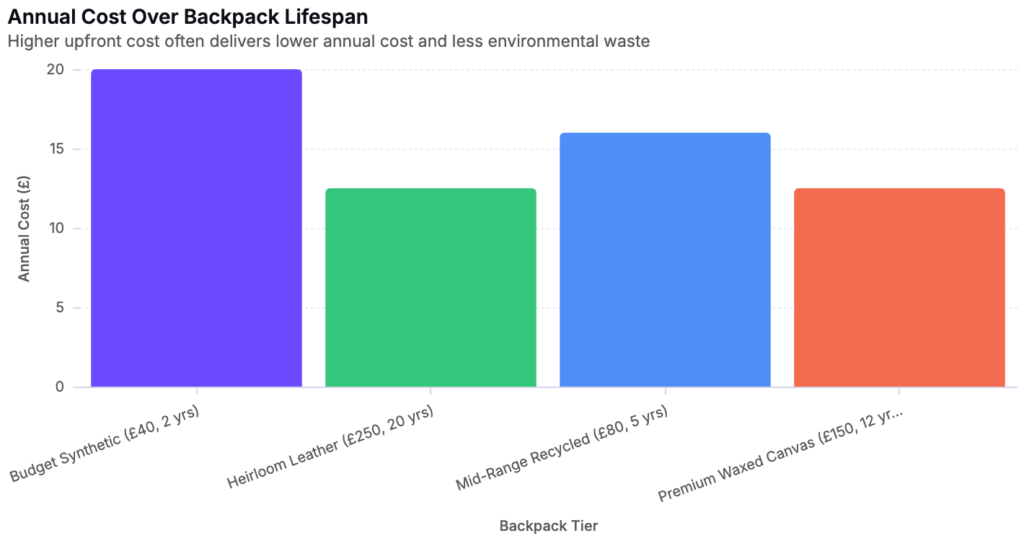
Price vs Lifespan: The Real Cost Calculation
A £40 backpack that lasts two years costs you £20/year. A £150 waxed canvas pack that lasts twelve years costs you £12.50/year. And the latter almost certainly has a lower environmental footprint per year of use.
This isn’t to say everyone should spend £250 on a backpack. Budget constraints are real. But if you can afford the upfront investment, buying fewer, better things is both financially and ecologically smarter over time.
Frequently Asked Questions
Can an eco-friendly backpack be truly waterproof?
Not fully waterproof in the way a synthetic dry bag is—but it can be highly water-resistant. Waxed canvas and vegetable-tanned leather both repel water naturally and can be re-treated periodically. For genuinely waterproof needs, pair a natural-material bag with a recycled-content rain cover or internal dry bags. The trade-off is between absolute waterproofing and material sustainability.
How do I re-wax a waxed canvas backpack?
You’ll need a block of wax (beeswax, paraffin, or a commercially blended wax like Fjällräven’s Greenland Wax). Apply evenly across the fabric surface, then use a hair dryer on medium heat to melt the wax into the fibres. Let it cure for 24 hours. The process takes about 20 minutes of active effort and restores water resistance for 6–12 months. It’s satisfying, meditative work—and a key reason waxed canvas lasts decades.
Are recycled polyester backpacks actually better for the environment?
Yes, incrementally. Producing rPET uses approximately 50–70% less energy than virgin polyester and diverts plastic bottles from landfill. However, rPET is still plastic—it sheds microplastics, doesn’t biodegrade, and is rarely recyclable at end of life. It’s harm reduction, not a complete solution. If your priority is maximum sustainability, natural materials remain preferable; if you need high performance and water resistance, rPET is a reasonable compromise.
What’s the ideal capacity for someone who bikes to work and hikes on weekends?
Look for a 24–30L pack with compression straps. Compression lets you cinch the bag down for commute loads (looking sleek and reducing sway while cycling) and expand it for weekend trails. Prioritise a sternum strap (critical for cycling stability) and consider a removable hip belt. A waxed canvas or rPET body with a ventilated back panel is ideal.
Is leather ethical?
This is genuinely complex and depends on your ethical framework. Vegetable-tanned leather is a byproduct of the meat industry—if you consume dairy or meat, the leather exists regardless of whether you buy it. Full-grain, veg-tanned leather is biodegradable and can last 20+ years, making its per-year environmental impact very low. However, chrome tanning (the dominant method globally) is highly polluting, and some people object to leather on principle regardless of sourcing. If you choose leather, seek out vegetable-tanned, full-grain hides from tanneries with environmental certifications.
How can I make my current backpack last longer?
Empty it fully each week and shake out debris. Spot-clean stains rather than machine washing (which damages coatings and shortens fibre life). Store it unzipped in a dry place to prevent mould. Replace worn zipper pulls before zippers fail. Apply seam sealer to high-stress seams annually. If a strap or buckle breaks, contact the manufacturer—many offer repair services or sell replacement parts. Every year of extended life is a year of avoided manufacturing impact.
What about vegan leather backpacks—are they eco-friendly?
It varies enormously. Piñatex (pineapple leaf fibre) and cork are promising biodegradable options with relatively low impact. However, many “vegan leather” products are actually polyurethane-coated fabric—essentially plastic with a marketing-friendly name. These shed microplastics and don’t biodegrade. If you’re choosing vegan leather for environmental reasons (rather than ethical ones), scrutinise the specific material carefully.
Final Thoughts: Buy Once, Carry Mindfully
The most sustainable backpack is the one you already own, used thoughtfully and maintained with care. If you’re in the market for a new one, the hierarchy of environmental preference generally runs: repair your current bag → buy a high-quality used bag → invest in a durable natural-material pack → choose recycled synthetics → avoid virgin synthetic fast-fashion packs.
Within that framework, the ideal purchase for most people looks something like this: a 20–28L waxed canvas or high-recycled-content backpack, with proper shoulder strap padding, a sternum strap, and enough organisational pockets to keep essentials accessible without encouraging hoarding. Something that looks good on a train platform and on a forest trail. Something that can be repaired, re-waxed, and re-loved for a decade or more.
Because the real luxury in a chaotic world isn’t having everything with you—it’s knowing that what you have is enough, and that the bag on your back wasn’t bought at the planet’s expense.
Have a question about eco-friendly backpacks that we didn’t cover? Drop a comment below, and we’ll update this guide as new materials, brands, and innovations emerge.
Walk into most modern homes and offices, and you’ll encounter a familiar scene: sleek furniture, curated accessories, perhaps some artwork—but increasingly, spaces feel emotionally muted and visually static. Worse yet, many conventional decorative materials silently emit volatile organic compounds (VOCs) that can linger in indoor air for years. From pressed wood furniture treated with formaldehyde to synthetic textiles releasing chemical off-gassing, our decorated environments can inadvertently compromise wellness.
There’s a growing movement toward biophilic design—incorporating natural elements into built spaces—and at its heart sits one of the simplest, most accessible solutions: houseplants.
Living plants offer vibrant, ever-changing decoration that evolves with seasons and care. Some varieties may contribute to air purification (though the science is nuanced). Flowering plants bring color and fragrance; culinary herbs provide dual visual and edible benefits. Research suggests exposure to plants can reduce stress and improve mood. Yet the promise comes with conditions: poorly cared-for plants can develop mold, attract pests, or die—a draining sight that defeats the purpose.
This comprehensive guide helps you navigate houseplants as intentional, healthy decor—from selecting the right species for your micro-climate to troubleshooting common problems and considering cut flower alternatives.
The Air Purification Question: What Does Science Actually Say?
One of the most popular claims about houseplants is their ability to “clean” indoor air. This originated from NASA’s 1989 Clean Air Study, which tested plants in sealed chambers designed to simulate space station conditions. The research found that certain species—including snake plant, peace lily, bamboo palm, spider plant, and dracaena—could absorb VOCs like benzene, formaldehyde, trichloroethylene, xylene, and toluene [Wikipedia, NASA Clean Air Study].
NASA suggested roughly one plant per 100 square feet for noticeable effects [Marcum’s Nursery].
However, subsequent research has added important nuance. A 2017 review published by the American Lung Association analyzed real-world indoor environments and concluded that while plants do remove pollutants in laboratory chambers, achieving comparable results in typical homes would require an impractically dense coverage—estimated at 10 to 1,000 plants per square meter [American Lung Association]. In other words: houseplants alone are insufficient for meaningful indoor air quality control.
The takeaway? Don’t rely on plants as your primary air filtration method. But this doesn’t diminish their value. Plants still contribute marginally to VOC removal (both through foliage and soil microorganisms), and their psychological and aesthetic benefits are well-documented regardless of air-cleaning capabilities. Think of them as one component of a holistic approach to healthier interiors—not a standalone solution.
Selecting Your First Houseplants: Matching Species to Environment
Choosing the wrong plant for your space is the fastest route to disappointment. Before purchasing, assess these three factors:
Solution: Allow top 1–2 inches of soil to dry between waterings. Ensure pots have drainage holes. Consider bottom-watering to encourage deep root growth without saturating soil.
Fungus Gnats and Soil Mold
Fungus gnats are tiny flies resembling mosquitoes whose larvae feed on organic matter and roots in damp soil. They’re annoying to humans but rarely fatal to established plants—except seedlings and vulnerable specimens [Scotts Miracle-Gro, Plant Perfect].
Prevention:
Avoid keeping soil constantly moist
Add a ¼-inch layer of horticultural sand to soil surface to deter egg-laying
Place yellow sticky traps near affected plants to catch adults
Treatment:
Soil drench with diluted hydrogen peroxide (1 part 3% H₂O₂ to 4 parts water) weekly
Neem oil spray on foliage and soil
Remove dead leaves and increase airflow with fans
Repot in fresh sterile potting mix if infestation persists
Powdery Mildew and Fungal Spots
Mold flourishes in stagnant, humid conditions without air circulation.
Prevention:
Space plants apart to improve airflow
Wipe dusty leaves regularly
Use a small fan to circulate air in enclosed spaces
Quarantine new plants for 2–3 weeks before introducing to existing collection
Solution: Move closer to windows or supplement with grow lights. Rotate plants weekly for even exposure.
Flowering Houseplants: Color and Fragrance Without Daily Bouquets
Flowering plants deliver the visual payoff of cut blooms with lasting presence. While they typically bloom seasonally rather than continuously, a rotating selection keeps displays dynamic.
Best Indoor Flowering Options
Plant
Bloom Season
Light Requirements
Duration
Orchid (Phalaenopsis)
Winter to spring
Bright indirect, no direct sun
Weeks to months per spike
Anthurium
Year-round with proper care
Bright indirect
Individual flowers last weeks
African Violet
Year-round
Bright indirect (no cold drafts)
Continuous blooming cycle
Kalanchoe
Winter
Bright light
Several weeks of clustered blooms
Flowering varieties generally demand slightly more attention than foliage-only plants—consistent light, occasional fertilization during growing season, and deadheading spent blooms encourage reblooming.
Culinary Herbs: Dual-Purpose Greenery
Kitchen windowsills offer perfect micro-climates for edible plants that simultaneously decorate and feed. Culinary herbs require bright light and regular harvesting (which encourages bushier growth).
Best Kitchen Herbs
Herb
Light Needs
Water Frequency
Harvest Cycle
Basil
Bright direct
Keep moist
Harvest regularly; cut back frequently
Mint
Medium to bright
Regular
Spreads aggressively; pot separately
Chives
Bright indirect
Moderate
Cut and regrow multiple times
Rosemary
Bright direct
Let soil dry between
Slow-growing but long-lived
Thyme
Bright direct
Dry between waterings
Woody; harvest tender tips
Note: Most culinary herbs originate from Mediterranean climates and prefer less humidity than tropical foliage plants. Bathroom or bedroom locations with lower light often fail to sustain them.
Cut Flowers: A Temporary Alternative
For those unwilling to commit to ongoing plant care, cut flower arrangements provide immediate visual and aromatic impact. They offer distinct advantages:
Pros of Cut Flowers:
Instant transformation of space
Stronger fragrance than most houseplants
Easy to match room color schemes
No watering or light requirements beyond display
Convey personal gestures (gifts from loved ones)
Cons of Cut Flowers:
Begin wilting within days
Shed petals requiring cleanup
Generate recurring cost and waste
Generate no long-term greenery
Require frequent replacement to maintain effect
Studies comparing mental health impacts found both options contribute to mood improvement, focus, and welcoming atmospheres. However, live plants provide sustained presence while cut flowers offer episodic emotional boosts [Elle Decor, Bouqs Blog].
For special occasions, guest rooms, or short-term decorating needs, cut flowers excel. For permanent decor strategies, live plants remain more economical and environmentally sustainable long-term.
Creating Your Personal Plant Micro-Climate Strategy
Successful indoor gardening isn’t about buying the “easiest” plant—it’s about matching species to your specific space conditions. Follow this systematic approach:
Step 1: Audit Your Spaces
Map each room’s characteristics:
Window orientation and hours of sunlight
Temperature consistency (away from HVAC vents?)
Humidity levels (bathrooms and kitchens run higher)
Foot traffic (high-traffic zones risk knock-over damage)
Step 2: Start Small
Begin with one or two low-maintenance varieties suited to your highest-light area. Master their care patterns before expanding.
Step 3: Establish a Routine
Check plants weekly at consistent times. Stick fingers into soil rather than relying on surface appearance. Create reminders if necessary.
Step 4: Document Observations
Note which plants thrive where. Take monthly photos to spot gradual changes. This builds intuition for future purchases.
Shopping Guide: Where to Buy and What to Look For
Retail Options
Option
Pros
Cons
Local Nurseries
Expert advice, healthier stock, rare varieties
Higher prices, limited hours
Big-Box Stores
Convenient, budget-friendly
Variable plant health, less knowledgeable staff
Online Plant Shops
Wide selection, delivered to door
Shipping stress on plants, can’t inspect before purchase
Plant Swaps
Free or low-cost, community learning
Limited availability, variable quality
Pre-Purchase Inspection Checklist
Before buying, examine plants for:
Firm, turgid leaves (not drooping or crispy)
Uniform coloration (avoid yellowing or brown spots)
No visible insects or webbing on undersides
Roots not circling heavily around pot interior
Soil free of fungus or white cottony mold
Stable stem structure (not leaning excessively)
FAQ Section
Q: Do houseplants really clean the air?
A: Research shows plants absorb VOCs in controlled laboratory settings, but real-world effectiveness is limited. A 2017 review found you’d need 10–1,000 plants per square meter for measurable air quality improvement. Plants contribute marginally but shouldn’t replace ventilation or air purification systems [American Lung Association, NASA Clean Air Study].
Q: How often should I water my houseplants?
A: There’s no universal schedule. Water when the top 1–2 inches of soil feel dry to touch. Overwatering kills more plants than underwatering. Use pots with drainage holes to prevent root rot.
Q: Which houseplants are safe for cats and dogs?
A: Pet-safe options include spider plants, parlor palms, calatheas, prayer plants, and button ferns. Avoid pothos, peace lilies, snake plants, monstera, and philodendrons if pets might chew foliage [ASPCA guidelines].
Q: My plants keep dying. What am I doing wrong?
A: The most common culprits are overwatering, insufficient light, or mismatched plant-to-environment pairing. Start with tough varieties like snake plants or ZZ plants, assess your actual light conditions honestly, and resist the urge to water daily.
Q: Are cut flowers better than houseplants for decorating?
A: It depends on goals. Cut flowers provide instant, intense visual impact with stronger fragrance but require frequent replacement and generate waste. Houseplants offer sustainable, evolving decoration with long-term cost efficiency. Many people use both strategically: permanent greenery as foundation, cut blooms for special occasions.
Q: Can I keep plants in rooms without windows?
A: Most plants require some natural or artificial light. Rooms without windows can accommodate very low-light tolerant species like snake plants or ZZ plants for short periods, but they’ll eventually decline without supplemental grow lighting.
Q: Why do my plants develop mold on the soil?
A: Surface mold indicates excess moisture and poor air circulation. Remove the mold layer, allow soil to dry, add horticultural sand topping, and improve airflow. Consider repotting if problem persists.
Q: Do flowering plants require more care than foliage plants?
A: Generally yes. Flowering plants need consistent light cycles, seasonal fertilization, and deadheading to rebloom. However, some varieties like African violets bloom year-round with basic care.
Final Thoughts: Plants as Intentional Design Elements
Houseplants represent more than trendy décor—they embody a philosophy of intentional, living spaces that evolve alongside their inhabitants. Success requires honest assessment of your environment, patience in learning care rhythms, and acceptance that imperfection is part of the process.
Don’t chase perfection. A single thriving snake plant contributes more vitality than ten neglected specimens. Start where you are, learn from mistakes, and let your collection grow organically. Whether you seek air quality improvements, stress reduction, or simply a more inviting atmosphere, the right plants in the right places transform sterile spaces into living sanctuaries.
And remember: if maintenance proves overwhelming, cut flowers offer valid alternative beauty. The goal isn’t botanical expertise—it’s creating environments that nurture both you and your chosen green companions.
Research Sources: NASA Clean Air Study (Wikipedia), American Lung Association, Planet Natural, Proven Winners, Southern Living, Scotts Miracle-Gro, Elle Decor, Bouqs Blog
Every time you open your pantry, you’re looking at a quiet environmental crisis. Those crinkly plastic bags, the flimsy clamshell packaging, the single-use wrap—they all add up. The average household throws away hundreds of pieces of food packaging waste each year, much of it not recyclable through municipal programs. But beyond the environmental toll, there’s a practical frustration we’ve all felt: packages that are absurdly oversized for the food they contain, bags that won’t seal properly after opening, and containers that hide deceptively small portions behind bulky cardboard.
Enter the eco-friendly food storage container—a seemingly simple solution that can transform your pantry, reduce your waste footprint, and even save you money over time. But choosing the right containers isn’t as straightforward as it seems. Different foods have wildly different storage needs. Some ingredients demand airtight seals to stay fresh; others will mold overnight if they can’t breathe. Materials matter enormously—not just for sustainability, but for food safety, durability, and ease of cleaning. And then there are the hidden trade-offs: the extra maintenance required, the logistics of transporting bulk foods, and the question of whether communal arrangements might serve you better than going it alone.
This guide walks you through everything you need to know to make informed, sustainable choices for your kitchen storage.
Why Eco-Friendly Food Storage Containers Matter
The Packaging Waste Problem
Food packaging accounts for a significant portion of household waste. According to the EPA, containers and packaging represent the largest category of municipal solid waste—over 80 million tons annually in the United States alone. Much of this is food-related: chip bags, pasta boxes, rice sacks, spice jars, produce clamshells, and the endless parade of plastic tubs.
Many of these materials aren’t accepted by standard curbside recycling programs. Multi-layered snack bags, black plastics, polystyrene foam trays, and grease-stained paperboard routinely end up in landfills. Even “recyclable” plastics degrade in quality with each cycle and often can’t be recycled more than once or twice.
Eco-friendly food storage containers break this cycle. By transferring ingredients from disposable packaging into durable, reusable containers, you eliminate the need for ongoing single-use packaging. One high-quality glass jar can replace hundreds of plastic bags over its lifetime.
Beyond Waste: Freshness, Visibility, and Organization
The benefits extend well beyond waste reduction. Proper food storage containers:
Extend shelf life by creating optimal environments (airtight for dry goods, ventilated for produce)
Reduce food waste by keeping ingredients visible and organized, so nothing gets lost in the back of the pantry until it’s spoiled
Enable bulk purchasing, which is typically cheaper per unit and uses less packaging per quantity of food
Improve kitchen aesthetics—a row of matching glass jars on open shelelling looks far more appealing than a jumble of half-crumpled bags
Simplify meal prep by making ingredients easy to identify and access
Understanding Different Food Storage Needs
Before diving into container types, it’s essential to understand that not all foods want the same environment. Choosing the right container means matching the storage method to the ingredient.
Foods That Need Airtight Storage
These ingredients are vulnerable to moisture, pests, and oxidation:
Grains and legumes (rice, quinoa, lentils, beans, oats)—moisture causes clumping and mold; pantry moths can infiltrate poorly sealed packages
Flours and baking supplies—particularly susceptible to weevils and rancidity
Nuts and seeds—oxidize and go rancid when exposed to air and light
Coffee beans and tea—lose flavor rapidly when exposed to air
Dried fruit—becomes overly dry and tough if left uncovered
Spices—lose potency when exposed to air and humidity
Foods That Need Ventilation
Some ingredients actually deteriorate when sealed too tightly:
Onions and garlic—need airflow to prevent mold and sprouting; airtight containers cause rotting
Tomatoes—should never be stored in airtight containers at room temperature; they need to breathe
Mushrooms—store best in breathable paper bags or vented containers
Root vegetables (carrots, beets, turnips)—benefit from some humidity but also need airflow
Bananas—should be kept in open air, away from other produce (they release ethylene gas)
Foods With Special Requirements
Berries—need ventilation but also humidity control; best in containers with built-in vents
Leafy greens—benefit from slight moisture; a damp cloth inside a loosely closed container works well
Cheese—needs to breathe slightly; wrapping in beeswax or storing in containers with small air gaps prevents suffocation while limiting drying
Bread—freezes well in airtight containers but stales faster in the refrigerator; countertop storage in breathable cloth bags is ideal for short-term use
Materials Comparison: Which Eco-Friendly Container Material Is Right for You?
This is where most buyers get overwhelmed. The market offers several materials, each with distinct advantages and drawbacks. Here’s a comprehensive comparison:
Material
Sustainability
Durability
Food Safety
Visibility
Weight
Best For
Glass (Borosilicate)
★★★★★ Endlessly recyclable, inert
★★★☆☆ Breakable but long-lasting
★★★★★ Non-reactive, no leaching
★★★★★ Fully transparent
Heavy
Dry goods, leftovers, fridge storage
Stainless Steel
★★★★★ Recyclable, extremely durable
★★★★★ Nearly indestructible
★★★★★ Non-reactive, no leaching
★☆☆☆☆ Opaque
Medium
Lunchboxes, pantry dry goods, outdoor use
Ceramic/Stoneware
★★★★☆ Made from natural materials
★★★☆☆ Chip-prone but can last decades
★★★★★ Inert if lead-free glaze
★☆☆☆☆ Opaque
Heavy
Countertop storage (sugar, coffee), serving
Silicone
★★★☆☆ Durable but not widely recycled
★★★★☆ Flexible, tear-resistant
★★★★☆ Food-grade is safe; concern over fillers
★★☆☆☆ Usually translucent
Light
Lids/seals, collapsible containers, freezer
Bamboo
★★★★☆ Renewable, biodegradable
★★★☆☆ Can crack or warp over time
★★★★☆ Natural; some finishes may contain chemicals
★☆☆☆☆ Opaque
Light
Produce storage, decorative pantry
Beeswax Wrap
★★★★★ Biodegradable, compostable
★★☆☆☆ Lasts months to ~1 year
★★★★★ All-natural
N/A
Very light
Wrapping cheese, bread, covering bowls
Cotton/Muslin Bags
★★★★★ Biodegradable, washable
★★★☆☆ Wear over time
★★★★★ Natural fiber
N/A
Very light
Produce, bulk shopping transport
Deep Dive: Glass vs. Stainless Steel
These are the two heavyweights in the eco-friendly container world, and the choice between them comes down to lifestyle factors:
Glass wins on transparency—you can see exactly what’s inside and how much remains without opening the container. It’s microwave-safe, doesn’t absorb odors or stains, and is generally considered the safest food-contact material. Borosilicate glass (used in brands like Pyrex and Glasslock) resists thermal shock better than standard soda-lime glass. However, glass is heavy, breakable, and not ideal for travel or households with young children.
Stainless steel is the adventurer’s choice. It’s lightweight relative to its strength, virtually indestructible in normal use, and impervious to staining or odor absorption. It’s the go-to for lunchboxes, camping, and outdoor kitchens. The downside? You can’t see through it, it’s not microwave-safe, and acidic foods can sometimes impart a metallic taste if stored for very long periods (though high-quality 304/316 stainless steel largely mitigates this).
Key Factors to Consider When Buying Eco-Friendly Food Storage Containers
1. Seal Quality and Mechanism
The seal is the heart of any food storage container. Look for:
Silicone gaskets—provide excellent airtight seals; removable for cleaning is essential
Locking clamp lids (bail-wire closures)—classic Mason jar style; reliable and long-lasting
Push-button air removal systems—found in premium containers; create near-vacuum conditions
Screw-top lids—simple and effective for jars; ensure threads are robust
Vent ports—for produce containers; adjustable vents let you control airflow
Avoid containers with glued-on gaskets or non-replaceable silicone seals, as these are the first components to wear out and will render the container useless when they fail.
2. Stackability and Space Efficiency
Kitchen space is precious. Containers that nest when empty and stack neatly when full dramatically improve pantry organization. Square and rectangular containers make more efficient use of shelf space than round ones—typically 25–30% more efficient. Modular systems designed to fit together in standardized dimensions (like OXO POP (affiliate link) or Container Store’s Elfa line) are ideal if you’re building a system from scratch.
3. Lid Compatibility and Standardization
One of the most frustrating aspects of food storage is the “lid drawer” problem—endless mismatched lids and containers. Choose a brand ecosystem that uses standardized lid sizes across multiple container volumes. This reduces clutter, simplifies finding the right lid, and means if one container breaks, its lid still serves others.
4. Cleaning Ease
Consider how easy containers are to clean thoroughly:
Wide-mouth openings allow hand and brush access
Removable silicone gaskets prevent mold buildup in crevices
Dishwasher-safe components (check both container and lid)
Avoid containers with complex hinge mechanisms or narrow necks that trap food residue
5. Transparency and Labeling
Clear containers let you monitor freshness and inventory at a glance. If using opaque containers (stainless steel, ceramic), invest in a labeling system—chalkboard labels, erasable markers on glass, or simple masking tape. Some premium containers include built-in date-tracking dials on the lid.
6. Size Range and Versatility
A good container system should offer sizes ranging from small (spices, nuts—4–8 oz) to large (flour, grains, pasta—up to 1 gallon or more). Having a range lets you right-size containers to contents, reducing excess air that can accelerate staleness.
Comparison Chart: Popular Eco-Friendly Food Storage Container Brands
As an Amazon Associate I earn from qualifying purchases.
Add larger containers for bulk grain/flour/sugar storage
Invest in stainless steel containers for lunch transport
Add specialized produce storage containers with vents (berries, greens)
Spice jars (standardize to one size—small Mason jars or dedicated spice containers)
Phase 3: Optimization (Months 3–6)
Replace remaining plastic containers as they wear out
Add vacuum-sealing capability for long-term storage of nuts, seeds, dried fruit
Consider a labeling system (consistent labels, marker type, or erasable options)
Evaluate whether your storage system supports bulk buying habits—are containers readily available when you shop?
The Hidden Trade-Offs: What Nobody Tells You
The Cleaning Burden
Eco-friendly containers require maintenance. Unlike disposable packaging—which you simply toss—reusable containers must be washed, dried, and stored. This is real labor, and it compounds with each container in your collection.
Tips to minimize the burden:
Establish a dishwashing routine that includes container cleaning
Choose dishwasher-safe containers whenever possible
Dry containers completely before sealing to prevent mold
Clean gaskets and seals weekly—they’re mold hotspots
Line containers for sticky/oily ingredients with compostable parchment or reusable silicone liners
The Transport Problem
Buying in bulk reduces packaging, but it creates a logistical challenge: how do you get loose food from the store to your home? Options include:
Reusable cloth bags (cotton, muslin, or hemp)—lightweight, washable, ideal for dry goods
Silicone bags—leakproof, good for wetter bulk items like nut butters or liquids
Glass jars with tare weight recorded—some zero-waste stores allow you to bring your own jars and deduct the container weight at checkout
Collapsible containers—save bag space when empty
The reality is that some zero-waste shopping requires planning and extra bags, which themselves represent additional packaging (albeit reusable). It’s not a perfect system, but it’s far better than the disposable alternative.
The Upfront Cost
Quality eco-friendly containers cost more upfront than disposable packaging. However, the long-term economics are compelling. If a glass jar costs $5 and replaces 200 plastic bags at $0.03 each, it pays for itself within months and continues saving money for years. The key is buying durable containers that last—cheap plastic “reusable” containers that crack within a year are false economy.
Alternative Approaches: Community and Scale
Communal Kitchen Arrangements
Not everyone needs to own a complete set of storage containers individually. Communal or shared kitchen arrangements—common in co-housing communities, student cooperatives, and intentional living situations—offer several advantages:
Shared container libraries distribute the cost and cleaning burden across many members
Bulk purchasing power enables group orders of staples (50 lb sacks of flour, bulk beans, wholesale nuts) that individuals couldn’t justify
Specialized containers (large fermentation crocks, vacuum sealers, dehydrators) become affordable when shared
Cleaning rotations make maintenance less burdensome for any single person
If you live in a situation where shared kitchens are feasible—roommate households, apartment buildings with community kitchens, co-housing, or co-ops—this model can significantly amplify the sustainability and cost benefits of eco-friendly storage.
Specialty Recycling Services
Even with the best intentions, some food packaging cannot be avoided. Condiment bottles with multi-material construction, snack bags with foil linings, polystyrene meat trays—these often fall outside municipal recycling capabilities.
Specialty recycling services fill this gap:
Terracycle offers free and paid programs for hard-to-recycle packaging, including snack wrappers, coffee capsules, and beauty product containers
Local zero-waste stores increasingly offer collection points for packaging their customers bring back
Mail-in recycling programs from brands like Gimme 5 (for #5 plastics) accept specific containers
Community recycling events periodically accept items not taken curbside
These services don’t eliminate the need for reduced consumption, but they provide a safety net for packaging that’s difficult to avoid.
FAQ: Common Questions About Eco-Friendly Food Storage Containers
Are glass containers really better for the environment than plastic?
In almost all cases, yes. Glass is infinitely recyclable without quality loss, doesn’t leach chemicals into food, and typically lasts far longer than plastic. The main environmental drawback of glass is its weight, which increases transportation emissions, and the energy intensity of production. However, because glass containers can last decades and are fully recyclable, their lifetime environmental impact is generally lower than repeatedly purchasing disposable or short-lived plastic containers.
Can I store acidic foods in stainless steel?
High-quality food-grade stainless steel (304/18-8 or 316 grade) is non-reactive and safe for most foods, including acidic ones like tomatoes and citrus. Lower grades of stainless steel (such as 201 or 430) may react with highly acidic foods over extended storage periods. When in doubt, check the manufacturer’s grade specification. For long-term storage of acidic foods, glass remains the gold standard.
Are silicone containers truly eco-friendly?
Silicone occupies a middle ground. It’s more durable than plastic, doesn’t leach harmful chemicals, and withstands extreme temperatures. However, it’s not biodegradable and recycling options are limited—most municipal programs don’t accept silicone. It’s a better choice than single-use plastic, but less sustainable than glass or stainless steel. Its key advantage is flexibility and versatility (freezer, microwave, dishwasher, oven-safe), which can reduce the number of different containers needed.
How do I keep pantry moths out of my containers?
Pantry moths (Indian meal moths) can infiltrate seemingly sealed containers. To prevent infestation:
Ensure containers are truly airtight—test the seal by pressing down on the lid; you should feel resistance
Inspect bulk grains and flours before transferring to containers—freeze new grains for 72 hours to kill any eggs
Keep containers clean and dry
Store susceptible items (grains, flour, nuts) in glass jars with rubber-gasket lids, which moths cannot penetrate
Use bay leaves in the pantry as a natural deterrent
What’s the best way to label glass containers?
Several effective labeling methods exist:
Chalkboard labels with liquid chalk markers—erasable, reusable
Washi tape with permanent marker—removable without residue
Dry-erase markers directly on glass—works well on smooth surfaces; easily wiped off
Engraved labels—permanent option for frequently used containers
Masking tape and pen—inexpensive, functional, won’t leave residue if removed within a few weeks
Avoid permanent adhesive labels on glass, as they leave stubborn residue.
Is it safe to freeze food in glass containers?
Yes, with precautions. Use borosilicate glass or specifically freezer-rated glass containers. Leave at least 1 inch of headspace to allow for expansion. Avoid putting frozen glass directly into a hot oven or vice versa—thermal shock causes cracking. Tempered soda-lime glass (standard Mason jars) can be frozen but is more prone to cracking than borosilicate. Wide-mouth jars are safer than narrow-neck jars for freezing, as the wider opening accommodates expansion more gracefully.
How do I transition from plastic to eco-friendly containers on a budget?
Start with Mason jars—they’re the most cost-effective entry point ($1–3 per jar). Gradually replace plastic containers as they wear out, prioritizing the most-used sizes first. Repurpose glass jars from purchased foods (pasta sauce, jam, pickles) after thorough cleaning. Shop thrift stores and secondhand marketplaces for quality containers at reduced prices. Focus on high-impact swaps first: the containers holding your most frequently used pantry staples.
Can I use beeswax wraps in place of all plastic wrap?
Beeswax wraps excel at covering bowls, wrapping cheese, bread, and firm produce—but they have limitations. They’re not ideal for wrapping raw meat, very wet foods, or for freezer storage. They typically last 6–12 months with proper care and can be re-waxed to extend life. For the applications they do cover well, they’re an excellent single-use wrap replacement. For raw meat and freezer storage, consider silicone lids or silicone bags as alternatives.
Quick-Reference Decision Matrix
Your Need
Recommended Container
Material
Approximate Cost
Dry pantry staples (rice, flour, beans)
Large airtight jar
Glass
$5–15
Spices
Small jars with shaker lids
Glass
$1–4 each
Fresh berries
Vented produce container
Glass or BPA-free plastic
$10–20
Onions/garlic
Wire basket or mesh bag
Metal or cotton
$10–15
Leafy greens
Container with vent + damp cloth
Glass
$10–15
Lunch transport
Leakproof container with compartments
Stainless steel or glass
$15–35
Cheese/bead
Beeswax wrap or cloth bag
Beeswax or cotton
$10–20
Bulk shopping transport
Cloth drawstring bags
Cotton/muslin
$2–5 each
Leftovers (fridge)
Glass with snap lid
Glass
$8–15 each
Freezer storage
Freezer-safe glass or silicone bag
Glass or silicone
$10–25 each
Coffee beans
Dark or opaque airtight container
Ceramic or stainless steel
$15–30
Conclusion: Building a Sustainable Kitchen, One Container at a Time
Transitioning to eco-friendly food storage containers is one of the highest-impact changes you can make in your kitchen—both environmentally and practically. It reduces waste, saves money over time, extends food freshness, and transforms chaotic pantries into organized, beautiful spaces.
The journey doesn’t require an overnight overhaul. Start with what you have—repurposed jars, a few strategic purchases, and a commitment to replacing disposables as they run out. Build gradually, choose materials that match your lifestyle and the foods you cook with, and don’t be afraid to experiment with communal solutions if they fit your living situation.
The perfect eco-friendly kitchen isn’t about having a Pinterest-ready wall of matching jars. It’s about making thoughtful choices that reduce waste, keep food fresher, and make your daily cooking routine simpler and more enjoyable. Every container you switch is a small vote for a less wasteful future—and those votes add up.
Ready to start your eco-friendly pantry transformation? Begin with a visit to your local bulk store, a handful of Mason jars, and a plan to phase out disposables one swap at a time. Your kitchen—and the planet—will thank you.
In a world of increasingly expensive fitness trends, high-tech gym memberships, and equipment-heavy sports, walking stands out as a refreshing exception. It requires no special membership, minimal gear, and can be enjoyed by virtually anyone with mobility. The health benefits are well-documented: studies consistently show regular walking improves cardiovascular health, aids weight management, boosts mental wellbeing, and can extend lifespan.
Yet many people overlook walking because they believe their footwear isn’t suitable. The wrong shoes can turn a pleasant walk into a painful ordeal, leading to blisters, joint strain, and eventual abandonment of the activity altogether. Conversely, investing in proper walking shoes can unlock years of accessible exercise.
This comprehensive guide addresses exactly that gap. Whether you’re a senior looking for comfortable daily walkers, a parent seeking budget-friendly options for family walks, or someone recovering from injury who needs supportive footwear, this guide will help you navigate the crowded market of walking shoes and find the perfect pair for your needs.
Why Walking Shoes Matter More Than You Think
The Science Behind Proper Footwear
Walking may seem simple, but each step involves approximately 20 muscles working together. Your feet absorb forces equivalent to 1-1.5 times your body weight with every stride. Without proper support, these forces travel up through your ankles, knees, hips, and spine, potentially causing chronic pain over time.
Proper walking shoes provide:
Cushioning: Reduces impact stress on joints
Arch support: Maintains natural foot alignment
Heel stability: Prevents excessive rolling inward or outward
Breathability: Keeps feet dry and prevents fungal infections
Traction: Reduces slip-and-fall risk on varied surfaces
Who Benefits Most from Quality Walking Shoes?
Demographic
Primary Benefit
Key Shoe Features Needed
Seniors (65+)
Fall prevention, joint protection
Wide toe box, strong heel counter, easy closures
People with diabetes
Circulation protection, pressure distribution
Seamless interior, extra depth, diabetic-approved
Overweight individuals
Impact reduction, arch support
Maximum cushioning, motion control, durable outsole
Flat-footed walkers
Pronation control
Stability features, firm midsole, structured arch
High-arched walkers
Shock absorption
Flexible sole, generous cushioning, neutral support
Plantar fasciitis sufferers
Heel pain relief
Heel cup, arch support, rigid shank
Budget-conscious buyers
Value without sacrificing health
Mid-range brands, versatile models, durability
Understanding Walking Shoe Categories
Not all “walking” shoes are created equal. The market has become flooded with products using the term loosely. Here are the main categories:
1. Dedicated Walking Shoes
Specifically engineered for walking mechanics. These typically have:
Rocker sole geometry to facilitate the heel-to-toe rolling motion
Softer cushioning than running shoes (walking generates less impact but more repetitive motion)
Flex grooves at the ball of the foot for natural movement
Often lighter construction than athletic sneakers
2. Running Shoes Used for Walking
Many people successfully walk in running shoes, which offer:
Superior cushioning for joint protection
Excellent durability for high-mileage walking
Strong arch support systems
Drawbacks: may be overly stiff, too aggressive tread for pavement, higher cost
3. Athletic Sneakers (Cross-Trainers)
General-purpose athletic shoes that work for walking plus other activities:
Versatile for mixed workouts
Moderate cushioning and support
Often better value if you do multiple activities
Compromise: may not excel at any single purpose
4. Orthopedic/Therapeutic Walking Shoes
Medical-grade footwear for specific conditions:
Prescription-adjacent designs
Accommodate custom orthotics
Extra width and depth options
Higher cost, often insurance-covered with documentation
5. Budget Walking Shoes
Entry-level options under $60:
Basic cushioning and support
Suitable for occasional walkers
Limited durability (typically 300-400 miles)
Good starting point for beginners unsure of commitment
Essential Features to Evaluate
Cushioning Systems
Different materials serve different needs:
EVA Foam: Lightweight, moderately cushioned, common in budget shoes. Good for casual walkers.
Polyurethane: Denser, more durable, lasts longer but heavier. Ideal for overweight walkers or those needing maximum support.
Gel/Cushion Inserts: Brand-specific technologies (like ASICS Gel or Brooks DNA Loft). Premium comfort, higher price point.
Air Chambers: Nike Air or similar. Responsive feel, good energy return, variable durability.
Recommendation: Try before you buy. Walk around the store for several minutes. If you feel hard spots or uneven pressure, move to another model.
Arch Support Types
Arch Type
Characteristics
Best Support Level
Low/Flat
Entire foot touches ground
Motion control/stability
Normal
Midfoot visible but partial contact
Neutral/mild stability
High
Only heel and forefoot touch ground
Maximum cushioning/flexible
Heel Counter Design
The heel counter is the rigid cup at the back of the shoe that stabilizes your heel. A quality heel counter:
Should be firm enough to hold its shape when squeezed
Should not dig into your Achilles tendon
Should prevent side-to-side heel wobble
Test it by gripping the shoe and twisting gently. Minimal flex indicates good construction.
Toe Box Space
Your toes need room to spread naturally during the walking gait. A cramped toe box causes bunions, hammertoes, and neuromas over time.
Measurement guideline: You should have roughly a thumb’s width of space between your longest toe and the shoe’s end. Consider sizing up half a size if between sizes.
Outsole Traction Patterns
Pavement walking: Smooth or lightly textured rubber outsoles perform best and wear evenly on hard surfaces.
Trail/incline walking: Deeper lugs and multidirectional patterns provide grip on dirt, gravel, and wet surfaces.
Mixed terrain: Hybrid tread patterns work adequately on both surfaces, though compromise slightly on each.
Top Walking Shoe Brands Compared
While specific models change frequently, brand philosophies remain relatively consistent. Here’s an overview of major players in the walking shoe market:
As an Amazon Associate I earn from qualifying purchases.
Money-Saving Tips:
Shop previous season colors/styles (often identical performance, 30-40% discount)
Check outlet stores and official brand sale sections online
Sign up for retailer newsletters for first-time buyer discounts
Purchase mid-season when demand drops (after peak hiking/walking seasons)
Consider certified refurbished or open-box options from reputable retailers
Sizing and Fit Guidelines
The Golden Rules
Shop later in the day: Feet swell throughout the day; afternoon shopping ensures comfortable fit during walking.
Wear walking socks: Bring or purchase the sock thickness you’ll use for walking to ensure proper fit.
Measure both feet: One foot is often larger; fit to the larger foot.
Account for swelling: Add ¼-½ inch beyond your measured length for warm-day swelling.
Don’t break in extensively: Walking shoes should feel comfortable within the first few wears. Significant discomfort indicates poor fit.
Width Considerations
Most brands offer standard width (D for men, B for women), but many accommodate wider needs:
Width Code
Men’s
Women’s
Availability
Narrow
AA
A
Limited selection
Standard
D
B
All models
Wide
2E
D
Most models
Extra Wide
4E
2E
Selected models
XX-Wide
6E
4E
Specialty retailers
New Balance and Brooks offer the widest range of width options among mainstream brands.
When to Size Up vs. Stay True
Size up if:
You have high-volume feet (instep sits high)
You plan to use custom orthotics inside the shoe
Your toes frequently hit the front after 30+ minute walks
You experience numbness in toes during activity
Stay true if:
Your heel slips despite tight lacing
You experience blisters on heels or pinky toes
You feel excessive foot movement inside the shoe
You have narrow feet and the shoe feels loose even when tightened
Maintenance and Replacement Schedule
Extending Shoe Life
Rotate pairs: Having 2-3 pairs extends individual shoe life significantly. Moisture has time to evaporate completely between uses.
Air dry properly: Never machine dry. Stuff with newspaper to absorb moisture and maintain shape. Keep away from direct heat sources.
Clean gently: Remove dirt with soft brush and mild soap. Avoid harsh chemicals that degrade adhesives and materials.
Store correctly: Keep in cool, dry place away from sunlight. Plastic bags trap moisture; breathable fabric bags are ideal.
Replacement Indicators
Replace your walking shoes when you notice:
Visible compression: Midsole foam appears permanently flattened or wrinkled
Uneven wear patterns: Excessive wear on one side of the outsole
Loss of cushioning feel: Ground becomes noticeably harder through the sole
Upper damage: Cracks, tears, or separated seams
New pain points: Increased foot, knee, hip, or back pain correlating with walking sessions
Mileage threshold: Most shoes reach functional limit at 300-500 miles depending on construction and body weight
Average calculator: For someone walking 2 miles daily (730 miles/year), expect annual replacement with standard shoes. Heavy walkers (4+ miles/day) may need 2 replacements yearly.
Special Considerations
For Diabetes
Diabetic neuropathy reduces sensation in feet, making it difficult to detect early blister or pressure damage. Critical features include:
Seam-free interior to minimize friction points
Removable insoles for custom orthotics
Extra depth for accommodative fit
Diabetic certification from healthcare provider
Regular foot inspection routine even with proper footwear
Brands with dedicated diabetic lines: New Balance, Drew Shoe, Orthofeet
For Seniors and Fall Prevention
As balance declines with age, footwear becomes a safety device. Prioritize:
Firm heel counter preventing ankle rollover
Non-slip outsole with proven traction ratings
Easy closures (Velcro or elastic) for those with arthritis
Low-profile design avoiding tripping hazards
Adequate width to accommodate foot spreading and deformities
Recommended features: Slip-resistant certifications, rocker sole designs reducing roll risk
For Plantar Fasciitis
This condition causes stabbing heel pain, especially with first steps in the morning. Beneficial shoe characteristics:
Deep heel cup stabilizing calcaneus
Rigid shank preventing excessive arch flattening
Contoured arch support reducing ligament tension
Moderate heel height (not completely flat)
Replaceable insoles for custom orthotic insertion
For Trail and Incline Walking
When venturing beyond pavement:
Aggressive lug pattern for loose terrain traction
Reinforced toe cap protecting against rocks
Water-resistant upper for stream crossings
Stiffer sole providing rock plate protection
Ankle coverage consideration based on incline severity
Addressing Mobility Limitations
We must acknowledge an important limitation in walking’s accessibility. While this guide focuses on optimal footwear for those who can walk, we recognize that mobility limitations—including leg amputations, paralysis requiring wheelchairs, severe joint disease, and neurological conditions affecting lower limbs—prevent some individuals from accessing this exercise form equally.
Alternative Exercise Options
For those unable to walk traditionally, comparable health benefits can come from:
Seated walking simulations: Upper-body ergometer cycling with hand pedals
Wheelchair propulsion exercises: Structured pushing routines on varied terrain
Chair yoga and stretching: Improves flexibility, circulation, and core strength
Resistance band training: Builds muscle without weight-bearing requirements
Aquatic therapy: Water provides support while allowing movement in any capacity
Standing assistive devices: Parallel bars, walkers, or supportive poles for limited ambulation
Adaptive Equipment Considerations
Some individuals benefit from prosthetic or orthotic modifications that enable modified walking:
Custom prosthetics designed specifically for walking exercise
If mobility limitations prevent walking, consult with healthcare providers about appropriate alternatives. The health goals—cardiovascular benefit, improved mental wellness, weight management—remain achievable through adapted means.
FAQ Section
How often should I replace my walking shoes?
Most walking shoes require replacement every 300-500 miles, which translates to 4-8 months for average walkers. Signs of wear include flattened cushioning, uneven outsole wear, and increased post-walk pain. Light walkers may extend use to 12 months, while heavy walkers might need quarterly replacement.
Are expensive walking shoes worth the cost?
Higher-priced models often feature superior materials, better durability, and more sophisticated support systems. However, the relationship between cost and benefit diminishes after approximately $120-140. Mid-range shoes ($80-110) typically provide excellent value for most walkers. Invest in premium footwear if you have specific medical conditions requiring advanced features.
Can I use running shoes for walking?
Yes, many people successfully walk in running shoes. Running shoes typically offer greater cushioning and durability. However, walking-specific shoes facilitate the natural heel-to-toe rolling motion better and may reduce shin splints in high-mileage walkers. Choose based on your walking intensity and comfort preference.
What’s the difference between walking and hiking shoes?
Hiking shoes provide stiffer construction, aggressive tread, and ankle coverage for uneven terrain. Walking shoes prioritize flexibility, lighter weight, and pavement-appropriate outsoles. Use hiking shoes only when encountering rough trails or elevation changes; stick to walking shoes for urban/suburban paths.
Do I need separate shoes for indoor versus outdoor walking?
Generally, no—unless you have hygiene concerns or extremely delicate flooring at home. Indoor treadmill walking may benefit from slightly softer cushioning since surfaces are uniform. Outdoor walking requires more durable outsoles and weather resistance. Many people use one versatile pair for both environments.
How do I know if I need orthotics instead of just good shoes?
Consult a podiatrist or orthopedic specialist if you experience persistent pain despite wearing proper footwear. Common indicators include chronic plantar fasciitis, recurrent ankle sprains, severe overpronation or supination, and diagnosed conditions like bunions or hammertoes. Custom orthotics represent an additional investment ($200-500) but may prevent costly injuries downstream.
Are vegan walking shoes available?
Yes, several brands now offer synthetic alternatives to leather construction. Altra, New Balance, and Brooks all produce vegan-friendly models. Materials typically include recycled polyester mesh, synthetic overlays, and rubber outsoles. Performance equals traditional materials in most cases, though break-in periods may differ slightly.
What if my feet sweat excessively during walks?
Look for moisture-wicking liners (merino wool blends, CoolMax fabrics) and breathable mesh uppers. Avoid waterproof membranes unless walking in wet climates—they trap internal moisture. Change socks mid-walk for extended sessions. Consider antimicrobial treatments to prevent odor and fungal growth.
Can walking shoes help with knee pain?
Appropriate footwear may reduce knee strain by improving alignment and shock absorption. However, knee pain often stems from multiple factors including gait abnormalities, muscle imbalances, and existing joint degeneration. Consult physical therapy for comprehensive treatment. Walking shoes serve as one component of a broader intervention strategy.
Should I buy online or in-store?
Try shoes on physically whenever possible to assess fit, width, and immediate comfort. Once you identify your ideal model and size, purchasing online offers cost savings and convenience. Some retailers provide free shipping and returns, mitigating fit risks. Always order from vendors with flexible return policies.
Conclusion: Walking Is Accessible Exercise for Most
Walking represents one of the most democratic forms of physical activity available. With proper footwear—achievable at nearly any budget level—it becomes sustainable, enjoyable, and health-promoting for decades. The key lies not in expensive equipment or exclusive facilities, but in understanding your unique needs and selecting shoes that match your physiology, walking environment, and lifestyle.
Remember these fundamental truths:
Comfort trumps fashion and marketing hype
Proper fit prevents far more problems than cheap alternatives solve
Regular replacement maintains protective function
Listen to your body—pain indicates something needs adjustment
Walking remains accessible to those with mobility; explore adaptive options when necessary
Start your journey today. Your future self—healthier, more mobile, mentally sharper—will thank you.
Related Reading & Resources
American Heart Association Walking Program Guidelines
Podiatric Medical Association Consumer Foot Care Guide
National Institute on Aging Exercise Recommendations
ADA Accessibility Standards for Public Walking Paths
Disclaimer: This guide provides general information for educational purposes. Consult healthcare professionals for personalized medical advice regarding foot conditions, injuries, or exercise programs.
By Golden Emissary Marketing LLC · Updated July 2026
Why Evaporative Cooling Matters Now More Than Ever
In a warming world, building cooling systems are transitioning from optional luxuries to essential safety measures. As heatwaves grow more frequent and intense, entire regions that once relied on opening a window or turning on a ceiling fan now face temperatures that threaten human health and survival. The conventional response—vapor-compression air conditioning powered by chemical refrigerants—comes with steep environmental and financial costs. Refrigerants like hydrofluorocarbons (HFCs) are potent greenhouse gases, and the electricity that powers conventional AC units drives further emissions, creating a vicious cycle: the hotter it gets, the more we cool, the more emissions we produce, and the hotter it gets again.
Enter evaporative cooling: one of humanity’s oldest cooling technologies, now refined into efficient, convenient, and surprisingly powerful devices that can deliver comfort at a fraction of the energy cost—and with zero synthetic refrigerants. From portable residential units to architectural-scale passive systems, evaporative cooling offers a genuinely sustainable path forward for millions of households and businesses.
This guide walks you through everything you need to know: how evaporative cooling works, what types of systems exist, how to choose the right one for your climate and space, what to watch out for, and how to combine evaporative cooling with complementary strategies like exterior shading for maximum effect.
How Evaporative Cooling Works: The Physics Made Simple
Evaporative cooling exploits a fundamental principle of thermodynamics: when water evaporates, it absorbs heat from the surrounding air. This is the same reason you feel cool when stepping out of a swimming pool on a breezy day—the water on your skin is evaporating, pulling thermal energy away from your body in the process.
Most commercially available evaporative coolers (also called “swamp coolers”) follow a straightforward mechanism:
A fan draws warm, dry outside air into the unit.
The air passes through water-saturated cooling pads (also called media) made of cellulose, aspen wood fiber, or other absorbent materials. The pads act as wicking substrates, distributing water evenly across a large surface area.
As the air contacts the wet pad surface, water evaporates, absorbing sensible heat from the air and converting it to latent heat (water vapor). The dry-bulb temperature of the air drops, while its humidity rises.
The now-cooled, moisturized air is blown out into the living space.
The cooling potential of any evaporative system depends on the wet-bulb depression: the difference between the dry-bulb temperature (standard air temperature) and the wet-bulb temperature (the lowest temperature achievable through evaporation at a given humidity). In dry climates—say, Phoenix at 105°F and 15% relative humidity—the wet-bulb depression is enormous, and evaporative cooling can drop air temperatures by 20–30°F. In humid climates—Miami at 90°F and 75% relative humidity—the wet-bulb depression is minimal, and evaporative cooling barely moves the needle.
This is why climate suitability is the single most important factor in deciding whether evaporative cooling is right for you. A general rule of thumb: evaporative coolers work well when ambient relative humidity is below 50–55%. Above that, the cooling effect diminishes rapidly, and the added moisture can make the air feel muggy and uncomfortable.
Types of Evaporative Cooling Systems
Evaporative cooling is not a monolith. Several distinct technologies fall under this umbrella, each with its own strengths, cost profile, and ideal use case.
1. Portable Evaporative Coolers (Swamp Coolers)
These are the most common residential evaporative cooling devices. They are freestanding, plug-in units with a water reservoir, a pump, cooling pads, and a fan. They range from small desktop units producing around 1,500 CFM (cubic feet per minute) of airflow to large rolling towers delivering 4,000+ CFM.
Best for: Individual rooms, apartments, garages, patios, and spot-cooling in dry climates.
Price range: $100–$400 for most consumer models; commercial-grade units can reach $800–$1,500.
Key spec to check: CFM rating. As a general guideline, you need approximately 20–30 CFM per square foot of space you want to cool. A 3,000 CFM unit is suitable for roughly 100–150 square feet; a 4,500 CFM unit can handle 150–225 square feet.
2. Window-Mounted Evaporative Coolers
Similar to window AC units, these mount in a window frame and draw outside air through wet pads, blowing cooled air inward. They are typically more powerful than portable units and don’t take up floor space.
Best for: Single-room cooling in dry-climate homes where a window unit is practical.
Price range: $200–$600.
3. Whole-House (Ducted) Evaporative Systems
These are installed on the roof or exterior wall of a home and connected to ductwork that distributes cooled air throughout multiple rooms. They are permanent installations, typically requiring professional setup.
Best for: Whole-home cooling in arid and semi-arid regions (Southwest US, inland Australia, Middle East, parts of South Asia).
Price range: $2,000–$6,000 installed, depending on home size and complexity.
Energy use: Typically 200–600 watts for the fan and pump combined, compared to 3,500–5,000 watts for a central AC system of comparable coverage.
4. Clay Honeycomb / Terracotta Passive Coolers
Drawing on ancient Persian and Indian cooling traditions, these systems use porous clay or terracotta structures arranged in a honeycomb lattice. The clay’s natural porosity holds water that migrates to the surface through capillary action. As air passes through the high-surface-area cells, water evaporates and cools the airflow—no electricity required.
The CoolAnt Beehive system, developed by architect Monish Siripurapu in New Delhi, is a notable modern example. Testing showed it reduced surrounding air temperature from 42°C to 36°C (about a 6°C / 11°F drop) on a hot day, using only water and natural airflow. Researchers have explored similar honeycomb clay-tube designs that also leverage stable underground temperatures by drawing air through buried earthen tubes.
Best for: Low-cost, zero-energy cooling in hot-dry climates; community spaces, agricultural storage, and developing-region applications.
Price range: Very low—the DIY versions cost tens of dollars in materials; commercial installations vary widely.
An ingenious low-tech approach popularized in Bangladesh and elsewhere, this design uses recycled plastic bottles cut and mounted on a board to create converging nozzles. As ambient air is pushed through the narrow bottle necks, it accelerates (the Venturi effect) and experiences a pressure drop that slightly cools it. When combined with a wet cloth or wick placed behind the bottle array, the fast-moving air evaporates water from the cloth, amplifying the cooling effect. Some designs reportedly achieve 5–10°C (9–18°F) temperature reductions in favorable dry conditions.
Best for: Extremely budget-constrained situations, off-grid applications, and educational/DIY projects.
Limitations: Modest cooling capacity, highly dependent on natural breeze, and the funnel-compression effect alone (without evaporative enhancement) provides only marginal temperature reduction.
6. Emerging Hybrid Systems
Researchers at Harvard’s Wyss Institute have developed cSNAP (a combined evaporative cooling and membrane dehumidification system) that aims to make evaporative cooling viable even in hot-humid climates. By first removing excess moisture from the air through a specialized membrane, then passing it through the evaporative stage, these hybrid systems could eventually extend evaporative cooling into markets where it has historically failed. As of 2026, these remain largely in the prototype and pilot stages, but they represent a promising frontier.
Evaporative Cooling vs. Conventional Air Conditioning: Head-to-Head
To make an informed purchasing decision, it helps to see how evaporative cooling stacks up against traditional refrigerant-based air conditioning across the dimensions that matter most.
HFCs and other synthetic refrigerants (GHG impact)
Operating cost/day
~$1.50–$2.20 at $0.12/kWh
Several dollars/day for central AC
Adds humidity
Yes (beneficial in dry climates)
No (removes humidity)
Climate suitability
Dry climates (RH < 50–55%)
All climates
Maintenance frequency
Every 1–2 weeks (pad cleaning, drain)
1–2x/year (filter change, tune-up)
Mold/mildew risk
Moderate—requires diligent drying and cleaning
Low to moderate (condensate drainage)
Fresh air intake
100% outside air (no recirculation)
Recirculates indoor air
Environmental impact
Very low (water + minimal electricity)
High (refrigerants + high electricity)
Bottom line: If you live in a dry climate, evaporative cooling delivers comparable comfort at roughly one-quarter the operating cost of AC, with a dramatically smaller carbon footprint. If you live in a humid climate, conventional AC—or a hybrid approach—remains the more practical choice.
How to Choose the Right Evaporative Cooler: A Step-by-Step Framework
Step 1: Check Your Climate
Before investing a single dollar, determine your summer climate profile. Look up the average afternoon relative humidity during your hottest months. If it consistently stays below 50%, evaporative cooling is a strong candidate. Between 50–60%, it can work but with diminishing returns. Above 60%, you should look elsewhere—or consider the hybrid systems emerging from research labs.
Quick climate test: Buy a cheap hygrometer ($10–$15), place it in the room you want to cool during a typical hot afternoon, and check the reading. If RH is under 50%, proceed. If it’s above 60%, evaporative cooling will likely make the room feel muggier rather than cooler.
Step 2: Size the Unit to Your Space
Evaporative coolers are rated by CFM (cubic feet per minute)—the volume of air they move. Because evaporative coolers rely on continuous airflow (they don’t recirculate air like AC), you need higher CFM than you might expect. The standard sizing formula:
Required CFM ≈ Room Area (sq ft) × Ceiling Height (ft) × 2 to 3 air changes per hour ÷ 60
A simpler approximation: aim for 20–30 CFM per square foot of living space.
Room Size
Recommended CFM
Example Units
Small bedroom (100–150 sq ft)
2,000–3,500 CFM
Dreo Smart Tower 712S, Hessaire MC18V
Medium living room (150–250 sq ft)
3,500–5,000 CFM
Uthfy 41″ Swamp Cooler, Portacool Apex 1200
Garage/workshop (250–500 sq ft)
5,000–8,000 CFM
Hessaire MC18M, Honeywell CO60PM
Whole house (1,000–2,000 sq ft)
8,000–15,000+ CFM
Ducted whole-house system
Note: These are rough guidelines. High ceilings, poor insulation, and large unshaded windows all increase your CFM requirement.
Step 3: Evaluate Key Features
Once you’ve identified the right CFM range, compare models on these features:
Water tank capacity: At least 3 gallons for continuous overnight operation. Smaller tanks (1–2 gallons) require frequent refilling. Some whole-house units connect directly to a plumbed water line.
Noise level: Look for under 50 dB for bedroom use. Large industrial units can exceed 60 dB and are better suited for garages or outdoor use.
Portability: Caster wheels, carry handles, and manageable weight matter if you plan to move the unit between rooms.
Controls: Digital thermostats, timers, remote controls, and smart-home integration (Wi-Fi enabled models) add convenience and can optimize energy use.
Water-level monitoring: Built-in sensors that alert you when water is low prevent the pump from running dry, which can damage the unit.
Pad type and accessibility: Cellulose honeycomb pads offer the best cooling efficiency and longevity. Ensure pads are easy to access for cleaning and replacement.
Outdoor rating: If you plan to use the cooler on a patio or in a semi-outdoor space, look for corrosion-resistant housings and weatherproof components.
Step 4: Consider Installation Constraints
Rental properties / HOAs: Portable units require no installation and are ideal for renters. Window units may require landlord approval. Whole-house ducted systems are a homeowner-only investment.
High-rise apartments: Portable units are your only realistic option. Ensure you can open a window for cross-ventilation—evaporative coolers need an exhaust path for the moist air they produce.
Water access: All evaporative coolers need water. Portable units are manually filled or connected to a hose. Ducted systems need a plumbed connection.
Step 5: Budget for Total Cost of Ownership
Cost Category
Evaporative Cooler
Notes
Purchase price
$100–$1,500 (portable/window)
Varies by size and features
Installation
$0 (portable) – $1,500 (ducted)
Professional install for whole-house
Electricity/day
$0.30–$0.50
At $0.12/kWh, ~250W continuous
Water/day
$0.10–$0.50
Varies by local water rates
Pad replacement
$20–$60 annually
Replace per manufacturer schedule
Cleaning supplies
$10–$20/year
Vinegar, mild bleach, brushes
Compare this to central AC, which can cost $3–$8+ per day in electricity alone during peak summer.
Top Evaporative Cooler Recommendations by Use Case (2026)
Based on aggregated expert reviews and specifications from multiple sources, here are standout models in each category:
Use Case
Model
CFM
Tank
Noise
Approx. Price
Best overall (whole-house portable)
Uthfy 41″ Swamp Cooler
~4,200
4 gal
Moderate
~$180
Best for bedrooms
Dreo Smart Tower 712S
~2,500
2 gal
<50 dB
~$144
Best for garage/workshop
Hessaire MC18V
~3,500
5 gal
Moderate
~$149
Best outdoor-rated
Honeywell Outdoor Safe Portable
~3,200
Moderate
Moderate
~$250
Best mid-size living room
Portacool Apex 1200
~3,800
Moderate
~53 dB
~$600+
Best budget/desktop
Various 3-in-1 portable coolers
~1,800
1–2 gal
Low
~$100–$130
Prices are approximate and vary by retailer and season.
The Catch: Limitations and Risks of Evaporative Cooling
Evaporative cooling is not a silver bullet. Understanding its limitations is essential to making a smart purchase and avoiding disappointment.
Humidity: The Dealbreaker
In humid climates, evaporative cooling simply doesn’t work well—and can make things worse. When the air is already saturated with moisture, evaporation slows to a crawl, and the cooler ends up adding more humidity to an already-sticky environment. If you live in Houston, Miami, Bangkok, or any tropical/coastal region, evaporative cooling is not recommended as a primary cooling strategy.
Mold and Mildew Risk
Because evaporative coolers constantly introduce moisture into the air, they can create conditions favorable for mold growth—both inside the unit and in the living space. This is a real concern that requires active management:
Dry the pads at the end of each operating day by running the fan-only mode for 15–20 minutes.
Drain and clean the water reservoir every 1–2 weeks. Flush with a hose, scrub with a vinegar or mild bleach solution, and rinse thoroughly.
Replace pads according to the manufacturer’s schedule, or sooner if you notice discoloration, odors, or reduced cooling performance.
Use water treatment additives (biocides) in the water reservoir to inhibit microbial growth.
Maintain airflow: Ensure the cooled space has an exhaust path (open a window or vent on the opposite side of the room) to prevent humidity from accumulating indoors.
Water Consumption
Evaporative coolers consume water as part of their normal operation—typically 3–15 gallons per day for a residential unit, and more for whole-house systems. In drought-prone regions, this is a consideration. However, when evaluated holistically, the water used by an evaporative cooler is often less than the water consumed by power plants generating the electricity that a conventional AC unit would use. A University of Arizona study examined this trade-off and found the comparison depends heavily on the local electricity mix (coal, hydro, solar, etc.).
Temperature Floor
Evaporative coolers can only cool air down to the wet-bulb temperature—they cannot go below it. On extremely hot, relatively humid days, the cooling effect may be insufficient for comfort, even in nominally “dry” climates during certain weather events.
Complementary Strategy: Exterior Shading to Reduce Solar Gain
Even with an excellent evaporative cooler, the less heat that enters your building in the first place, the less work your cooling system has to do. Exterior shading is one of the most effective passive-cooling strategies available, because it blocks solar radiation before it reaches the glass and interior surfaces.
Why Exterior Shading?
Exterior shading can block over 50% of solar heat gain through windows. Interior blinds and curtains help somewhat, but because they are positioned inside the glass, they absorb solar radiation and re-radiate heat into the room. Exterior shading—awnings, overhangs, louvers, exterior roller shades, and shutters—intercepts sunlight before it passes through the window, making it dramatically more effective.
Orientation-Specific Shading Strategies
Not all windows need the same treatment:
Window Orientation
Best Shading Strategy
Why
South-facing
Horizontal overhangs, awnings
Summer sun is high; overhangs block it while allowing lower winter sun in
East-facing
Vertical fins on the left side
Morning sun comes from the southeast; left-side fins block it
West-facing
Vertical fins on the right side
Afternoon sun comes from the southwest; right-side fins block it
North-facing
Minimal shading needed
Receives little direct summer sun
Practical Options for Renters and HOA-Restricted Properties
Not everyone can install permanent overhangs or awnings. Here are alternatives:
Retractable exterior roller shades: Can be mounted without major construction; roll down during the day and up at night.
Exterior solar screens: Mesh screens that attach to the outside of window frames; some are removable (magnetic or hook-and-loop mounting).
Potted plants and trellises: Climbing vines on a balcony trellis provide seasonal shade and evaporative cooling through plant transpiration.
Reflective window films: Applied to the exterior glass; reduce solar transmission significantly. Check HOA rules before applying.
Shade sails: Tensioned fabric stretched between anchor points; can cover patios, balconies, and even windows without permanent structure.
Important caveat: Shading reduces solar heat gain—it does not address ambient air temperature. On a 105°F day with no sun, shading won’t help much. But combined with evaporative cooling, exterior shading can mean the difference between a tolerable interior and an unbearable one.
Combining Strategies for Maximum Effect
For the best results, think of cooling as a layered approach rather than a single-device solution:
Reduce heat at the source: Exterior shading, reflective roofing, and strategic landscaping (deciduous trees on east/west sides) minimize solar gain.
Improve the building envelope: Weatherstripping, insulation, and sealing air leaks prevent hot outside air from infiltrating.
Ventilate strategically: Open windows during cooler evening/early-morning hours to flush accumulated heat, then close up before the day heats up.
Deploy evaporative cooling: Once the building envelope is shaded and ventilated, an evaporative cooler handles the remaining cooling load efficiently.
Manage humidity: In borderline-humid climates, use the evaporative cooler during the driest part of the day (usually afternoon) and switch to ventilation-only mode when humidity rises.
This layered approach can reduce your cooling energy costs by 70–85% compared to conventional AC alone, while maintaining comfort and dramatically reducing your environmental footprint.
Frequently Asked Questions
Can an evaporative cooler replace my air conditioner entirely?
In dry climates (average summer RH below 50%), yes—many homeowners in the Southwest US, inland Australia, and the Middle East rely exclusively on evaporative cooling. In borderline climates or during rare humid spells, a supplemental portable AC or even a well-placed fan may be needed for a few days per year. In humid climates, no—evaporative cooling cannot replace AC.
How much money will I actually save?
Running a 250-watt evaporative cooler costs roughly $0.03/hour at $0.12/kWh. A comparable window AC unit (1,500 watts) costs about $0.18/hour. Over a 100-day cooling season running 8 hours/day, that’s $24 for the evaporative cooler versus $144 for the AC—a savings of $120 per room per season. For whole-house central AC versus ducted evaporative, the savings can be $500–$1,500+ per cooling season.
Do evaporative coolers work at night?
Yes, and often even better than during the day. Nighttime humidity is typically higher, which reduces efficiency somewhat, but nighttime temperatures are also lower, so the cooling demand is reduced. Many units have quiet/sleep modes for bedroom use. Just remember to dry the pads before bed if you’re turning the unit off, to prevent mold growth overnight.
Can I use an evaporative cooler with the windows closed?
No—and this is a critical distinction from AC. Evaporative coolers work by pushing cooled air into the space and forcing warm air out. Without an exhaust path (an open window or vent on the opposite side of the room), humidity builds up rapidly and the cooling effect stalls. A good rule: open a window 1–2 inches on the leeward side of the room the cooler is in.
Are evaporative coolers bad for allergies?
It’s a mixed picture. On one hand, evaporative coolers draw in 100% outside air (no recirculation of indoor allergens) and many models include basic filtration. On the other hand, if pads and reservoirs aren’t cleaned regularly, mold and bacteria can proliferate and be blown into the living space. If you have severe allergies or asthma, opt for a unit with washable antimicrobial pads and commit to a strict cleaning schedule.
How long do evaporative cooler pads last?
Cellulose honeycomb pads—the most common and efficient type—typically last 2–3 seasons with proper maintenance. Aspen wood fiber pads last 1–2 seasons. Signs it’s time to replace: visible mineral buildup (scaling), sagging or warping, persistent odors, or noticeably reduced cooling performance despite proper water flow.
What about water quality—does it matter?
Yes. Hard water (high mineral content) accelerates pad scaling and reduces cooling efficiency. If you live in a hard-water area, consider using filtered water, installing an inline water filter, or using a water-softening tablet in the reservoir. Descaling the unit with vinegar every few weeks will extend pad life and maintain performance.
Can I build my own evaporative cooler?
Absolutely. DIY evaporative coolers made from buckets, fans, pumps, and cooling pads can be built for $30–$80 and work on the same principles as commercial units—though with lower efficiency, durability, and safety features. The plastic-bottle funnel approach described earlier is an even simpler (though less powerful) DIY option that requires no electricity at all.
Is evaporative cooling environmentally friendly?
Compared to conventional AC, evaporative cooling is dramatically better for the environment. It uses no synthetic refrigerants (which are potent greenhouse gases), consumes 60–80% less electricity, and uses water as its only “refrigerant.” The main environmental consideration is water consumption, which should be weighed against the water used by power plants generating electricity for AC units. In most grid scenarios, evaporative cooling wins on total resource use.
Final Thoughts: A Pragmatic Path Forward
Evaporative cooling is not a universal solution—nothing in building science is. But for the hundreds of millions of people living in hot, dry climates who are facing escalating temperatures and energy costs, it represents one of the most accessible, affordable, and sustainable cooling strategies available today. The technology spans an extraordinary range: from a $30 DIY bottle-and-cardboard rig that runs on a breeze, to a $6,000 professionally installed ducted whole-house system, to experimental membrane-dehumidification hybrids from Harvard that could one day bring evaporative cooling to the tropics.
The key to a successful purchase is honesty about your climate, your space, and your maintenance habits. Buy too small and you’ll be disappointed. Ignore humidity and you’ll be miserable. Neglect cleaning and you’ll be fighting mold. But choose wisely, maintain diligently, and pair your evaporative cooler with smart shading and ventilation, and you can stay comfortable through increasingly brutal summers—for a fraction of what your neighbors pay to run their AC.
Last updated: July 2026. Prices and product availability are subject to change. Always verify current specifications with manufacturers before purchasing.
Introduction: The Problem Nobody Talks About Under Your Arms
Every morning, millions of people reach for a deodorant or antiperspirant without a second thought. It’s one of the most ingrained personal-care rituals in modern life. Yet the conventional products lining drugstore shelves carry hidden costs—for your skin, your body, and the planet—that most consumers never hear about.
On one side, the problem is well-documented: traditional deodorants and antiperspirants frequently rely on aluminum salts to plug sweat ducts, parabens to extend shelf life, phthalates to stabilize synthetic fragrances, and antimicrobial agents like triclosan to kill bacteria wholesale. Each of these ingredients has been flagged by researchers for potential health concerns ranging from skin irritation to endocrine disruption, and each carries a measurable ecological footprint—from the energy-intensive mining of bauxite ore for aluminum to the persistence of synthetic compounds in waterways where they can disrupt aquatic ecosystems and accumulate in soil.
On the other side sits the natural deodorant movement, which promised a cleaner alternative—but for years delivered disappointment. The early generation of “natural” deodorants were often little more than baking soda and coconut oil, which could irritate sensitive skin, leave greasy residue, and—most critically—fail to control odor past noon. Consumers who tried them, smelled themselves by lunchtime, and quietly reverted to their aluminum-based standby. The reputation stuck: natural deodorant doesn’t work.
But something has changed. Over the past several years, a new generation of natural deodorant formulations has emerged that combines multiple advanced approaches—botanical agents, activated charcoal, probiotics, mandelic acid, and magnesium-based odor neutralizers—to achieve genuinely long-lasting odor control, often exceeding 24 hours and sometimes rivaling the protection window of conventional products. These new sticks smell sophisticated, apply cleanly, and are formulated to be gentle on skin.
There’s a catch, of course, and we’ll be upfront about it: many of these improved products are still packaged in plastic, shipped through global supply chains, and marketed in ways that can obscure the remaining environmental trade-offs. An honest buying guide needs to address that tension head-on rather than glossing over it.
This guide is designed to walk you through everything you need to know to make an informed switch—without the greenwashing.
Part 1: Understanding the Problems With Conventional Deodorants
Skin and Body Concerns
Let’s be precise here. The scientific literature does not conclusively link aluminum in antiperspirants to breast cancer or Alzheimer’s disease—those fears, while widely circulated, are not supported by robust epidemiological evidence. However, what is well-established is that the ingredients in conventional deodorants and antiperspirants can cause genuine dermatological issues:
Aluminum salts (typically aluminum chlorohydrate or aluminum zirconium) can cause contact dermatitis, itching, redness, and burning in sensitive individuals. They also react with proteins in sweat to produce the yellow staining on clothing that many people blame on perspiration itself.
Parabens (methylparaben, propylparaben, etc.) are preservatives that have been detected in human tissue samples and exhibit weak estrogenic activity. While regulatory bodies like the FDA consider them safe at current usage levels, some consumers and researchers advocate for a precautionary approach.
Phthalates, often hidden under the term “fragrance” or “parfum” on ingredient lists, are plasticizers linked to endocrine disruption. They’re increasingly being phased out, but remain present in some mainstream products.
Triclosan, an antibacterial agent formerly common in deodorants (and now restricted by the FDA for over-the-counter use in many applications), has raised concerns about antibiotic resistance and aquatic toxicity.
Formaldehyde-releasing preservatives like DMDM hydantoin slowly release small amounts of formaldehyde, a known sensitizer and probable carcinogen, to prevent microbial growth in the product.
None of this means a conventional deodorant will immediately harm you. But the cumulative exposure—daily application to thin, highly vascularized underarm skin, over decades—is a legitimate reason some people choose to seek alternatives.
Environmental Impact
The ecological footprint of conventional deodorants extends well beyond your bathroom:
Aluminum extraction and processing is among the most energy-intensive mining operations on earth. Bauxite mining destroys landscapes, and the refining process (the Bayer process) produces “red mud”—a highly alkaline toxic sludge that has caused environmental disasters when containment fails.
Chemical runoff: When you shower, residues of parabens, phthalates, and triclosan wash down the drain and enter wastewater systems. Many municipal treatment plants don’t fully remove these compounds, allowing them to reach rivers and oceans where they persist and accumulate in aquatic organisms.
Aerosol propellants: Aerosol deodorants (still popular in many countries) release volatile organic compounds (VOCs) that contribute to ground-level ozone and air pollution, even though modern propellants no longer damage the ozone layer directly.
Plastic waste: The vast majority of conventional deodorant sticks are housed in multi-material plastic containers that combine polypropylene, polyethylene, and metal components—making them virtually impossible to recycle in standard municipal programs. Billions of these containers end up in landfills annually.
Part 2: Why Early Natural Deodorants Failed (And What Changed)
The First Generation: Well-Intentioned but Flawed
The early wave of natural deodorants (roughly 2010–2018) was built on simplistic formulations:
Baking soda (sodium bicarbonate) was the primary odor fighter. While effective at neutralizing acidic odor molecules, baking soda is highly alkaline (pH ~9) and can severely disrupt the skin’s acid mantle, causing painful rashes in a significant percentage of users.
Coconut oil and shea butter served as carriers and moisturizers, but they melt at relatively low temperatures, leading to grainy texture, greasy feel, and poor stability in warm climates.
Essential oils provided scent, but at concentrations necessary for adequate odor masking, they could trigger allergic reactions and photosensitivity.
Most damning: these products simply didn’t last. Without sophisticated odor-neutralizing mechanisms, users often experienced odor breakthrough within 4–6 hours.
The New Generation: Multi-Mechanism Formulations
What distinguishes the current crop of effective natural deodorants is their multi-pronged approach. Instead of relying on a single active ingredient, modern formulations combine several complementary mechanisms:
Activated Charcoal: Highly porous activated charcoal acts as an adsorbent—it physically traps odor-causing volatile compounds and impurities on its vast surface area. It also helps absorb moisture, keeping underarms drier without blocking sweat glands. Some users also report that charcoal helps during the “transition period” when switching from conventional antiperspirants by drawing out residual buildup.
Probiotics: This is perhaps the most innovative development. Body odor is produced when bacteria on the skin break down the proteins and lipids in sweat into volatile, malodorous compounds. Rather than killing all bacteria (as triclosan does), probiotic deodorants introduce beneficial bacterial strains—typically Lactobacillus species—that compete with odor-producing bacteria for resources and habitat. Over time, this reshapes the underarm microbiome to favor bacteria that produce little or no odor. The approach is analogous to how probiotics support gut health: cultivate the right community, and the problem addresses itself.
Mandelic Acid and Other AHAs: Alpha-hydroxy acids like mandelic acid lower the pH of the underarm environment, creating conditions hostile to the bacteria most responsible for odor while being gentle on skin. Mandelic acid in particular has gained traction because it has a larger molecular size than other AHAs, meaning it penetrates skin more slowly and causes less irritation.
Magnesium Hydroxide: Functioning similarly to baking soda in odor neutralization, magnesium hydroxide has a gentler pH profile (closer to neutral), making it suitable for those who react to baking soda formulations.
Botanical Agents: Ingredients like hop extract (a natural antimicrobial), sage, and licorice root provide additional odor suppression and anti-inflammatory benefits. Hop extract in particular has demonstrated antimicrobial efficacy against the bacteria most associated with underarm odor.
Prebiotics: Some formulations include prebiotic fibers that feed beneficial bacteria, supporting the probiotic strategy over the long term.
The synergy of these ingredients is what gives modern natural deodorants their staying power. Where a single-ingredient approach might fail after a few hours, the combination of microbial management, physical adsorption, pH modulation, and moisture absorption creates a layered defense that can genuinely protect for 24+ hours—sometimes even 72 hours, according to manufacturer testing.
Part 3: Comparison Chart — Key Categories of Natural Deodorants
Feature
Charcoal-Based
Probiotic-Based
Magnesium-Based
Mandelic Acid-Based
Primary Mechanism
Adsorption of odor molecules
Microbiome rebalancing
pH neutralization
pH acidification
Typical Duration
12–24 hrs
24+ hrs (improves over time)
12–24 hrs
24–48 hrs
Best For
Active sweaters, transition period
Long-term users, sensitive skin
Baking soda–sensitive users
Sensitive skin, brightening
Skin Irritation Risk
Low
Very low
Low
Low to moderate
Reapplication Needed?
Occasionally (heavy activity)
Rarely after acclimation
Sometimes
Rarely
Common Pairings
Baking soda, clay
Prebiotics, aloe
Arrowroot, shea
AHA blends, glycerin
Part 4: Comparison Chart — Representative Products (2026)
Note: Prices, availability, and formulations change. Always verify current product details before purchasing. As an Amazon Associate I earn from qualifying purchases.
As an Amazon Associate I earn from qualifying purchases.
How to read the Eco Rating: Five stars means fully plastic-free, compostable or refillable packaging, minimal shipping footprint, and transparent sourcing. Three stars means the formulation is clean and the brand makes sustainability efforts but still uses plastic packaging. Two stars indicates conventional packaging with otherwise clean ingredients.
Part 5: How to Choose the Right Eco-Friendly Deodorant for You
Step 1: Identify Your Skin Sensitivity Level
If you’ve ever experienced redness, burning, or a rash from natural deodorants in the past, the culprit was almost certainly baking soda. Look specifically for baking soda–free formulations. Magnesium-based and probiotic-based options tend to be the gentlest on reactive skin.
If your skin is generally tolerant, you have more options—including charcoal + baking soda blends, which often deliver the strongest immediate odor control.
Step 2: Assess Your Activity Level and Climate
Hot, humid environments and heavy physical activity require deodorants with robust moisture absorption. In these scenarios, charcoal and magnesium formulations tend to outperform probiotic-only products, which need time (weeks of consistent use) to optimize their microbiome-balancing effect.
For office workers in temperate climates, nearly any modern natural deodorant will provide all-day protection.
Step 3: Decide on Packaging Priorities
This is where the honesty comes in. If minimizing plastic waste is a top priority for you—and it’s a legitimate priority given that billions of deodorant containers are discarded annually—you’ll want to seek out brands using:
Compostable cardboard tubes (Ethique, Paper Cosmetics, Trail Botanica)
Refillable metal or glass systems (some boutique brands; the initial container is an investment but reduces waste long-term)
Minimal or FSC-certified recycled cardboard packaging
Be aware that products in fully compostable packaging may be slightly more prone to softening in hot environments (left in a car, etc.) and may not have the same shelf stability as plastic-encased counterparts. This is a trade-off inherent to eco-friendly packaging.
Also worth acknowledging: even “zero-waste” deodorants are part of a global supply chain. Ingredients are sourced from multiple continents, shipped to manufacturing facilities, packaged, distributed to retailers, and delivered to your door. No consumer product is truly zero-impact. The goal is reduction, not perfection.
Step 4: Plan for a Transition Period
If you’re switching from a conventional antiperspirant (which blocks sweat with aluminum plugs), expect a 1–3 week adjustment period. During this time, your sweat glands resume normal output, and the underarm microbiome begins to rebalance. You may experience:
Increased sweating temporarily (your body recalibrating)
Stronger-than-usual odor in the first few days (as trapped bacteria and product residues are expelled)
Detox symptoms (this is somewhat debated in the scientific community—some dermatologists attribute it to microbiome shifts; others view it as marketing language)
Using a charcoal-based deodorant during this transition can help absorb excess odor and moisture. Some people also do a “pit mask” (applying bentonite clay and apple cider vinegar for 10 minutes) to accelerate the process, though clinical evidence for this is anecdotal.
Step 5: Give It Time
The most common mistake consumers make is trying a natural deodorant for two days, deciding it “doesn’t work,” and abandoning the effort. Particularly with probiotic formulations, the odor-suppressing benefits improve over weeks as the beneficial bacteria establish themselves. Commit to a single product for at least two weeks before evaluating.
Part 6: Ingredients to Embrace and Ingredients to Avoid
Part 7: The Honest Catch — Sustainability Gaps in “Natural” Deodorants
It would be disingenuous to present eco-friendly deodorants as a panacea. Here are the remaining issues that even the best products haven’t fully solved:
Plastic packaging persists. Despite the emergence of compostable and refillable options, the majority of natural deodorants sold globally—including many from well-known “clean” brands—are still packaged in plastic. Multi-component plastic (caps made of one polymer, sticks of another, push-up mechanisms of yet another) defies recycling infrastructure. A brand may slap a “recyclable” label on the package, but that doesn’t mean your local facility can process it.
Greenwashing is rampant. Terms like “natural,” “clean,” and “eco-friendly” are largely unregulated in the personal care industry. A deodorant can contain a handful of botanical ingredients alongside synthetic preservatives and still be marketed as “natural.” The Environmental Working Group (EWG) and certifications like USDA Organic, Ecocert, and COSMOS offer more rigorous benchmarks.
Supply chain opacity. Even brands committed to transparency often can’t fully trace the provenance of every ingredient. Charcoal may be sustainably produced from bamboo or it may come from unclear timber sources. Essential oils can be sustainably harvested or contribute to overharvesting pressure on wild plant populations. Shipping ingredients and finished products across oceans generates carbon emissions that no amount of compostable packaging fully offsets.
Price accessibility. The most genuinely eco-friendly deodorants—those with compostable packaging, certified organic ingredients, and transparent supply chains—tend to cost $12–20 per stick, which puts them out of reach for many consumers. Cheaper natural options ($5–8) almost always compromise somewhere: plastic packaging, less rigorous ingredient sourcing, or simpler formulations that may not last as long.
The “perfect” product doesn’t exist yet. A deodorant that is simultaneously: baking soda–free, probiotic-enhanced, charcoal-infused, packaged in home-compostable materials, affordably priced, manufactured locally, clinically tested for 24+ hour efficacy, and available in a range of sophisticated scents—does not currently exist as a single product. Every choice involves trade-offs. The goal is to make the trade-offs consciously.
Part 8: Frequently Asked Questions
Will I sweat more after switching?
Possibly, temporarily. If you’re transitioning from an antiperspirant (which uses aluminum to physically block sweat ducts), your body will resume its normal sweating pattern. This typically normalizes within 1–2 weeks. Natural deodorants do not prevent sweating—they manage the odor associated with it. If excessive perspiration is a medical concern (hyperhidrosis), consult a dermatologist, as natural deodorants alone may not be sufficient.
Can I use these deodorants on other parts of my body?
Many can be applied to feet, chest, or groin folds where odor occurs. Products marketed as “whole body” deodorants (like Lume) are specifically formulated and tested for multi-area use. If a product doesn’t specify whole-body use, patch-test on a small area first, as some active ingredients may be too strong for more delicate skin.
How long does a natural deodorant stick typically last?
Most sticks contain roughly 2.5–3.0 ounces of product and last 1–3 months with daily use, comparable to conventional deodorants. Compostable cardboard packaging may degrade slightly faster than plastic if exposed to humidity, so store in a cool, dry place.
Is it true that natural deodorants don’t stain clothes?
They generally produce far less staining than aluminum-based antiperspirants. The yellow underarm stains on shirts are primarily caused by aluminum reacting with proteins in sweat—not by sweat itself. However, some natural deodorants containing heavy oils (coconut oil, shea butter) can leave grease marks on certain fabrics. Apply thinly and allow to dry before dressing.
Are probiotic deodorants safe for pregnancy?
The topical application of probiotics is generally considered safe during pregnancy, and probiotic deodorants avoid many of the ingredients pregnant individuals are advised to limit. However, always consult your healthcare provider before changing personal care routines during pregnancy, as individual circumstances vary.
What if natural deodorant gives me a rash?
Discontinue use immediately. The most common cause of rashes from natural deodorants is baking soda sensitivity (alkaline irritation). Switch to a baking soda–free formula. If the rash persists, you may be reacting to an essential oil or another ingredient—consider an unscented formulation. Persistent or severe rashes warrant evaluation by a dermatologist.
Do I need to “detox” my armpits?
The concept of an “armpit detox” is popular in wellness communities but lacks robust clinical evidence. That said, some users find that applying a bentonite clay mask to the underarm area for 10–15 minutes once or twice during the transition period helps absorb excess residue and reduces the intensity of the adjustment phase. It’s harmless to try, but not medically necessary.
Can I recycle my old plastic deodorant containers?
Technically, many are made from recyclable plastics (often PP, recycling code #5), but the multi-material design (plastic + metal spring mechanism) means most municipal facilities won’t process them. TerraCycle offers specialty recycling programs for personal care packaging. Some brands (like Tom’s of Maine, owned by Colgate-Palmolive) have partnered with TerraCycle for free take-back programs.
Is there a difference between “deodorant” and “antiperspirant”?
Yes—a significant one. Deodorants address odor (by neutralizing bacteria or masking scent). Antiperspirants reduce wetness (by blocking sweat glands, typically with aluminum compounds). Natural deodorants are exclusively deodorants—they will not prevent you from sweating. This is by design, as sweating is a natural thermoregulatory function.
Conclusion: Progress, Not Perfection
The landscape of eco-friendly deodorants has transformed dramatically since the days when “natural” meant ineffective. Today’s best formulations—combining charcoal’s adsorptive power, probiotics’ microbiome intelligence, magnesium’s gentle pH balancing, and sophisticated botanical actives—genuinely deliver all-day odor protection in ways the first generation couldn’t.
At the same time, we should resist the narrative that any consumer product can be perfectly sustainable. Plastic packaging remains pervasive, global supply chains carry unavoidable carbon costs, and the personal care industry’s use of terms like “natural” and “clean” remains largely unregulated. The most honest approach is to choose thoughtfully: prioritize the factors that matter most to you (skin sensitivity, plastic reduction, ingredient transparency, cost), accept the trade-offs, and continue to push brands toward better practices through your purchasing decisions.
The perfect eco-friendly deodorant doesn’t exist yet. But the best ones available today represent a meaningful step forward—both for your skin and for the planet. And that’s worth celebrating, even as we keep demanding more.
Disclaimer: This guide is for informational purposes and does not constitute medical advice. If you have specific skin conditions, allergies, or health concerns, consult a qualified dermatologist or healthcare provider before changing personal care products. Prices and product availability are subject to change.